
Summary of Contents for RJ-Global DL02
- Page 1 INSTRUCTION MANUAL 16 inch Cordless Chain Saw Made in China Model: DL02 (G0303OG85)
-
Page 2: Table Of Contents
CONTENTS WARRANTY Technical data....................1 RJ-Global is committed to building tools that are dependable for years. Our warranties Warranty......................2 are consistent with our commitment and dedication to quality. Introduction.....................3 Twelve (12) MONTHS LIMITED WARRANTY OF RJ-Global PRODUCTS FOR Safety information...................3 HOME USE. -
Page 3: Introduction
• DO NOT operate power tools in explosive atmospheres, such as in the presence of accuracy of the information in this manual. RJ-Global reserves the right to change this flammable liquids, gases, or dust. Power tools create sparks which may ignite the dust or product and specifications at any time without prior notice. -
Page 4: Specific Safety Rules For Chain Saw
nose of the Guide bar contact a log, branch, fence, or any other obstruction while you are • Check the work area before each use. Remove all objects such as rocks, broken glass, nails, operating the unit. Have a planned retreat path. wire, or string which can be thrown or become entangled in the machine. -
Page 5: Charger Maintenance
CHARGER MAINTENANCE • Attach the battery pack to the chainsaw. • Remove the battery, check contacts and re-install • The battery pack is not the battery pack. attached to the chain saw. • Keep the charger clean and clear of debris. Do not allow foreign material to get into the •... -
Page 6: Maintenance
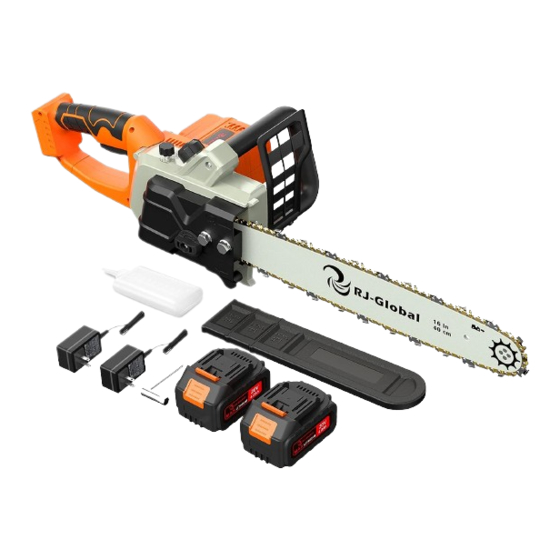
GUIDE BAR MAINTENANCE • DO NOT place batteries in regular household trash. • DO NOT incinerate batteries. When the guide bar shows signs of wear, reverse it on the saw to distribute the wear for • DO NOT place batteries where they will become part of any waste landfill or municipal maximum bar life. - Page 7 PACKAGED HARDWARE AND OTHER ACCESSORIES CORE COMPONENTS Number Item name Quantity Picture Number Item name Quantity Picture M8 hex wrench + Electric chain saw 1pcs Phillips screwdriver 1pcs host multi-tool M8 outer hexagonal Guide plate 1pcs screw (installed on 2pcs the host) Chain cover Chains...
- Page 8 STEP 1: Set the M8 hexagonal wrench + Phillips screwdriver multifunctional tool to the M8 external hexagonal screw on the chain cover, turn counterclockwise to remove the screw. STEP 4: Place the black plastic baffle at the corresponding position of the auxiliary handle, and STEP 2: tighten the M4*20 Phillips cross tapping screws to the proper position clockwise with the M8 hexagonal wrench + Phillips screwdriver multifunctional tool.
- Page 9 STEP 8: STEP 6: Use the M8 hexagonal wrench + Phillips screwdriver multifunctional tool to rotate the M8 Install the chain guide plate to the product host, pay attention to the correct direction of the hexagon screw clockwise to 80% tightness (do not tighten too much). chain guide plate.
- Page 10 STEP 10: STEP 13: Use the M8 hexagonal wrench + Phillips screwdriver multifunctional tool to turn the M8 Insert the two lithium battery packs into the card slot sockets of the product host external hexagonal screws clockwise to the proper position. respectively.
-
Page 11: Operation
OPERATION the oil tank after each use then run for one minute. When storing the unit for a long period of time(three months or longer) be sure the chain is lightly lubricated; this will prevent rust on the chain and bar sprocket. WARNING: If bar and chain become jammed, stop the motor, allow the chain to stop, and disconnect the CONNECTING AND REMOVING BATTERY... -
Page 12: Chain Tension
STOPPING THE CHAIN SAW NOTE: Chain tensioned while warm, can be too tight upon cooling. Check the "cold tension" before next use. • Remove the chain saw &om the cutting area, release the trigger switch and stop the chain saw. REPLACING THE BAR AND CHAIN •...
Need help?
Do you have a question about the DL02 and is the answer not in the manual?
Questions and answers
what gauge/pitch is the chain? I need to replace it and not finding RJ Global chain sold for this saw.