Table of Contents
Advertisement
Quick Links
Advertisement
Table of Contents

Subscribe to Our Youtube Channel
Related Manuals for Comfee CO-F25A1


Summary of Contents for Comfee CO-F25A1
- Page 1 AIR FRYER OVEN INSTRUCTION MANUAL CO-F25A1...
-
Page 2: Table Of Contents
CONTENTS ................IMPORTANT INSTRUCTIONS ..................SPECIFICATIONS ..................SHORT CORD INSTRUCTION .................. PARTS AND ACCESSORIES .................. CONTROL PANEL ....................BEFORE FIRST USE .................. OPERATION INSTRUCTION ..................PRODUCT FUNCTIONS ..................... PRODUCT SETTING ....................FUNCTION OPERATION ....................... MUTE MODE ....................ECO MODE ....................HOW TO PREHEAT .................... -
Page 3: Important Instructions
IMPORTANT INSTRUCTIONS When using electrical appliances, basic safety precautions should always be followed including the following : 1. Read all instructions. 2. Do not touch hot surfaces. Use handles or knobs. 3. To protect against electrical shock do not immerse cord, plugs, or any electrical parts in water or other liquid. -
Page 4: Specifications
Allow to cool before handing. 24. Avoid contacting moving parts. 25. For household use only. 26. During operation, press " START/PAUSE " can pause cooking. SAVE THESE INSTRUCTIONS SPECIFICATIONS MODEL CO-F25A1 RATED VOLTAGE 120 V~ 60 Hz POWER 1600 W... -
Page 5: Short Cord Instruction
SHORT CORD INSTRUCTION (DETACHABLE POWER-SUPPLY CORD) 1. A short power-supply cord (or detachable power-supply cord) should be used to reduce the risk resulting from becoming entangled in or tripping over a longer cord. 2. Longer detachable power-supply cords or extension cords are available and may be used if care is exercised in their use. -
Page 6: Parts And Accessories
PARTS AND ACCESSORIES rack position 4 rack position 3 rack position 2 rack position 1 1. Baking tray The baking tray can be placed in 1-4 rack position. Hand-wash recommended. 2. Baking rack The baking rack can be placed in 1-4 rack position. (Please use concave upward). Hand-wash recommended. -
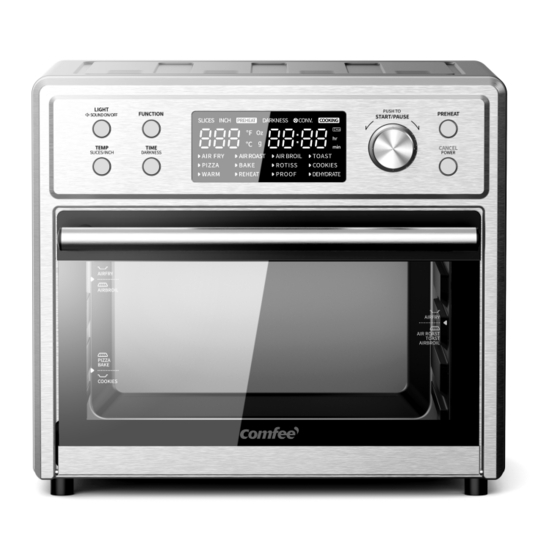
Page 7: Control Panel
5. Rotisserie Fork Used to roast a whole chicken(≤4 lbs) or a big piece of meat. Hand-wash recommended. 6. Rotisserie Kit Used to remove rotisserie fork. Hand-wash recommended. CONTROL PANEL Light Function Start/Pause button Preheat and Time/Temperature/ Switching an internal Press this button to enter Press this button Function Selector Knob... -
Page 8: Before First Use
BEFORE FIRST USE 1. Unpack the electric oven and remove all packaging materials. 2. Wash the baking rack and baking tray in warm soapy water. Wipe the inside of the oven with a damp cloth or sponge. Blot dry with the paper towels to sure the oven is dry before using it. -
Page 9: Product Setting
Best for baking cookies Bake and evenly and other ready-to-bake COOKIES brown cookies and Baking Tray crescent rolls, cinnamon other baked goods rolls, biscuits and strudels Keep food warm and Baking Tray or Prevents cooked food WARM prevent bacterial growth Rack from getting cold. -
Page 10: Function Operation
FUNCTION OPERATION Note 1. When the oven is plugged into on outlet, the buzzer will sound once. 2. During cooking, you can press " CANCEL/POWER " to cancel cooking. 3. In the end of cooking, the buzzer will sound 3 times and "End" will display. 4. -
Page 11: Air Fry Function
1. Press the "FUNCTION" button to select function. PUSH TO START PAUSE 2. Press the "TIME/DARKNESS" button then turn the knob to select the cooking time. PUSH TO START PAUSE 3. Press the "TEMP/SLICES/INCH" button then turn the knob to select the temperature. 4. -
Page 12: Air Roast Function
PUSH TO START PAUSE 4. Press the "START/PAUSE" button to start cooking. AIR ROAST FUNCTION 1. Press the "FUNCTION" button to select " AIR ROAST ". PUSH TO START PAUSE 2. Press the "TIME/DARKNESS" button then turn the knob to select the cooking time. PUSH TO START PAUSE... -
Page 13: Toast Function
PUSH TO START PAUSE 4. Press the "START/PAUSE" button to start cooking. TOAST FUNCTION 1. Press the "FUNCTION" button to select " TOAST ". PUSH TO START PAUSE 2. Press the "TEMP/SLICES/INCH" button then turn the knob to select the slice of bread (1-9 slices). PUSH TO START PAUSE... -
Page 14: Bake Function
4. During cooking, press the "TIME/DARKNESS" PUSH TO START PAUSE button then turn the knob to select the cooking time. The default time is 10 min for 12 inches. BAKE FUNCTION 1. Press the "FUNCTION" button to select " BAKE ". PUSH TO START PAUSE... - Page 15 PUSH TO START PAUSE 3. Press the "TEMP/SLICES/INCH" button then turn the knob to select the temperature. PUSH TO START PAUSE 4. Press the "START/PAUSE" button to start cooking. Note: Place the baking tray on the rack position 1. This will catch all the drippings from the food that is on the rotisserie forks as it cooks.
-
Page 16: Cookies Function
COOKIES FUNCTION 1. Press the "FUNCTION" button to select " COOKIES ". PUSH TO START PAUSE 2. Press the "TIME/DARKNESS" button then turn the knob to select the cooking time. PUSH TO START PAUSE 3. Press the "TEMP/SLICES/INCH" button then turn the knob to select the temperature. -
Page 17: Reheat Function
REHEAT FUNCTION 1. Press the "FUNCTION" button to select " REHEAT ". PUSH TO START PAUSE 2. Press the "TIME/DARKNESS" button then turn the knob to select the cooking time. PUSH TO START PAUSE 3. Press the "TEMP/SLICES/INCH" button then turn the knob to select the temperature. -
Page 18: Dehydrate Function
Note: If the oven displays "HOT", the temperature in the oven is higher than the temperature you set. Please open the oven door to lower heat before operating. DEHYDRATE FUNCTION 1. Press the "FUNCTION" button to select " DEHYDRATE ". PUSH TO START PAUSE... -
Page 19: How To Use
HOW TO USE · Place the baking rack and baking tray in position that will accommodate the height of the food to be cooked. · The food must be put into the baking tray to avoid the fire danger that caused by the accumulation of food chipping on the heating pipes. -
Page 20: Troubleshooting & Faq
TROUBLESHOOTING & FAQ ERROR MESSAGES When the screen display "E01" "E02" "E03" ·Power off the oven and call Customer Service at 1-844-224-1614, or E-mail to officialservice@comfeeappliance.com and have the product on hand when you call. Why won’t the oven turn on? ·Make sure the power cord is securely plugged into the outlet.
Need help?
Do you have a question about the CO-F25A1 and is the answer not in the manual?
Questions and answers