Table of Contents
Advertisement
Available languages
Available languages
Advertisement
Table of Contents

Subscribe to Our Youtube Channel
Related Manuals for 70mai TPMS Lite

Summary of Contents for 70mai TPMS Lite
- Page 1 70mai Tire Pressure Monitoring System Lite User Manual...
- Page 2 Please install the 70mai TPMS Lite at a workshop or with the help of a qualified technician. 9. The battery of the receiver may deplete when the 70mai TPMS Lite is not used for a prolonged period of time. In such cases, charge the receiver using a USB cable before using the 70mai TPMS Lite.
-
Page 3: Basic Parameters
Basic Parameters 1. Sensor 2. Receiver Air pressure range: 0.0 to 8.0 bar (0 to 100 psi) Working Voltage: 5 V Working temperature: -40 to 80℃ Working Current: 1A Storage temperature: -40 to 85℃ Working Temperature: -20 to 70 ℃ Air Pressure Accuracy: ±0.1 bar Storage Temperature: -35 to 85 ℃... -
Page 4: Product Overview
Product Overview 1. Receiver Power button USB connector Label Solar panel Adhesive 2. Sensor More marking information: LF stands for the RF stands for the right front left front wheel wheel C35HJD25 Sensor ID LR stands for the left rear wheel Sensor ID QR code RR stands for the right rear... -
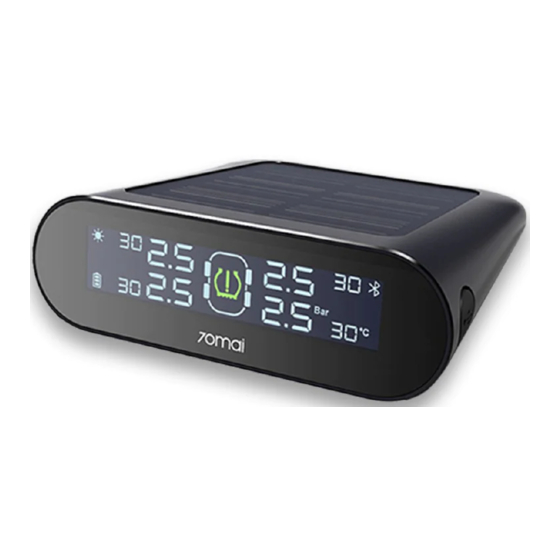
Page 5: Receiver Interface
Receiver Interface : Solar charging icon : Receiver battery/charging status : Current tire pressure : Current tire temperature : Abnormal tire pressure/temperature alarm : Bluetooth connection status Installing the Receiver Remove the film on the adhesive and attach the receiver in the direct view of the driver. Receiver... -
Page 6: Installing The Sensor
Installing the Sensor 1. First, install the hex nuts into the valves of the tires. 2. Install the sensors on the tire nozzles according to the top marking. Tighten the sensors clockwise onto the tire valves. 3. Use a wrench to tighten the hex nuts counterclockwise to the sensors to activate the anti-theft mechanism. - Page 7 Battery replacement (when the battery is flat after a long period of use) 1. Use battery removal clamps to turn the sensor housing counterclockwise. 2. Replace the battery with a new lithium battery with the positive (+) side facing up. CR 1632 lithium battery 3.
-
Page 8: Using The Receiver
Using the Receiver 1. Power On After installing the receiver, press and hold the power button or plug in the USB cable to power on the sensors. When powered on, the receiver will give out a “beep” before showing the tire pressure values on the display. -
Page 9: Using The App
1. Download and install the app The “70mai” App can be used to view data and adjust tire temperature and pressure settings. Search for “70mai” in the App store or scan the QR code below to download and install the App. 2. Adding the device Open the “70mai”... - Page 10 Rules. Operation is subject to the following two conditions: (1) this device may not cause harmful interference, and (2) this device must accept any interference received, including interference that may cause undesired operation. Service: help@70mai.com For further information, please go to www.70mai.com...
-
Page 11: Меры Предосторожности
предупредительный сигнал для оповещения водителя. Меры предосторожности 1. Система 70mai TPMS Lite контролирует давление и температуру в шинах, но не может предотвратить прокол шин и утечку воздуха из них. Очень важно использовать шины хорошего качества. Когда приемник подаст предупредительный сигнал, остановите... -
Page 12: Основные Характеристики
Основные характеристики 1. Датчик 2. Приемник Диапазон давления воздуха: Рабочее напряжение: 5 В 0,0 ‒ 8,0 бар (0 ‒ 100 фунт/кв.дюйм) Рабочий ток: 1 А Рабочая температура: от -40 до 80℃ Рабочая температура: от -20 до 70 ℃ Температура хранения: от -40 до 85℃ Температура... - Page 13 Общий вид устройства 1. Приемник Кнопка питания Разъем USB Этикетка Солнечная панель Клейкая лента 2. Датчик LF означает Дополнительная левое переднее маркировочная колесо информация RF означает правое C35HJD25 Обозначение переднее колесо датчика LR означает левое Двумерный заднее колесо матричный RR означает правое штрих--код...
- Page 14 Интерфейс приемника : Значок зарядки солнечной батареи : Состояние зарядки аккумулятора приемника : Текущее давление в шинах : Текущая температура шин : Предупредительный сигнал о превышении давления/температуры шин : Состояние соединения Bluetooth Установка приемника Снимите пленку с клейкой ленты и прикрепите приемник в зоне прямой видимости водителя.
- Page 15 Установка датчика 1. Сначала установите шестигранные гайки в клапаны шин. 2. Установите датчики на клапаны шин согласно верхней маркировке. Закрутите датчики по часовой стрелке на клапанах шин. 3. Используйте гаечный ключ для затяжки шестигранных гаек против часовой стрелки на датчиках для активации антикражевого механизма.
- Page 16 Замена аккумуляторов (когда аккумулятор разряжен после длительного периода эксплуатации) 1. Используйте зажимы для снятия аккумулятора, чтобы повернуть корпус датчика против часовой стрелки. 2. Замените аккумулятор на новый литиевый аккумулятор с положительной клеммой (+) кверху. Литиевый аккумулятор CR 1632 3. Убедитесь в целостность водонепроницаемого резинового кольцо. Для...
- Page 17 Использование приемника 1. Включение питания После установки приемника нажмите и удерживайте кнопку питания или вставьте кабель USB для включения датчиков. После включения приемник издает короткий звуковой сигнал перед отображением на экране значений давления в шинах. Сперва на экране отображается следующее «- - ».
- Page 18 1. Загрузка и установка мобильного приложения Приложение «70mai» можно использовать для просмотра данных и регулировки настроек температуры и давления в шинах. Для загрузки и установки приложения найдите «70mai» в разделе приложений «App store» (аппстор) или отсканируйте нижеприведенный QR-код. 2. Добавление устройства...
Need help?
Do you have a question about the TPMS Lite and is the answer not in the manual?
Questions and answers