
Related Manuals for SimPark Easymatic-E

Summary of Contents for SimPark Easymatic-E
-
Page 1: Table Of Contents
INSTALLATION MANUAL Easymatic-E 1. List of parts 2. Connection bar 3. Mounting clamps 4. Chassis profiles and dimensions 5. Electric connections 5 / 6 6. Users manual 7 / 8 7. Safety precautions 8. Warranty conditions Keep this installation manual in your caravan! -
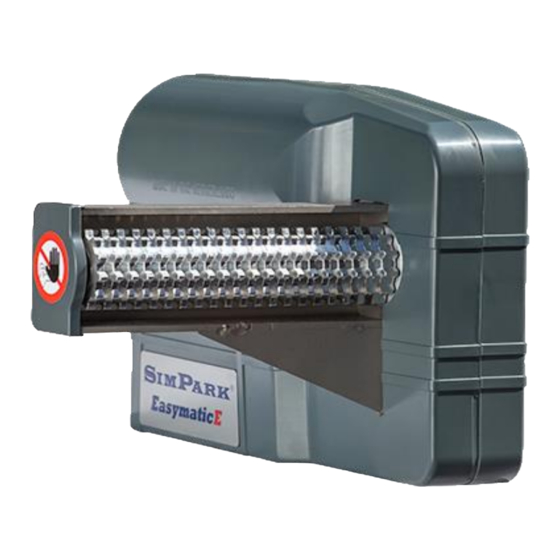
Page 2: List Of Parts
• Use a support to press the movers to the chassis of the caravan. • Slide the mounting clamps aside to the caravan chassis and tighten the clamps as per instructions If necessary, SimPark has several mounting plates for different types of chassis in stock... -
Page 3: Mounting Clamps
3. MOUNTING CLAMPS • Be sure that the distance between the drive-rollers and the caravan tyres is 20 mm. • When the system is in one straight line and the distance between the drive-rollers and tyres is still 20 mm, you can tighten the bolts A and B using a torque of 70 Nm. -
Page 4: Chassis Profiles And Dimensions
4. CHASSIS PROFILES AND DIMENSIONS Fig. 3 Fig. 4 Vario IV plate Vario III chassis Hobby I chassis Fig. 5 L en U profile caravan chassis Fig. 6 Dimensions SimPark® caravan mover... -
Page 5: Electric Connections
The colors of the motor cables are paired, do not change them. If the main power cables are wrongly connected, the Controller will be destroyed immediately Fig. 7 Easymatic-E safety function • The brown and purple cable goes to the Caravan plug no.13 (brown) & no.9 (purple) of the towbar socket... - Page 6 Rear view receiver Fig. 8 Pair button for the remote controller Multi connector safety function Antenna: Pin 6 of controller to pin 9 of Pin no.2 is the antenna towbar socket (12 volt) Top view receiver Pinnumber Pinnumber Fig. 9 9 8 7 6 5 4 3 2 1 Controller...
-
Page 7: Users Manual
Press the button "arrow down" and after 3 warning beeps the drive-rollers will be retracted of the tires. Simultaneously operation of the commands Simultaneously operation is possible with the SimPark mover. While driving forwards it is possible to change the direction by pressing the button left or right without releasing the forward or backward button. - Page 8 6. USERS MANUAL Switch on the Controller When the remote control has been recognized by the main Controller, it will be activated. After one beep the cooling fans start to run, the system is now ready to use. The Controller and remote control switch off automatically after 60 seconds after the last given command. Safety features of the Controller Temperature protection The Controller goes into "safety"...
-
Page 9: Safety Precautions
7. SAFETY PRECAUTIONS • Practice in an area which is free from parked cars and/or other obstacles. • Be sure that there are no children playing near the caravan during practicing. • Before you enable the drive-rollers to the tires, be sure that no little stones or other sharp objects are stuck between the drive-rollers and the tires. - Page 10 This unique SimPark safety function makes it impossible to drive away with the drive-rollers enabled. Keep the drive-rollers clean Keep your SimPark caravan mover and in particular the drive-rollers, free of grit, sharp objects, bits of wood,grease, mud and other contaminants. Use water and a brush to clean the drive-rollers.
-
Page 11: Warranty Conditions
The warranty provides the purchaser with extra security in the event that the system does not functions properly. It does not limit the rights of the purchaser but rather expands them. SimPark is not liable for any damage that may result from a partial or complete malfunction of the parking assistance device.
Need help?
Do you have a question about the Easymatic-E and is the answer not in the manual?
Questions and answers