Table of Contents
Advertisement
Advertisement
Table of Contents

Summary of Contents for AA RoadPatrol 3823
- Page 1 RoadPatrol 1080p Wide-Angle Dash Camera Instruction Manual Item No: 3823...
-
Page 2: Table Of Contents
Table of Contents Precautions Please read this manual carefully before operation and PRECAUTIONS keep it for future reference. It will be helpful should CAUTIONS ON USING THIS PRODUCT you encounter any operational problems. PRODUCT WARNINGS WARNING: Do not expose this product to rain, moisture or water under CAMERA LEGAL REQUIREMENTS any circumstances, doing so may result in the risk of electric shock or fire. -
Page 3: Cautions On Using This Product
Always mount your Dash Cam in a location that does not Do not expose the device to rain or water. obstruct the driver’s view of the road. The AA & DSL Group does not assume any responsibility for any fines, penalties, Failure in following these battery warnings may result in a or damages of your RoadPatrol device. -
Page 4: Camera Legal Requirements
If the Dash Cam is to be used within a UK commercial ensure it includes the following: environment, i.e.. truck use, then the CCTV • AA RoadPatrol Dash Cam regulations apply in addition to the Data Protection Act regulations. This includes labelling to identify the •... -
Page 5: Camera Parts And Functions
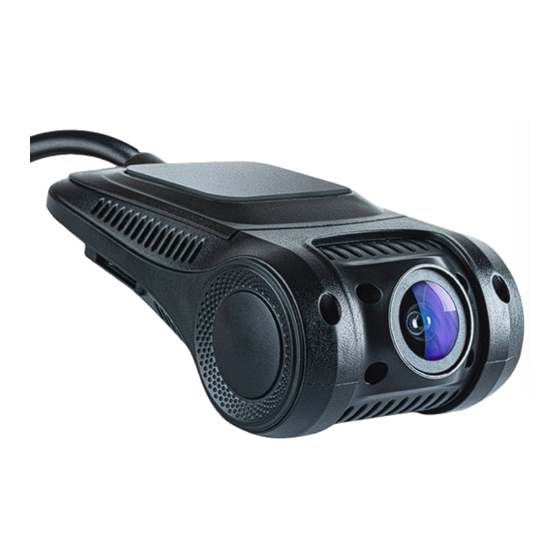
Camera Parts and Functions See below for the parts and functions of your Dash Cam Micro-SD Card Slot Camera Lens Insert Micro-SD card here, ensuring the gold contacts Adjustable 120° Lens rotates up & down are facing towards the rear of the Dash Cam. A class 10 Micro-SD Card or above is recommended. -
Page 6: Vehicle Installation
Vehicle Installation Please follow the instructions below for first-time installation of the Dash Cam 2. Remove Adhesive Cover on Mounting Point Peel back to expose the adhesive surface, ready to mount on your windscreen. 1. Insert Micro-SD Card Insert a suitable Micro-SD card in to the Dash Cam, taking care that the gold contacts are facing towards the Mounting Point side of the Dash Cam. -
Page 7: Vehicle Installation - Position & Power
Vehicle Installation - Position & Power Notes On Positioning the Dash Cam • When installing the Dash Cam , always place the device securely against the windscreen and where possible, conceal the power cable under trim to avoid distractions. • Ensure the Dash Cam power cable does not interfere with the drivers operating controls, such as the steering wheel, pedals or gear levers. -
Page 8: App Installation
Dash Cam and to change the settings. In order for in order to establish a connection. Follow the steps below for this function to work, you must have the AA RoadPatrol App your chosen device. installed, a valid mobile data plan and access to a Wi-Fi iOS Devices connection. -
Page 9: App Functions
You can also view and change the settings of the AA RoadPatrol Dash Cam via the settings menu located in the top right corner of the screen. You can change settings such as Resolution (automatically set to 1080 Full HD at 30 Frames per Second) depending on the quality desired and the storage capacity of your Micro-SD Card. -
Page 10: Dash Cam Settings
AA RoadPatrol: Dash Cam Settings Explained situations such as during winter months. Choosing a + The settings for your AA RoadPatrol Dash Cam can be exposure will make the scene brighter, choosing a - exposure changed to suit your preferences. Below are the settings and will make the scene darker. - Page 11 Dash Cam Settings - Cont. System Settings Frequency Date/Time Format Photo Mode Settings Format Memory Resolution Default Setting Exposure Firmware Version Date Stamp Wi-Fi Settings White Balance Wi-Fi Name Wi-Fi Password Photo Mode Settings • Resolution - Change the photo resolution quality (clarity). System Settings Automatically set to 3 Megapixels.
-
Page 12: Pc Connection
PC Connection Connecting the Micro-SD Card with your PC Insert the Micro-SD Card Adaptor into the PC In order to view footage taken with your Dash Cam on your PC, Once you have inserted the Micro-SD card into the adaptor, you must first remove the Micro-SD card from the Dash Cam, you can now insert this into your PC’s SD card slot if it has one. -
Page 13: Frequently Asked Questions
Frequently Asked Questions Video Image is blurred. My Dash Cam has no power. Remove the protective lens cover, clean the lens, make sure Ensure a stable connection from your 12/24V dc outlet and the windshield is clean and clear of grease, dirt, and debris. the Dash Cam is made. - Page 14 Warranty This warranty does not cover: DSL warrants its products against defects in materials and workmanship for a period of one year. DSL will a: Goods that are damaged as a result of misuse by the repair or replace this product if, due to defective parts or customer.
- Page 15 ITEM NO: 3823...
Need help?
Do you have a question about the RoadPatrol 3823 and is the answer not in the manual?
Questions and answers