Table of Contents
Advertisement
Quick Links
Advertisement
Table of Contents

Summary of Contents for SCANER MK-200
- Page 1 COLPOSCOPE MK-200 Operation Manual...
- Page 2 COLPOSCOPE MK-200 Operation Manual...
-
Page 3: Table Of Contents
6.7. Spatial movement of the colposcope head ............33 6.8. Adjustment of the tilt of the balancing leaver ............34 7. Colposcope care ......................35 7.1. Cleaning and disinfecting external surfaces ............35 Colposcope MK-200 Operation Manual (revision: 31 date: 06.07.2020) - Page 4 Table of contents 7.2. Cleaning optical surfaces ..................35 8. Possible malfunctions and ways of their elimination ..........36 8.1. Replacement of the fuse element ............... 37 Colposcope MK-200 Operation Manual (revision: 31 date: 06.07.2020)
-
Page 5: Safe Usage Guidelines
This manual contains important safe usage guidelines and technical maintenance of the colposcope MK-200 (hereinafter referred to as colposcope). To ensure operational safety, follow the instructions and warnings contained in this manual. ATTENTION. In case of using colposcope for purposes that are different from described in this manual, there is a risk of getting injuries and material damage. - Page 6 ISO 13485:2016. The entire production process is subject to constant quality inspection and undergoes a periodic check by inspection audits. The colposcope MK-200 corresponds to the provisions of the European Directive of Medical Devices 93/42/EEC and the Technical Regulations on Medical Devices of Ukraine.
-
Page 7: Symbols Used In The Manual
ATTENTION. Avoid getting any liquid inside the colposcope. PROHIBITED. To keep and use the colposcope in places with prolonged exposure of direct sunlight, as well as with impact of X-ray beams or strong electromagnetic radiation. Colposcope MK-200 Operation Manual (revision: 31 date: 06.07.2020) -
Page 8: Marking And Symbols
ATTENTION. Each moving part of the colposcope has its limited range of motion. Do not try to increase this range by moving the colposcope beyond these limits with excessive force. Colposcope MK-200 Operation Manual (revision: 31 date: 06.07.2020) - Page 9 PROHIBITED. To look into the lens of the colposcope, when the illuminator is on, this can cause damage to the retina. ATTENTION. Before cleaning and disinfection of external surfaces it is necessary to turn off the colposcope from the power source. Colposcope MK-200 Operation Manual (revision: 31 date: 06.07.2020)
-
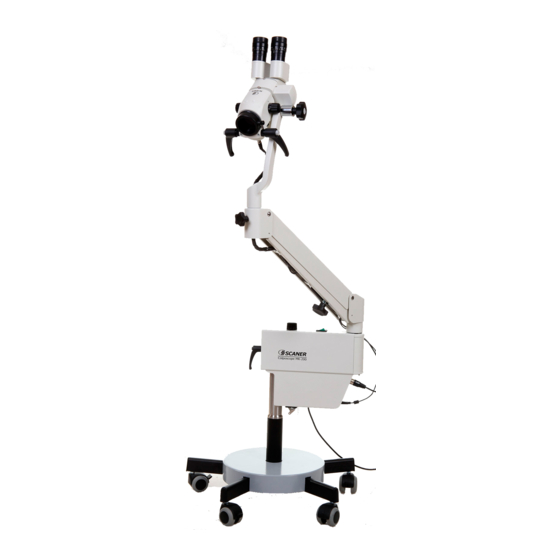
Page 10: The Field Of Use, Design And Appearance
Design and appearance 2. The field of use, design and appearance The colposcope MK-200 is a medical device intended for stereoscopic observation with optical magnification by a non-contact method: of the vagina, cervix and the lower third of the cervical canal during gynecology and oncogynecology research. -
Page 11: Tripod Floor
2.1. Tripod floor Tripod floor (hereinafter referred to as tripod) is a mobile base on 5 self-aligning rollers. The rollers of the tripod have a locking feature rolling to prevent spontaneous movements. Colposcope MK-200 Operation Manual (revision: 31 date: 06.07.2020) -
Page 12: Power Supply Unit
The eyepieces have a mechanism for changing dioptries within +5 -5 D, for each eyepiece. Diopter correction enables doctors to work with ametropia without glasses. The colposcope can be supplied with eyepieces magnification of 12,5х or 16х (option). Colposcope MK-200 Operation Manual (revision: 31 date: 06.07.2020) - Page 13 (1920x1080). The video system is installed between the optical head and the binocular adjustment of the colposcope without compromising of the optical characteristics, and the transmitted video image coincides with the image observed through the eyepieces of the colposcope. Colposcope MK-200 Operation Manual (revision: 31 date: 06.07.2020)
-
Page 14: Complete Set
Eyepieces: - 12.5х - 16х (optional) U-shaped handle (optional) Colposcope video system MK-200: (may not be supplied, at the customer's request) - digital video system - additional USB cable (5 m) (only for export, or at the request of the customer) - Page 15 ATTENTION. Ensure that there is no possible damage of the colposcope components associated with transportation, such as: constrained deformation, holes and cracks, breach of lacquer coating. If you find damage, contact the supplier. Colposcope MK-200 Operation Manual (revision: 31 date: 06.07.2020)
-
Page 16: Specifications
General magnification, ratio 3.7 - 24.2 59.4 - 9.1 68,8 – 10.6 3.2 - 20.7 2.8 - 18.3 78.6 - 12 2.6 - 16.4 84.6 - 13.4 2.3 - 14.8 95.6 - 14.8 Colposcope MK-200 Operation Manual (revision: 31 date: 06.07.2020) -
Page 17: Technical Parameters
Power supply voltage from the single phase AC current with from 90 to 250 frequency of 50 Hz, V Power consumed by the colposcope, VA, not more The colposcope weight, kg, not more 36.5 Colposcope MK-200 Operation Manual (revision: 31 date: 06.07.2020) -
Page 18: System Settings
Specifications 4.3. System settings 40° 3 0° 360° 227 mm 480 mm 340° Ø 55 mm Colposcope MK-200 Operation Manual (revision: 31 date: 06.07.2020) -
Page 19: Mounting And Installation
Mounting and installation 5. Mounting and installation The colposcope MK-200 is supplied in a package consisting of 4 seats. Before the start of device mounting, it is necessary to extract all its components from the transport container and remove the packaging material. -
Page 20: Mounting Of The Tripod Floor
Insert the fastening screw through the locking washer and the washer, then screw it into the threaded hole of the holder from the bottom of the base, until it stops completely. Place the assembled tripod on the floor. Colposcope MK-200 Operation Manual (revision: 31 date: 06.07.2020) -
Page 21: Power Supply Unit Installation
ATTENTION. The power supply and balancing lever is heavy! The mounting of the power unit must be carried out with the help of several people. Tighten the plug into the holder axis until it stops completely. Colposcope MK-200 Operation Manual (revision: 31 date: 06.07.2020) -
Page 22: Installation Of Colposcope Head
In alignment without inclination install the colposcope head on the balancing lever inserting the axis of the colposcope head bracket into the nozzle of the lever. Tighten the safety screw and the force adjustment knob of the colposcope head rotation. Colposcope MK-200 Operation Manual (revision: 31 date: 06.07.2020) -
Page 23: Connecting The Cables
(above the cable channel). Connect the USB plug of the video system (when the colposcope is supplied with video system) into the connector on the bottom of balancing lever. Colposcope MK-200 Operation Manual (revision: 31 date: 06.07.2020) - Page 24 Fasten the cable channel by tightening the mounting screws completely until it is secure. Colposcope MK-200 Operation Manual (revision: 31 date: 06.07.2020)
- Page 25 When operating a colposcope more than 5 meters away from the PC, use the additional USB extension cable from the supply kit (available only in case of export, or at the request of the customer). Colposcope MK-200 Operation Manual (revision: 31 date: 06.07.2020)
-
Page 26: Installation Of The U-Shaped Handle
Place the U-shaped handle so that the holes in her body will match the threaded holes in the body of the optical head. Install the U-shaped handle by tightening the fastening screws from the kit, completely until it is secure. Colposcope MK-200 Operation Manual (revision: 31 date: 06.07.2020) -
Page 27: Operation
PROHIBITED. To fully unscrew and remove the force adjustment knob and the movement adjustment handle of the colposcope moving parts during its operation. Colposcope MK-200 Operation Manual (revision: 31 date: 06.07.2020) - Page 28 Operation Colposcope MK-200 Operation Manual (revision: 31 date: 06.07.2020)
-
Page 29: The Adjustment Of Interpupillary Distance Of The Eyepieces And Adjustment Of The Diopter Values
Fix the position of the diopter rings with fixing screws until it stops completely. Focus on the observation object and in turn change the magnification of the optical system (6.3), to ensure that the image is sharp at all magnifications. Colposcope MK-200 Operation Manual (revision: 31 date: 06.07.2020) -
Page 30: The Switching Of Magnifications Of The Optical System
The knobs have a position marking of the optical head magnification ratio (6 positions) relative to the position of the knobs. The overall magnification of the optical system is given in 4.1. Colposcope MK-200 Operation Manual (revision: 31 date: 06.07.2020) -
Page 31: The Use Of The Filter Lens
(the specific click). To output a filter lens from the light channel it is necessary to move the holder to the left until the click. Colposcope MK-200 Operation Manual (revision: 31 date: 06.07.2020) -
Page 32: Fine Focusing Lens
Loosen a locking ring of the lens. When rotating lens, place the fine focusing knob in a position convenient for the work . Fix the position of the knob by tightening the locking ring completely, until it stops. Colposcope MK-200 Operation Manual (revision: 31 date: 06.07.2020) -
Page 33: The Use Of Video System
To get a snapshot of the observed object press the photo taking button on the video system body (the function works only when using software MEDVisor-EVA). Colposcope MK-200 Operation Manual (revision: 31 date: 06.07.2020) -
Page 34: Spatial Movement Of The Colposcope Head
(for each handle separately). To change the inclination angle of the U-shaped handle, it is necessary to pull them aside from each other, then turn them to the desired angle and let them down until the specific click. Colposcope MK-200 Operation Manual (revision: 31 date: 06.07.2020) -
Page 35: Adjustment Of The Tilt Of The Balancing Leaver
ATTENTION. The tension force of the gas springs may vary depending on the ambient temperature. PROHIBITED. To adjust the tension of a gas spring with a sudden change of the ambient temperature. Colposcope MK-200 Operation Manual (revision: 31 date: 06.07.2020) -
Page 36: Colposcope Care
70% ethanol. Then wipe them with dry cotton swab. After cleaning, before using the colposcope, the optical surface must be completely dry and have no traces of streaks. Colposcope MK-200 Operation Manual (revision: 31 date: 06.07.2020) - Page 37 Disconnect the USB plug of the video video system system on the power unit and connect directly to the USB connector on the computer to check for the presence of a signal; restart the computer Colposcope MK-200 Operation Manual (revision: 31 date: 06.07.2020)
- Page 38 Close the fuse compartment and connect the power supply plug. Secure the power plug with holding lock. PROHIBITED. To use a colposcope, when power supply plug is not secured with lock. Colposcope MK-200 Operation Manual (revision: 31 date: 06.07.2020)
Need help?
Do you have a question about the MK-200 and is the answer not in the manual?
Questions and answers