Advertisement
Table of Contents
What's in the Box
•
Woojer Vest Series 3™
•
USB-C cable
•
Power Delivery charger and outlet adapters
•
User manual
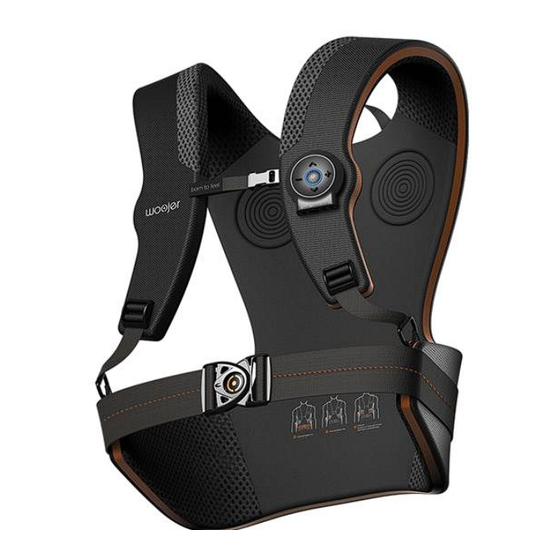
Woojer Vest Mk. 3™
1. Power button
2. Power indicator
3. Bluetooth Headphones indicator
4. Bluetooth Source indicator
5. Volume Up button
6. Volume Down button
7. Volume indicator
8. Sensation Up button
9. Sensation Down button
10. Sensation indicator
11. Battery level / charging indicator
12. Multi-Channel input indicator
13. 3.5mm audio-in port
14. Digital USB-C input Port
15. Headphone output jack
16. Control unit
17. Front-left transducer
18. Front-right transducer
19. Back-left transducer
20. Back-right transducer
21. Side-left transducer
22. Side-right transducer
Rear
23.
Power Delivery charging port
Woojer Vest Series 3™ User Manual
Overview
5
7
6
3
13
14
Placeholder location for Vest Next
1
2
11
4
8
10
9
15
Advertisement
Table of Contents

Summary of Contents for Woojer Vest 3 Series
- Page 1 Woojer Vest Series 3™ User Manual What’s in the Box • Woojer Vest Series 3™ • USB-C cable • Power Delivery charger and outlet adapters • User manual Woojer Vest Mk. 3™ Overview 1. Power button 2. Power indicator 3. Bluetooth Headphones indicator 4.
-
Page 2: Update Your Firmware
. Follow the onscreen instructions to set up your Woojer. Woojer app lets you easily control your Woojer, pair it with other devices, update its firmware, fine- tune your experience, get updates for content, special deals, news and much more. For the best experience, it’s highly recommended to install Woojer app on your mobile. - Page 3 Woojer Vest Mk. 3™ LED Indicators ADD a table Power Indicator (2) Solid green – Vest is on, no audio source connected Solid blue - Vest is on, audio source connected Bluetooth Source Indicator (4) Solid blue – Bluetooth audio source connected Blue, slow blinking - Searching for a Bluetooth audio source Red/blue, fast alternating blinking –...
- Page 4 Connecting to an Audio Source Woojer Vest Mk. 3™ can be connected to various audio sources using either wired connection or wireless Bluetooth. Choose the right diagram according to your hardware and follow the connection instructions. For other hardware types, or special hardware setups, please visit our support portal at www.woojer.com/support...
- Page 5 Connecting to Headphones Woojer Vest Mk. 3™ can be connected to either wired or Bluetooth headset. When turning on, it will first search for previously paired Bluetooth headset. Note: For Bluetooth connection, we highly recommend using the Woojer app. Bluetooth Headset Connection Manually (without Woojer app) •...
-
Page 6: Care And Maintenance
• Attach the Vest to a chair using Woojer Chair Adapter (sold separately) • Set the Woojer Chair Adapter back holder to the width of your chair • Playing Once you’ve connected the audio source device and headset to the Vest: •... - Page 7 This product must be discarded in accordance with your local legal requirements. • As with other devices with permanent magnets, Woojer Vest Mk. 3™ is not suitable for use by persons with pacemakers. • Do not use Woojer Vest Mk. 3™ with headphones/earphones while driving, cycling, or operating any motorized vehicle.
-
Page 8: Warranty
The Woojer Vest Mk. 3™ Qualified Design Listing was achieved in accordance with the Bluetooth Qualification Process as specified within the Bluetooth Specifications. CE Declaration of Conformity We, Woojer Ltd., declare under our sole responsibility, that this Woojer Vest Mk. 3™ product is in conformity with the standards and other normative documents. Warranty 12 months from purchase. - Page 9 This device contains licence-exempt transmitter(s)/receiver(s) that comply with Innovation, Science and Economic Development Canada’ s licence-exempt RSS(s). Operation is subject to the following two conditions: (1) This device may not cause interference. (2) This device must accept any interference, including interference that may cause undesired operation of the device.
Need help?
Do you have a question about the Vest 3 Series and is the answer not in the manual?
Questions and answers
White blink when charging