
Subscribe to Our Youtube Channel
Related Manuals for Raptor HJ3010

Summary of Contents for Raptor HJ3010
- Page 1 ROBOTIC POOL CLEANER Raptor HJ3010 USER MANUAL Subject to update by manufacturer without prior notice...
- Page 2 Important Precautions 1. In order to prevent severe damage to the cleaner, never power on the unit when it is outside of the swimming pool. 2. The power cord must be connected to an appropriate earthed socket. 3. Do not operate the cleaner when people are in the pool. 4.
-
Page 3: Table Of Contents
Contents Ⅰ.Introduction····················································································P 4 II.Safety· ··················································································· ··P 5 III.Specifications·················································································P 5 Ⅳ Components of Swimming Pool Cleaner·················································P 6 Ⅴ. Preparation Before Operating······························································P 9 Ⅵ. Instruction of Operating panel ··························································P 10 Ⅶ. After Use of Cleaner·····································································P16 Ⅷ. Caddy assembling···········································································P18 Ⅸ. Packing List················································································P19 Ⅹ. Warranty ·····················································································P20... - Page 4 Ⅰ.Introduction The Raptor HJ3010 (Basic model) robotic pool cleaner is a new type of highly efficient and energy-saving swimming pool cleaning robot. Through its advanced computer controlled program, it can clean the pool walls and bottom automatically. At the same time, it filters the pool water and gets rid of suspended particles without replace the pool water.
-
Page 5: Ii.safety
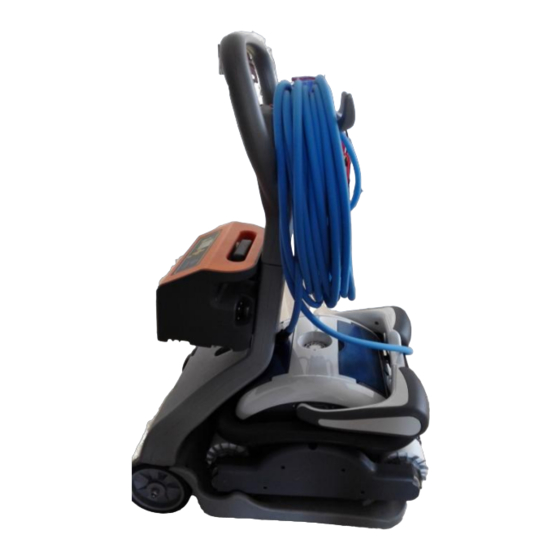
Ⅱ. Safety 1, Power supply unit position: Power supply unit need to be placed in proper position so as to reach the distal end of pool for the cleaner, meanwhile as least 3.5m from pool edge. 2,important: Before power make sure local voltage/frequency matches the rated... - Page 6 Ⅳ. Components 1. The cleaner consists of power supply unit, caddy, cleaner and remote control, with Bluetooth control function. Power line Control board Cable socket Usb transmission interface Pic.4-1 Power supply unit Handle Cable bracket 图 4-2 清洁机 Power unit bracket Middle part...
- Page 7 Remote control Pic. 4-3 Remote control Symbol Description Function Antenna Indicator light triple pool floor then once pool Press this button, robot runs automatically as per preset programme wall, working time-2 hours Keep pressing Turn right ▶ STOP Stop Robot stops Press once or keep Move forward pressing...
- Page 8 Bluetooth control item Function Detail ●Disconnected: white Connection status ●Connected: Purple Signal search Press to search blue signal Forward Press to let the cleaner move forward Press to let the cleaner move Backward backward Left Press to let the cleaner turn left Press to let the cleaner turn right Right Pic.4-4 Bluetooth control...
- Page 9 Ⅴ. Preparation before start 1、 Hold the top handle and put the cleaner into the pool, Make sure to empty the trapped air inside, then The cleaner can immerse into the pool floor. 2、Power Connection Once the cleaner immersed into the pool floor, connect the cable with the power supply unit, and fasten the nuts on both sides, then plug into your power socket;...
- Page 10 Ⅵ. Operation 1、Panel Parameter(for Display maintains only) Setting buttons: 1. “up” / “down” for different modes Power Back or delete “left”/ “right” for detail parameter “ok” for confirmation or quick start button 2、Detail 2.1,Press button to power on 2.1.1 Press button machine will running as【DEFAULT】setting.(2 hours working cycle, three times of bottom one time wall )...
- Page 11 2.1.2, Notice:when machine start to running as【DEFAULT】setting all button on the right of the display will not able to work, to stop machine please press button. 2.2.1, Press button, choose【AUTO】into AUTO mode setting AUTO AUTO mode setting MANUAL Manual mode setting AUTO START Auto start setting DEFAULT...
- Page 12 2.3, Press button,select【MANUAL】option. 2.3, Press button, into【MANUAL】sub-menu. FORWARD Moving forward BACKWARD Moving backward LEFT Turn left RIGHT Turn right STOP Stop Once choose MANUAL potion, keep pressing the direction button to control the machine, release the button the machine will stop. 2.4 Press button,choose【AUTO START】option.
- Page 13 2.4.1, Press button, into【AUTO START】sub-menu SINGLE TIME Auto start single time MUTI TIMES Auto start more then once WEEKLY Auto start weekly RESET Cancel auto start 2.4.2, Press button,into【SINGLE TIME】sub-menu. Can choose any day from 1-28 TIME Choose start time FULL FLOOR WALL Three working models, full;...
- Page 14 2.4.4according to menu, choose 】 option, into 【WEEKLY】 sub-menu. 【WEEKLY 2.4.5.Press button,into【WEEKLY】sub-menu. WEEK Choose a day to auto start TIME Choose the time FULL FLOOR WALL Three working models, full; floor only; wall only. CLEAN TIME Duration of working cycle, from 1 to 12 hours NOTICE:Make sure press to confirm all settings, press to switch off.
- Page 15 2.5, Press button, choose【DEFAULT】option. Press button,machine will work follow the default setting. ( three times of pool floor one time of pool wall) 3, Press button to see the working status DATE: Current date TIME: hour-min.-sec. PRESET: appoint time date-time 0 ALARM: 6-3:9: Fault diagnose and date, time.
- Page 16 Pump over load! Check pump motor Pump motor over loaded Motor over load Check 1_motor! Driving motor 1 over loaded Motor over load Check 2_motor! Driving motor 2 over loaded Fault on power supply unit, Voltage V Check power! unusual voltage Robot box full Check Robot box Filter tray over loaded 5.
- Page 17 Note: 1) In order not to scratch the pool wall or damage the cleaner, avoid the cleaner touching the pool wall during carrying out from pool. 2) Before lifting out from pool, suspend the cleaner above water for about 10-15 seconds to empty the inside water.
-
Page 18: Ⅷ. Caddy Assembling
Ⅷ. Caddy assembling Press the caddy part to facilitate the shaft to pass through. -
Page 19: Ⅸ.packing List
Ⅸ.Packing list (delivered package in kind prevail) Item Name Type QTY-p Model Remark Cleaner Cleaner body In carton Power supply HJ-3010 In carton unit HJ-3011 User manual Plastic bag Plastic bag Filter Plastic bag Remote battery Plastic bag Antenna HJ-2028 HJ2028/HJ -3010/HJ30 Plastic bag... -
Page 20: Ⅹ. Warranty
Ⅹ. Warranty Motor and electronic parts two years warranty.
Need help?
Do you have a question about the HJ3010 and is the answer not in the manual?
Questions and answers