Table of Contents
Advertisement
Multilingual
RT /
OP
HIGH
SHAVER
MED
SUCTION
LOW
AGE
Instruction Manual
EN
Bedienungsanleitung
DE
Handleiding
NL
Manuale di istruzioni
IT
Manuel d'instructions
FR
Manual de instrucciones
ES
Kullanım klavuzu
TR
Instrukcja obsługi
PL
Manual de instruções
PT
Bruksanvisningen
NO
Instruktionsmanual
SE
Instruktionsmanual
DK
Käyttöopas
FI
Advertisement
Table of Contents

Summary of Contents for Smith & Nephew DOUBLEFLO
- Page 1 Multilingual Instruction Manual Bedienungsanleitung Handleiding Manuale di istruzioni RT / Manuel d'instructions Manual de instrucciones HIGH SHAVER SUCTION Kullanım klavuzu Instrukcja obsługi Manual de instruções Bruksanvisningen Instruktionsmanual Instruktionsmanual Käyttöopas...
- Page 3 Instruction manual p.4 - 50...
-
Page 4: Table Of Contents
Table of contents Introduction: presentation of the pump General description 1.1 Operator profile 1.2 Target population 1.3 Intended use and contraindications 1.4 Symbols description 1.5 Warnings and general precautions 1.6 Technical characteristics Product description 2.1 System indicators 2.2 Consumable tubing 2.3 Accessories 2.4 Audible indicators 2.5 Light indicators... - Page 5 Table of contents Maintaining the device 7.1 Cleaning Contact 8.1 Legal manufacturer 8.2 Warranty Technical characteristics 9.1 Physical dimensions (pump) 9.2 Storage conditions (pump and accessories) 9.3 Operating conditions (pump and accessories) 9.4 Performance specifications (pump) 9.5 EMC compliance matrix Stock keeping units...
-
Page 6: Introduction: Presentation Of The Pump
Introduction: presentation of the pump Dear Customer, Thank you for purchasing your arthroscopy pump. This device is delivered with the technical documentation. Please always ensure that this manual is close at hand; it describes your equipment and its operation. This arthroscopy pump must be used with its own tubing. Its system manages irrigation automatically as a function of suction, thereby providing a flow rate and a precisely controlled pressure. -
Page 7: General Description
General description The arthroscopy system consists of a pump, accessories and consumables. Accessories: Consumable tubing: • Footswitch - Wired • Day Tube Set • Hand Control Interfaces (HCI) • Patient Tube Set • Foot Control Interfaces (FCI) • Inflow Tube Set •... - Page 8 General description Inflow Tube Set Outflow Tube Set Arthroscopy sheath / cannula Handpiece Hand Control Interface Shaver unit Footswitch - Wired Shaver cable The pump Infrared remote control This diagram represents the arthroscopy system with the use of a hand control interface except for S+N Hand Control Interface.
- Page 9 General description Inflow Tube Set Outflow Tube Set Arthroscopy sheath / cannula Handpiece Foot Control Interface Shaver unit Footswitch - Wired Infrared remote control Shaver cable The Pump This diagram represents the arthroscopy system with the use of a Foot Control Interface.
-
Page 10: Operator Profile
Precautions for use 1.1 Operator profile The DOUBLEFLO system is to be used in the operating theatre; the users include nurses and orthopedic surgeons. 1.2 Target population 8-years-old or older pediatric and adults patients requiring an arthroscopic surgery, regardless of gender. -
Page 11: Symbols Description
Precautions for use 1.4 Symbols description A - Symbol used within this user manual Symbol Name Description Indicates a hazardous situation which, if not avoided, could result in serious injury or damage. Obey Warning all safety messages that follow this symbol to avoid possible injury or damage. - Page 12 Precautions for use Symbol Name Description Indicates serial number assigned by the manufacturer in Serial number order to formally identify a specific medical device Indicates the number of the Manufacturing batch manufacturing batch Indicates that this equipment complies with the medical device regulations (MDR 2017/745).
- Page 13 Precautions for use C- Symbol for tubing Symbol Name Description Indicates the date after which the Use-by date medical device may no longer be used Indicates that a medical device may Do not reuse only be used once or on a single patient for one treatment only Manufacturing date Indicates the date on which the...
- Page 14 Precautions for use Symboll Name Description Indicates a unique sterile barrier Unique sterile barrier system with system with packaging inner protective packaging protection inside. Indicates a medical device which should not be used if the packaging Do not use has been damaged or opened if the packaging is damaged and whose user should consult and consult the instructions for use...
-
Page 15: Warnings And General Precautions
Precautions for use 1.5 Warnings and general precautions The hospital staff are urged to read this manual before using and cleaning this product and its accessories. Failure to abide by these instructions may cause injuries and possible damage to, or malfunction of the equipment. The manufacturer of this device cannot be held liable for direct or consequential injuries or damage resulting from inappropriate use of the single-use products other than the products. -
Page 16: Technical Characteristics
The pump is not a BF part but it is considered as a BF part for shaver input according to the IEC 60601-1 standard. There is one part considered as BF part: input dedicated for Hand Control Interfaces and Foot Control Interfaces (25 pin connector) situated on the back of the DOUBLEFLO pump. -
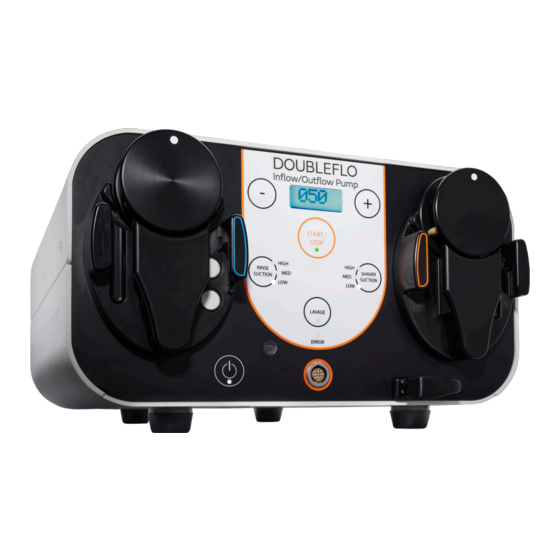
Page 17: Product Description
Product description 2.1 System indicators A - Front panel of the Pump Irrigation pump head Suction pump head Retaining bracket for the irrigation tubing Note : The two circles on the right opening are silicone membranes from force sensors. Avoid touching these white silicone membranes Retaining bracket for the suction tubing Pressure decrease Pressure increase... - Page 18 “POWER” button: Turns the unit on or off. If the pump is enabled, “mmHg” appears on the display screen. “PEDAL” connector: Allows the wired DOUBLEFLO footswitch to be connected Infrared opening: Allows the communication with the wireless remote control B - Back panel of the Pump...
-
Page 19: Consumable Tubing
Product description 2.2 Consumable tubing Day Tube Set Towards the Patient Tube Set From the bags of saline The Day Tube Set connects the irrigation bags to the Patient Tube Set. The pressure is read through the pressure sensor membranes situated in the blue connector connected on the pump. - Page 20 Product description Inflow Tube Set The Inflow Tube Set tubing delivers irrigation fluid from the bag to the arthroscopy sheath / cannula. The pressure is read through the pressure sensor membranes situated in the blue connector connected on the pump. Towards the arthroscopy sheath / cannula From the bags of saline The Inflow Tube Set is intended for single use and must not be reused.
-
Page 21: Accessories
Product description 2.3 Accessories Only connect the accessories dedicated for the pump. Please, check the accessories available on chapter 10. Perform functional tests (as mentionned part 3.2) before use on the patient. A - Footswitch - Wired The wired 4-way footswitch is connected to the Pump (PEDAL connector ). - Page 22 DOUBLEFLO footswitch. C- Hand Control Interfaces (HCI) The S+N Pump / Shaver Interface Cable is connected on the back of the DOUBLEFLO pump and on the back of the DYONICS POWER II shaver console. The other Hand Control Interfaces (compatible with ARTHREX, CONMED and STRYKER shaver...
- Page 23 The wireless remote control is an accessory of the pump with infrared technology which allows controlling functions of the pump keyboard and the “LAVAGE” function of the DOUBLEFLO footswitch. This remote control must be used in the sterile area but to guarantee sterility, the remote control must be placed in a sterile protective bag (not provided by Hemodia).
-
Page 24: Audible Indicators
Product description 2.4 Audible indicators A double signal sounds when the pump is switched on (when the “POWER” button pressed) and when “LAVAGE” mode is stopped. A single audible signal sounds each time a button is pressed. 2.5 Light indicators Numbers below refer to descriptions in chapter 2.1. - Page 25 Product description Displayed on Description Action the screen Device was switched on with tube set Remove irrigation tube set inserted; the sensor could not be checked. Attempted pump activation without day Insert day tube set or inflow E01A tube set or inflow tube set inserted tube set Remove used day tube set Used day tube set or inflow tube set has...
- Page 26 Product description Displayed on Description Action the screen Remove current day tube set or inflow tube set & insert Pressure sensor error new day tube set or inflow tube set. If error appears again, call service Check if pump heads can rotate freely.
-
Page 27: Receiving The Equipment
Receiving the equipment 3.1 Transport If the device is dropped or in case of damage to the equipment and its accessories, do not use the pump or any of its accessories. 3.2 Service life listing Prior to each use, inspect each device to ensure it is functioning properly and is not damaged. -
Page 28: Setup Procedures
Setup procedures 4.1 Installing the pump The pump has to be placed at the same level as the operating joint depending on patient position. • Connect the power supply cable to an electrical socket. • Press the “POWER” button: the LCD screen illuminates and displays “mmHg”. 4.2 Connecting the tubing •... - Page 29 Setup procedures Precautions for the white silicone membranes situated on the retaining bracket for the irrigation tubing Blue connector from the Day Tube Set or Inflow Tube Set Pressure sensor membranes pressurized III. White silicone membrane deformed Be careful when inserting or removing the blue connector: do not insert nor remove the blue connector with pressure inside to avoid to deform the white silicone membranes.
- Page 30 Setup procedures • Insert the blue connector from the tubing into the bracket with blue indicator (right opening) Insert the blue connector only if the membranes are not pressurized Do not touch the white silicone membranes. • Place and center the tube around the irrigation pump head Do not twist the tube •...
- Page 31 Setup procedures The circulating nurse: • Remove the blue cap from the end of the Patient Tube Set and the Day Tube Set • Connect the Patient Tube Set to the Day Tube Set and tigh the ring to lock both Luer connectors The scrub nurse: •...
- Page 32 Setup procedures The circulating nurse: • Close the two clamps from the tubing • Remove all the caps on the spikes and connect the spikes to the bags of saline solution • Insert the blue connector of the tubing into the bracket with blue indicator (right opening) Insert the blue connector only if the membranes are not pressurized Maintain the blue connector vertically throughout insertion •...
- Page 33 • Insert the “SHAVER” tube part into the left side of the “Pinch valve” “OUTFLOW CANNULA” tube “SHAVER” tube Make sure the DOUBLEFLO pump is positioned such that the “OUTFLOW CANNULA” tube and “SHAVER” tube hang vertically and the shelf does not interfere.
-
Page 34: Connecting The Footswitch
Setup procedures The scrub nurse: • When the cannula is used: insert the “OUTFLOW CANNULA” tube into the cannula • When the cannula is not used: close the clamp on the “OUTFLOW CANNULA” tube • Insert the “SHAVER” tube into the outflow spigot of the shaver handpiece The circulating nurse: The pump fluid management has to be launched by pressing on the “START/STOP”... -
Page 35: Connecting The Hand Control Interfaces (Hci)
72200873 POWERMAX 7210542 POWER 72201092 DYONICS Control System Footswitch POWERMAX ELITE 72200617 NOTE : When using the S+N Interface Cable, all functions of the DOUBLEFLO footswitch can be activated by the DYONICS POWER II footswitch. The DOUBLEFLO footswitch becomes optional. - Page 36 Setup procedures B- HCI compatible with CONMED, ARTHREX and STRYKER shaver consoles Pump Shaver console Hand Control Interface Shaver pedal Handpiece 4-way footswitch INSTRUCTIONS FOR USE Connection Connection to the handpiece to the handpiece Connection to the handpiece Connection Connection to the handpiece Connection connector of the shaver console to the pump...
-
Page 37: Connecting The Foot Control Interfaces (Fci)
Setup procedures 4.6 Connecting the Foot Control Interfaces (FCI) PRECAUTIONS Before plugging and unplugging the FCI, turn off both electromedical devices. Prior to use, inspect the product and do not use if damaged. Check the FCI connectors and ensure that cleaned cable connectors are completely dry prior to connecting the electromedical devices. - Page 38 Setup procedures A- Foot control interface CONMED shaver consoles a CONMED The Foot Control Interface CMD is used during arthroscopy procedure to activate CONMED handpiece of a shaver console by using the 4-way footswitch connected to the pump. This FCI is compatible with the following shaver systems: Shaver console Footswitch of the shaver console...
- Page 39 Setup procedures B - Foot control interface for ARTHREX shaver console an ARTHREX The Foot Control Interface ARTX is used during arthroscopy procedure to activate ARTHREX handpiece of an shaver console by using the 4-way footswitch connected to the pump. This FCI is compatible with following shaver system: Shaver console Footswitch of the shaver console...
-
Page 40: Tubing Life Cycle
Tubing life cycle 5.1 During the operating day: after surgery A- Day Tube Set Leave the Day Tube Set in place when another operation is scheduled on the same B- Patient Tube Set disconnection Flush the irrigation system after each patient procedure prior to disconnection After flush, switch off the fluid management by pressing on the “START/STOP”... -
Page 41: Connection Of A New Patient Tube Set For The Next Operation
Tubing life cycle D- Outflow Tube Set disconnection The circulating nurse: Switch on the fluid management by pressing on the “START/STOP” button The scrub nurse: • Press and keep pressed the “LAVAGE/RINSE” control of the footswitch in order to drain the joint and the suction tubing on the cannula side •... -
Page 42: Pump Functions
Pump functions 6.1 Starting the pump Press the “POWER” button to switch on the pump. You must set up all tubing (irrigation and suction part) before launching the fluid management with the “START/STOP” button 6.2 Pressure setting adjustment A - Adjustment 28 29 Press once on the pressure adjustment buttons ( + or - ) to adjust pressure... -
Page 43: Lavage Mode
Pump functions D - Errors When an error is detected, the error indicator light illuminates and the error code flashes on the LCD screen. When the error indicator lights up without an error code on the pump screen, this means that there is an overpressure, this is why the fluid management automatically switches to STOP (and restart automatically). -
Page 44: Maintaining The Device
Maintaining the device 7.1 Cleaning Switch off the pump (“POWER” button ) at the end of a operating day. To avoid electric shock, disconnect the power supply before cleaning the pump. Disconnect each accessory from the pump and remove the used tubing. Clean all the surfaces of the pump using a cloth moistened with a neutral pH detergent. -
Page 45: Contact
Contact 8.1 Legal manufacturer HEMODIA SAS First affixing of the 85 rue du Chêne vert CE marking: January, 31670 Labège - France 2021 +44 20 34 45 51 79 8.2 Warranty The warranty period for the pump is 18 months. Within this period, errors resulting from faulty material and/or inadequate workmanship will be remedied by the manufacturer free of charge. -
Page 46: Technical Characteristics
Technical characteristics 9.1 Physical dimensions (pump) Dimensions Height: 7.7 in (195 mm) Width: 13.2 in (336 mm) Depth: 14.5 in (367mm) Weight: 28.7 lbs (12,8 kg) 9.2 Storage conditions (pump and accessories) Temperature range: from 14°F to 113°F (-10°C to +45°C) Relative humidity range: between 35% and 90% 9.3 Operating conditions (pump and accessories) Temperature range: 50°F to 95°F (10 °C to 35 °C) -
Page 47: Emc Compliance Matrix
Professional healthcare facility environment The DOUBLEFLO pump is designed for use in the electromagnetic environment specified below. The client or user of the DOUBLEFLO pump should ensure that it is used in such an environment. - Page 48 Professional healthcare facility environment The DOUBLEFLO pump is designed for use in the electromagnetic environment specified below. The client or user of the DOUBLEFLO pump should ensure that it is used in such an environment. Basic EMC phenomenon/...
- Page 49 Technical characteristics Electromagnetic emission Professional healthcare facility environment The DOUBLEFLO pump is designed for use in the electromagnetic environment specified below. The client or user of the DOUBLEFLO pump should ensure that it is used in such an environment. Phenomenon...
-
Page 50: Stock Keeping Units
Stock keeping units PUMP AND ACCESSORIES Product ref. Designation 72205352 PUMP 72205357 FOOTSWITCH - WIRED 72205359 REMOTE 72205360 SMITH + NEPHEW PUMP/SHAVER INTERFACE CABLE 72205361 HAND CONTROL INTERFACE ARTX 72205362 FOOT CONTROL INTERFACE ARTX 72205363 HAND CONTROL INTERFACE SYK 72205364 HAND CONTROL INTERFACE CMD 72205365 FOOT CONTROL INTERFACE CMD... - Page 52 STAR HIGH RINSE SUCTION LAVA...
Need help?
Do you have a question about the DOUBLEFLO and is the answer not in the manual?
Questions and answers