
Subscribe to Our Youtube Channel
Summary of Contents for Ancheer F103A
- Page 1 Owner’s Manual for Home Use Rowing Machine Model F103A Installation Video:https://youtu.be/ZYbQMs1U5b4 Please read carefully before assembling or using. Keep this Owner’s Manual for future reference.
- Page 2 Important Safety Information It is important to read this entire manual before assembling and using the rower. Safe and efficient use can be achieved only when the equipment is assembled, maintained and used properly. It is your responsibility to ensure that all users of the equipment are informed of all the warnings and precautions.
- Page 3 Warnings: The equipment must be installed on a stable base and a level floor. Always use the equipment as indicated. If you find any defective components while assembling or checking the equipment, or if you hear any unusual noise coming from the equipment during use, stop immediately.
-
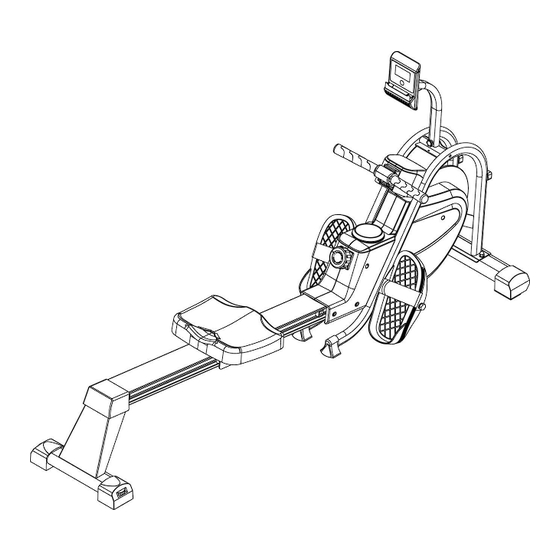
Page 4: Parts List
Parts List Below are the parts and assembly pictures. Open the carton and you will find the below items. Parts List: Item Parts Name Spec. Qty. Item Parts Name Spec. Qty. Main Frame Pedal Holder Front Allen Bolt Cross S5 Stabilizer Glide Track Spanner... -
Page 5: Assembly Steps
Assembly Steps Step 1: 1. Put Seat Assembly (A7) onto Glide Track (A3) and lock tight with Screw (#61), using Allen Wrench (#50). 2. Assemble End Cap (A8) onto Glide Track (A3) with Cross Screw (#78) and lock tight with Allen Wrench (#50). - Page 6 Assembly Steps Step 3: 1. Attach Front Stabilizer (A2) onto Main Frame (A1) with Screw (#55),and cap Nut(#67), Flat Washer (#64) and lock them tight with Spanner (51). Step 4: 1. Attach Glide Track (A3) onto Main Frame (A1), lock them tight with...
- Page 7 Assembly Steps Step 5: 1. Hold Glide Track (A3) with both hands, stand the whole machine up. 2. Insert Pedal Holder (A9) onto Main Frame (A1), lock Pedal Axle (#11) tight onto Main Frame (A1) with Hex Bolt (#83) and Hex Nut (#65), using Spanner (#51).
-
Page 8: Folding Steps
Folding Steps 1. Screw off T Knob (#46). Rotate Watch Stand Assembly (#3) along the arrow shows until the end. Fix the position of Watch Stand Assembly (#3) and Main Frame (A1) with T knob (#46) again. 2. Screw off T Knob (#46). Rotate Watch Stand... - Page 9 Exploded Parts 8...
-
Page 10: Part List
Part List Part Name Part Name Spec. Qty. Main Frame Handle grip Rear Stabilizer T-knob Rubber Pad Watch Stand Assembly Magnetic Assembly Alloy Bushing Front Stabilizer Console Limit Hand Bar Tube Allen Wrench Aluminum Track Spanner S=10/13/17/19 Seat Plate Spring Console Plate Hex bolt M12*145... - Page 11 EXERCISE MONITOR INSTRUCTION MANUAL COUNT TIME TOTAL COUNT CALORIES ■KDY FUNCTIONS: Pressing the MODE key to select and lock on a function for following sequence: SCAN COUNT TIME TOTAL COUNT CALORIES Pressing and hold the MODE key with 3 seconds to reset the value to zero (without TOTAL COUNT).
Need help?
Do you have a question about the F103A and is the answer not in the manual?
Questions and answers