Advertisement
Quick Links
Advertisement

Summary of Contents for Tower Top Smart Battery Charger
- Page 1 3142026...
- Page 2 Intended Use Important Safety Information Main Parts of Product Before Each Use Operating Instructions Maintenance Troubleshooting PLEASE SAVE THESE INSTRUCTIONS WARNING: Read carefully and understand all ASSEM- BLY AND OPERATION INSTRUCTIONS before operating. Failure to follow the safety rules and other basic safety precau- tions may result in serious damage.
-
Page 3: Protection Features
This battery charger is suitable for 12V Lead-acid batteries, including GEL, AGM and STD. This battery charger will quickly and easily charge the vehicle battery and keep the battery performing at its optimal while lasting longer. This battery charger has an interactive LCD display showing charging rate, battery type, error message in words and icon. - Page 4 Overtime Charging Protection - If the battery cannot be fully charged within 24 hours, charger will stop charging automatically. Short Circuit Protection - If the cables connected suffer from short circuit when the charger works, charger will stop charging automatically. •...
- Page 5 • Use of an attachment not recommended or sold by the battery charger manufacturer may result in a risk of fire, electric shock, or injury to persons. • Do not operate charger if it has received a sharp blow, been dropped, or otherwise damaged in any way;...
- Page 6 • Make sure that someone is within range of your voice to c ome to your aid if needed while you work with or are near a lead-acid battery. • Wear complete eye and clothing protection when working with lead-acid batteries. •...
- Page 7 • Never alter AC cord or plug provided. If it does not fit the outlet, have a proper outlet installed by a qualified electrician. Improper connection can result in a risk of fire or electric shock. • Do not operate charger with damaged cord/plug - replace the cord/plug immediately.
- Page 8 • Connect the equipment into an outlet on a circuit different from that to which the receiver is connected. • Consult the dealer or an experienced radio/TV techni cian for help." • NOTE: If using this battery charger/maintainer for a marine battery, the battery must be removed and charged on shore unless you have purchased special equipment designed for marine use to allow for onboard charging.
- Page 9 • Place the free end of the battery cable as far away from the battery to be charged as the cable will allow and then connect the black negative (-) charger clip to the free end of the cable. NEVER face the battery when making the connection.
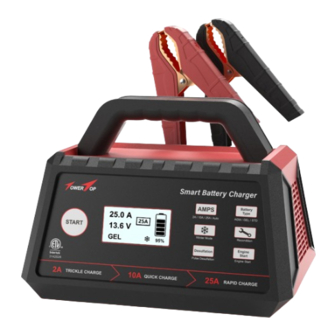
- Page 10 LCD Display Window - shows charging status, charging current, voltage, battery type, start aid and error information in words and icon. Start Button - press the “START” button to start charging after your settings. Press the “START” button again to make the smart charger in a standby mode.
- Page 11 Winter Mode Button - press the “Winter Mode” first and then “START” button to start it. The corresponding pattern will be displayed on the LCD screen. Press the “Winter Mode” button again to stop the mode. Recondition Button - press the “Recondition” button first and then “START”...
- Page 12 If it is necessary to remove the battery prior to charging, always remove the grounded terminal first. Ensure all electrical accessories are off prior to charging. It is best to clean the battery terminals prior to charging. Using a battery terminal brush is a good way to remove corrosion. When charging a lead-acid battery that is not sealed, it may be necessary to add distilled water into battery so the battery acid solution reaches the level as specified by manufacturer.
-
Page 13: Battery Reconditioning
SELECT CHARGING RATE This smart charger has an optimal function (defaulted setting). If you don't want to use the best settings, you can select your expected battery type, charging rate, and other modes manually. The smart charger has three additional charging rate options. -
Page 14: Charging Time
CHARGING TIME Charging time may vary depending on some factors listed below stop the process. * Battery State Depending on the voltage of your battery, it may take up to 10 hours to charge. Batteries with higher voltage can usually be charged in a few hours. - Page 15 8-STAGE CHARGING 1. Desulphation: Pulse charges the battery to break down the buildup of lead sulphate crystals. Lead sulphate crystals can occur when a battery has been discharged or left unused for a period of time, seriously affecting the performance and lifetime of the battery. 2.
- Page 16 8. Pulse: Keep the battery charged at 100% without overcharg- ing or damaging the battery, allowing smart charger to be connected all the way to the battery.Suitable for intermittent use of batteries, such as seasonal use of vehicles, including vintage cars, motorcycles.
- Page 17 After the battery is connected normally, it enters the standby interface. At this time, press the "AMPS" button to select the current range (Auto/2A/10A/25A), press the "BatteryType" button to select the BatteryType (STD/GEL/AGM), press the "Winter Mode" button to select the Winter Mode (snowflake symbol). The LCD displays the voltage and current parameters.
- Page 18 RECONDITION DISPLAY In the standby interface, press the "Recondition" button to select the repair mode, and then press the "START" button to start the repair. The LCD displays "BATTERY IN REPAIR NOW".
- Page 19 When the repair is completed, the LCD displays "REPAIR COMPLETED". BATTERY DESULFATION In the standby interface, press the "Pulse Desulfation" button to select the desulfation mode, and then press the "START" button to start the mode. The LCD displays "BATTERY IN DESULFA- TION NOW".
- Page 20 When the desulfation is completed, LCD displays "DESULFA- TION COMPLETED". ENGINE START DISPLAY In the standby interface, press the "engine start" button to select the engine mode, and then press the "START" button to wait for 100s countdown.The first countdown is 100s,the second is 60s,the third is 30s.
- Page 21 Wait for 100s,60s,30s countdown. 100 SECS 60 SECS 30 SECS Rerun engine output.
- Page 22 Always unplug and disconnect the charger before performing maintenance on the unit. After each use, use a dry, lint-free cloth to clean battery corrosion and other dirt from the clips, cords and charger. Ensure that all components are in good working order. Never open the charger as there are no serviceable parts inside the unit.
- Page 24 1. The desulfurization stage exceeds 4h. 2. Abnormal battery charging in soft start stage. 3. Charging timeout in Please replace the Wrong constant voltage phase battery. Battery (24H) 4. Timeout in the repair phase (4H) 5. Repair mode Repair timeout (4H) 6.
- Page 25 Make sure the vents are unblocked.The charger will recharge automati- cally after cooling The temperature of the down.If the charger has charger is too high or the Over Heat been unable to restore internal temperature charging, the tempera- sensor of the charger ture sensor failure, by a fails.
Need help?
Do you have a question about the Smart Battery Charger and is the answer not in the manual?
Questions and answers
When I first hooked up the battery charger to my battery, it was not recognizing that the clamps were on. Then, I chose the desulification mode and it said Desulificating now. It has been on that setting for over 4 hours and it is not going into charging mode. What can i do? Is the charger perhaps not working?