
Related Manuals for UTA UnFairchild 670M II

Summary of Contents for UTA UnFairchild 670M II
-
Page 1: Table Of Contents
UT A UnderToneAudio UnFairchild 670M II User Manual Version 1.3 1. INTRODUCTION 2. SAFETY/ POWERING UP 3. REAR CONNECTIONS 4. FRONT PANEL CONTROLS 7 - 8 5. CALIBRATING PROCEDURES Calibration Procedure Balancing by Ear 6. USING THE SIDE CHAIN Using the Loop Side Chain Compression FX 7. -
Page 2: Introduction
From our sound lab to yours, we sincerely hope you will nd the results as useful and satisfying as we have. What’s di erent about the UnFairchild 670M II from an original Fairchild? We are using Cinemag recreations of the original transformers used in the audio path. They are extremely close to the originals with only small adjustments made to accommodate a more desirable gain structure. -
Page 3: Safety/Powering Up
2. SAFETY/POWERING UP SAFETY I NSTRUCTIONS WARNING: T o r educe t he r isk o f f ire o r e lectric s hock, d o n ot e xpose t his product ... - Page 4 12. Do n ot u se t his d evice w ith w all o r c eiling m ounts n ot s pecified b y t he m anufacturer. 13.
- Page 5 2. RACK MOUNTING and POWERING UP Before powering up, be sure you are plugging in to a properly grounded outlet. The standard setup for the UnFairchild is for a 110V-120V 60hz AC power source. It can be setup for 220V-240V op- eration upon request.
-
Page 6: Rear Connections
3. REAR CONNECTIONS AUDIO INPUTS/OUTPUTS You are now ready to plug in cables to the rear of the unit. All audio connections on the unit are XLR. INPUT • Plug the source signals you want to be processed into the INPUT LEFT and INPUT RIGHT XLR input jacks on the back (see gure 1). -
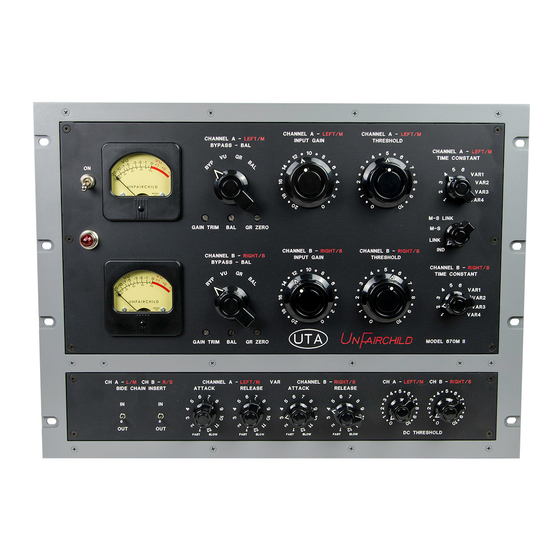
Page 7: Front Panel Controls
4. FRONT PANEL CONTROLS UNFAIRCHILD UNFAIRCHILD DESCRIPTION OF FRONT PANEL CONTROLS 1. POWER SWITCH - Use this switch to turn the UnFairchild on and o . Push the switch UP to the “ON” position to turn the unit on and push the switch down to power the unit o . 2. - Page 8 7. BYPASS/VU SWITCH - This 4-position switch allows you to bypass the active circuitry and control the meter functionality. • BYP: When set to the bypassed BYP mode, the signal plugged to the input jacks will be connected directly to the output jacks; bypassing all of the active electronics. •...
-
Page 9: Calibration Procedure
5. CALIBRATION PROCEDURES Tools Needed: 1. #2 Phillips head screwdriver 2. Tweaker tool or small at head screwdriver 3. Signal generator (e.g. from DAW) 4. Level meters (e.g. DAW meters or console meters) 5. Multimeter (optional) Prep UnFairchild: 1. With the UnFairchild powered o , make sure the front, back, and right side of the UnFairchild are accessible •... - Page 10 VU Meter Calibration: 1. Verify that the test tone is at +4dBu • With the test tone still going, put a multimeter in AC Voltage mode, disconnect each male XLR connector that’s plugged into each Main Input of the UnFairchild, and measure between its pins 2 & 3. Channel A Adjust the level of the signal generator until the multimeter reads approximately 1.228v, and plug each XLR back into the UnFairchild.
-
Page 11: Balancing By Ear
IMPORTANT! There is another aspect to the level gain trim adjustments; the gain trim control adjusts the bias current of the 6386 tubes. It is a great way to adjust the level, but it will a ect the sonic character of the compression, and can also a ect the lifespan of the 6386 tubes. This o ers another opportunity for sonic exibility! Lower bias current settings will have a softer, thicker, more saturated sound. -
Page 12: Using The Side Chain
6. USING THE SIDE CHAIN There are many ways to make use of the side chain feature on the UnFairchild. In this manual, there are 2 common approaches that we will discuss. USING THE LOOP In this application, the SC SEND - L and SC SEND - R outputs on the back panel send signal to an ex- ternal processing device (typically an equalizer). -
Page 13: Feedback Vs. Feedforward
7. FEEDBACK VS. FEEDFORWARD One of the advantages of having a side chain insert on the Fairchild circuit, is that you can set up the com- pressor to be FEEDFORWARD instead of its intended FEEDBACK design. The add-on expansion unit to the UnFairchild, the UNFa-1 Accessory Box, allows you to blend between the two. -
Page 14: Time Constant Presets
8. TIME CONSTANT PRESETS PRESET # ATTACK RELEASE .2 ms .3 Sec. .2 ms .8 Sec. .4 ms 2 Sec. .8 ms 5 Sec. .4 ms 2 sec. for individual peaks, 10 seconds for multiple peaks .2 ms .3 sec for individual peaks, 10 sec. for multiple peaks and 25 sec. -
Page 15: Example Settings
DRUMS There are a lot of cool applications for the UnFairchild with drums. The UnFairchild 670M II is liter- ally the tube compressor I had been looking for... for 20 years. I had never found a tube compressor that had the right combination of the smoothness, that is inherent in tube circuitry, with the ex- ibility and aggressiveness I need for making modern records. -
Page 16: Bass
BASS Bass is one of the instruments that has always worked well with the original Fairchild. You will nd that settings 1,2 or 3 feel very similar to an original 660 or 670. Settings 4 and 5 always had to slow of a release for bass guitar in my opinion. -
Page 17: Piano
PIANO For piano I have two types of recordings I typically do. Either a bigger more open natural sound or a really aggressive a ected sound. For the big open sound VAR4 (ATK5/REL3) is great. For the really aggressive sound I like to use the FEEDFORWARD mode. You can get this really cool e ect of the sound almost imploding on itself. -
Page 18: Maintenance
10. MAINTENANCE There are only a couple topics for general maintenance with the UnFairchild. First, is the issue of when to keep it ON and when to turn it OFF: There are di ering opinions on this but my rule of thumb with tube gear is to leave it on if I am going to be using it again the next day and turn it o if I won’t be using it again for a couple days or more.
Need help?
Do you have a question about the UnFairchild 670M II and is the answer not in the manual?
Questions and answers