
Subscribe to Our Youtube Channel
Related Manuals for Soho SD07


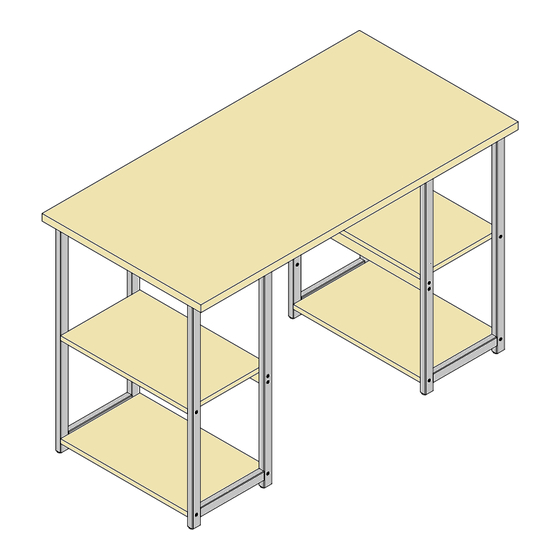
Summary of Contents for Soho SD07
- Page 1 SOHODESK SD07 ASSEMBLY INSTRUCTIONS - PLEASE KEEP FOR FUTURE REFERENCE Dimensions Length - 120cm Depth - 60cm Maximum Weight Tolerance Height - 77cm 50kg Weight - 25,80kg IMPORTANT - PLEASE READ THE INSTRUCTIONS FULLY BEFORE STARTING ASSEMBLY page 1...
- Page 2 SAFETY AND CARE ADVICE Important - Please read these instructions fully before starting assembly Do not stand or put weight on the Check you have all the We do not product during assembly, this could components and tools listed on recommend the use cause damage.
-
Page 3: Components - Fixings
COMPONENTS - FIXINGS PLEASE CHECK YOU HAVE ALL THE PARTS LISTED BELOW Note : The quantities below are the correct amount to complete the assembly. In some cases more fittings may be supplied than are required. Size M6 x 50 Bolt Size M6 x 40 Bolt Size M6 x 15 Bolt x 10... -
Page 4: Components - Parts
COMPONENTS - PARTS PLEASE CHECK YOU HAVE ALL THE PARTS LISTED BELOW Desktop Middle board x2 Bottom board x2 Rear frame x 2 Front frame x 2 Beam Top bar x 2 Connecting rod x 2 Middle bar x 2 page 4... - Page 5 ASSEMBLY INSTRUCTIONS Step 1 Carefully screw in adjustable feet F into the rear and front frames Step 2 Align the leg frame holes with the top and middle bar as shown in the assembly instruction image. Once aligned, use the M6 x 40mm bolt B to fix the leg frames and bars together.
- Page 6 ASSEMBLY INSTRUCTIONS Step 3 Align the middle and bottom board panels with the frame holes. Use frame B to fix the board panels to the frames. Fix bolt B to the underside of the board panels through the top and middle bar Please make sure all bolts are tight and no gapping is visible.
- Page 7 ASSEMBLY INSTRUCTIONS Step 5 Carefully turn the desktop upside down and place onto a soft surface. Once the desktop is upside down carefully repeat the process with the constructed frames as shown in the assembly instruction image. Align the constructed frames with the predrilled and inserted holes in the desktop...
Need help?
Do you have a question about the SD07 and is the answer not in the manual?
Questions and answers