
Summary of Contents for HE Slushie Stars
- Page 1 Slushie Stars (MODEL #19275-0001) OPERATORS MANUAL V1.2 Highway Entertainment, 44-48 Maitland Road, Mayfield East, 2304, NSW, Australia. Phone: 0249 689 313. Fax 0249 689 314. Email: sales@highway.net.au...
- Page 2 INDEX Section Sub Section Page Number 1. Safety Instructions 2. Introduction 2.1. Quick Start 3. Product Description 3.1. Product Overview 3.2. Product Specifications 4. Control Panel & Functions 4.1. Panel Diagram 4.2. Set Parameters 4.3. Introduction to Functions 4.4. Temperature Range & Default Settings 5.
- Page 3 IMPORTANT Please read all SAFETY PRECAUTIONS and INSTALLATION sections before operating machine. Please keep instructions. 1.SAFETY INSTRUCTIONS______________________________________________________ Safety instructions apply to operators and service personnel. Read and follow all instructions carefully, and heed all warnings. Other safety instructions may appear elsewhere in this manual. ...
-
Page 4: Quick Start
2. Introduction_____________________________________________ Thank you for purchasing our Slushie Stars 15L Slushie machine. Please take a moment to read this manual and understand all the features of this machine which you can customise to suit your venue or home. This machine is suitable for;... -
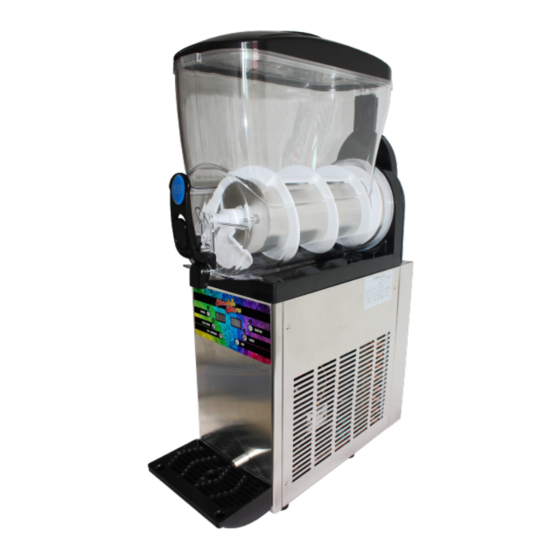
Page 5: Product Overview
5. Control Panel 6. Machine Chassis 7. Waste Tray Specifications Model Name & Number: Slushie Stars 15L Model #19275-001 Assembled Size L x B x H (cm): D52cm x W21cm x H80cm Packing Size L x B x H (cm):... - Page 6 4. Control Panel Description & Function_________________________ 4.1 Panel Diagram Current Temperature Cold Drink Button Indicator Slush Button Wanted Temperature Cold Drink Button 10 Slush Button Indicator Mixing Button LED Indicator Set/ Subtract Button 11 Lighting Button Mixing Button Add Button 12 Lighting Button Indicator 4.2 Set Parameters Press “Set”...
- Page 7 4.3 Introduction to Function Function Description Indicator Press Mixing Button Turns on mixing function Mixing light is on Press Mixing Button Again Turns off mixing function Mixing light is off Press the Cold Drink Button Turns on the cold drink function Cold drink light is on (Mixing function must be turned on, otherwise the Cold Drink function...
- Page 8 5. Operations______________________________________________ Please choose a flat and firm mounting position. If your base is not level or unstable, it will dramatically influence the Slushie machine’s function. Please also check that the machine is fully assembled well before adding liquid, especially that the tank is seated properly into the machine chassis (photo above).
- Page 9 Please follow the above guide for liquid levels in your machine. 5.2 Making Slushie Drinks Everyone’s tastes are slightly different, and we recommend you trial different mixes, temperatures, and flavours to match your tastes and slush consistency. If you have purchased our Slushie Syrup, we recommend you use the 2 Litre plastic bottle for your measuring (and storage);...
- Page 10 Machine Setup (after pouring liquid and turning machine on); 1. Press the Mixing Button 2. Press the Slush Button 3. To change temperature, press the Set button, and use the +/- to adjust Default Temperature is -2.0 degrees. Please Note: Machine will save your previous use temperature settings. Hint: Keep the 2 Litre empty bottles and fill and pre-cool the water in you fridge.
- Page 11 5.3 Making Cold Drinks Pour your favour juice/drink/cordial into the tank, but take special care to never leave concentrate/high sugar (more than 13%) in your machine, and always premix with water if necessary. Or, use your Slushie machine for cold water dispenser. Machine Setup (after pouring liquid and turning machine on);...
- Page 12 6. Disassembly, Cleaning & Assembly___________________________ 6.1 Disassembly Warning: (a) Please disconnect the machine from power before Disassembly (b) Please remove all liquid before disassembly Step 1 Remove the Tank Lid Step 2 Push the Tank gently forward/upwards to Step 3 Gently slide out the tank release the plastic legs that hold the Tank to the machine chassis.
- Page 13 6.2 Cleaning Once parts are dismantled, wash all parts thoroughly with non-corrosive cleaner and warm water, then air dry or wipe down with soft cloth. Warning: Do not submerge Tank Lid in water, as the lighting globe is inside the Lid. Please clean the lid with sponge and wipe dry.
- Page 14 3. Align the head of the mixer shaft with the interface inside the Tank, press down the Tank until it sits well in place in the machine chassis. Please make sure the seal (B) is tight and well seated. 4. After assembly, perform a Rinse Cycle by filling the tank and running for 5 minutes. Empty the water in the tank and fill with your syrup/water mix.
- Page 15 FUNCTION RANGE PARAMETER Slush temperature return difference 0.3 (Degrees) value Slush middle position corresponds to -2.0 (Degrees) temperature Slush position number 20 (Position) Press protection time 5 (Minutes) Low voltage protection value 187(V) 1 (0: Disable 1: Enable) Voltage protection enabled Tank temperature correction Not used Cold drink temperature return...
- Page 16 8. Spare Parts______________________________________________ For current spare parts list, please visit; www.slushiestars.com.au www.highway.net.au We carry all major parts as stock items in our warehouse. 9. Warranty Policy & Contact Details___________________________ ALL components are covered by Highway Entertainment’s 12 months unlimited (worry free) warranty, which means that you can operate this machine commercially or in your home and should anything go wrong, we will provide parts to solve (at our cost including transport to you).
Need help?
Do you have a question about the Slushie Stars and is the answer not in the manual?
Questions and answers