Advertisement
Quick Links
Advertisement

Summary of Contents for Tilvision QL-G001
- Page 1 Smart Lock Ref.: QL-G001 Instruction Manual...
- Page 2 TABLE OF CONTENTS What's Included Device settings Name for parts How to use smart lock Prepare door before Specifications installation How to install smart lock...
- Page 3 It is very important to install and operate this product according to the following instructions. Failure to do so may render your guarantee void. 1. What’s included Strike box Exterior assembly Interior assembly Mounting plate Strike plate Deadbolt Mechanical keys Key fob Long mounting Short mounting...
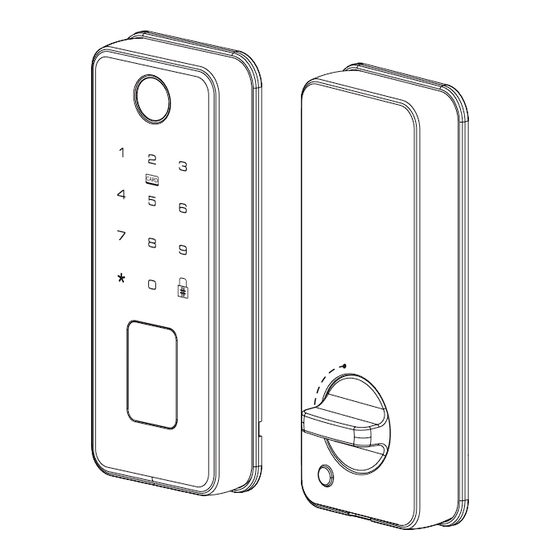
- Page 4 2. Name for parts (1) Fingerprint scanner (2) Key fob reading area (3) Keypad (4) Cylinder & Cylinder cover (5) Locked inside on / off (6) Battery cover (7) Battery compartment (8) Thumbturn (9) Reset button (10) Type C port (11) Speaker - 02 -...
- Page 5 3. Prepare Door before Installation 3.1. Make sure the following criteria are met so that the Smart Lock can be installed properly : • Check the door status, make sure the door frame is aligned with the door. • There are no obstructions stuck in the door frame. •...
- Page 6 3.3. If you already have an existing lock, please remove it including the deadbolt. 4. How to install smart lock Step 1: Install the Deadbolt 1. Measure your door's backset dimension: whether it is 2 " / 70 mm or 2 "...
- Page 7 2. If your door's backset dimension is 2 " / 60 mm, use the provided deadbolt to install. If your door's backset is 2 " / 70 mm, turn the faceplate 180° and pull to extend simultaneously until the deadbolt locks in position as the illustration shows below.
- Page 8 Step 3: Install the Exterior Assembly 1. Route the cable connected on the exterior assembly under the deadbolt. 2. Keep the tailpiece in vertical position and insert it into the center hole of the deadbolt. - 06 -...
- Page 9 Step 4: Install the Mounting Plate 1. Route the cable through the mounting plate. 2. Fix the mounting plate onto the interior doorframe with the mounting plate screws. Make sure the long mounting plate screws go through the mounting plate and lock into the connecting pillars of the exterior assembly. Short mounting plate screw Long mounting plate screw...
- Page 10 Step 5: Install the Interior Assembly 1. Check your existing door in the left or right and then turn the thumbturn in position as the illustration shows below. 2. Match the wire connector from the circuit board with the one from the exterior assembly as illustrated.
- Page 11 4. Remove the battery cover. 5. Secure the provided screws into the interior assembly. 6. Turn the thumbturn to check whether the deadbolt is retracted. If the deadbolt does not work smoothly, adjust the screws and install the mounting plate again. 7.
- Page 12 5. Device settings At factory default mode, press lock button ‘ ’ to check if the locking direction is correct. If it’s incorrect, press ‘888#’ to switch the direction. Administrator setting At factory default mode, the initial administrator password is ‘123456’ and it’s a must to change it following up steps as shown below.
- Page 13 User setting Initial state Press ‘ ’ + ‘#’ Enter ‘123456#’ Press ‘2’ for user settings Press ‘1’ to add user Press ‘2’ to delete user Register fingerprint and Input user no such as ‘002’ repeat by 4 times + press ’#’ to confirm Set password with 6-8 User info you input will be digital numbers +...
- Page 14 System setting Initial state Press ‘ ’ + ‘#’ Enter ‘123456#’ Press ‘3’ for system settings Press ‘1’ to turn Setting will be on voice saved. Press ‘1’ to Press ‘ ’ to return setup voice to last setting or Press ‘2’...
- Page 15 Factory default setting Long press ‘Reset’ at back door or follow the steps as below. Initial state Press ‘ ’ + ‘#’ Enter ‘123456#’ Press ‘4’ to restore factory default settings Input administrator no. + press '#' to confirm Press ‘ ’ to return to last setting or exit 10s later - 13 -...
- Page 16 6. How to use smart lock Unlock the door You can unlock the door using fingerprint, password, key fob, mobile app, or the provided key. Option 1: fingerprint Scan registered fingerprint and wait until the fingerprint breathing light breathes blue. Option 2: password Press any key or tap the touch panel to wake up the keypad and enter correct password to unlock the door.
- Page 17 Lock the door At standby mode, press ‘ ’ to lock the door directly. Low-power alert Smart lock will alert you automatically when low power. You are able to unlock the door up to 200 times since you get the first alert. Please replace the batteries asap.
- Page 18 7. Specifications • Power supply: 4 AA batteries or 5VDC charger in an emergency • Standby current: ≤50uA • Working current: ≤180mA • Administrator qty: Up to 10 • Fingerprint capacity: Up to 50 • Fingerprint + password + key fob capacity: Up to 250 •...
- Page 19 SHENZHEN QIAOHUA INDUSTRIES LIMITED Add: Qiaohua Industrial Zone, LuoTian Forestry Center, Yan Luo, Bao An, Shenzhen, China 518127 Customer Support: support1@tilvision.com www.tilvision.com Made in China...
Need help?
Do you have a question about the QL-G001 and is the answer not in the manual?
Questions and answers