Table of Contents
Advertisement
Quick Links
Advertisement
Table of Contents

Summary of Contents for FUELL Flluid 1
- Page 2 FUELL Inc. 244 Fifth Avenue, Suite A209, New York, NY 10001, USA E-Mail: fuell@fuell.us · www.fuell.us 2021 06 006...
- Page 3 Flluid 1 - Flluid 1S - Flluid 1E Owner’s Manual...
- Page 4 FOREWORD Flluid 1 Safety symbols and notes Be sure to read this manual carefully to FUELL is constantly working on the fur- familiarize yourself with your Flluid. The ther development of all models. Please Please note: expert treatment, in addition to the regular...
- Page 5 PEDELECS - with pedal assistance up to 500 watts but only while the rider is At this time FUELL Inc. does not offer a also pedaling. The motor will assist up to Class 2 E-Bike.
- Page 6 Flluid 1...
-
Page 7: Table Of Contents
Flluid 1 CONTENTS MAINTENANCE USING YOUR FLLUID Charging the Battery......34-36 Maintenance and Care ....50-52 Vehicle Side Views ......2-3 Battery Charge Level ......37 Cranks, Pedals ........53 Vehicle Dimensions ........ 4 Ring Lock ..........38 Handlebar Controls......... 5 Gear Shifting........54-56 Tire Pressure ........38 Display - Introduction ...... -
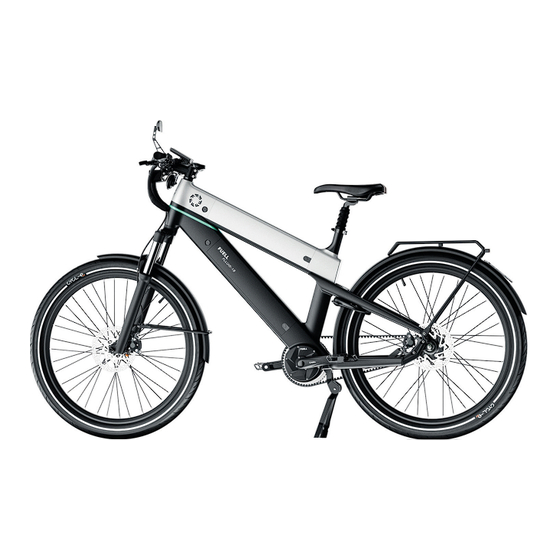
Page 8: Using Your Flluid Vehicle Side Views
Flluid 1 USING YOUR FLLUID Right Side View Quick Release Seat Adjustment Lever Display Rearview Mirror Hand Controls Front Suspension Adjustment Pedal, Right Stand Drive Belt Geared Hub 10. License Plate 11. Tail Light / Brake Light... - Page 9 Flluid 1 USING YOUR FLLUID Left Side View Horn Headlight Battery Lock, Upper Battery Battery Lock, Lower Battery Rear Brake Pedal, Left Drive Motor Front Brake Reflectors...
-
Page 10: Vehicle Dimensions
Flluid 1 USING YOUR FLLUID Vehicle Dimensions 650 mm 1800 mm... -
Page 11: Handlebar Controls
Flluid 1 USING YOUR FLLUID Function and SERVICE Handlebar Controls Handlebar Controls, Left Handlebar Controls, Right - Flluid-1, 1S Handlebar Controls, Right - Flluid-1E 9 Continuous shifting twist grip 1 Fixed Grip 6 Rear Brake Lever 2 Front Brake Lever... -
Page 12: Display - Introduction
Flluid 1 USING YOUR FLLUID Display - Introduction Specifications Material / Dimensions Product Name Electrical Specifications Material and Dimensions TFT-LCD-Display IPS- Screen 3.2 Inches Housing; ABS Screen: High Strength Acrylic Input Voltage 24 V / 36 V / 48 V Model: APT TFT 850C 3... -
Page 13: Display Features
Flluid 1 USING YOUR FLLUID Display Features Features Smart Battery Indicator: Accurate Speed limit value indicator Suitable for low temperatures down to state of charge -20 °C/ -4 °F. Error code indicator 5 Levels of Assist: High-Contrast 3.2 inch color IPS matrix... -
Page 14: Display Functions
Flluid 1 USING YOUR FLLUID Display Functions Battery Batterie Clock High Beam Scheinwerfer Power Indicator Leistungsschleife Tachometer Speed Scale Speed Value Geschwindigkeit Einschalttaste Power Leistungsanzeige Power Indicator Unterstützungsstufe Power Assist Level Power Scale Leistungsskala Time Zeit Strecke Mileage Switchable Page... -
Page 15: Display Control
Flluid 1 USING YOUR FLLUID Powering the display Driving with Motor Assistance TOUR To Switch On and Off Briefly press the keys DOWN/- (2) or UP/+ (3) to change the assist level. The strongest assist is available at level 5; at level 0 there is no rider assist. -
Page 16: Mode
Flluid 1 USING YOUR FLLUID Switch Between Speed and Distance Modes Briefly press the ON / OFF button (1) to switch between speed and distance mode: Trip Range (not available on Flluid) Odometer Trip Time Max Speed Average Speed If there is no input for 5 seconds, the display automatically returns to "speed"... -
Page 17: Push Assist (6 Km/H)
Flluid 1 USING YOUR FLLUID Push Assist 3.5 mph (6 kmh) Data Reset Press and hold the UP and DOWN but- tons for one second to clear various tem- porarily stored data: AVERAGE SPEED/ MAX SPEED/ TRIP/ TIME. Temporary data is stored in memory and will not be lost when the display is pow- ered off. -
Page 18: Setting Up Your Display
Flluid 1 USING YOUR FLLUID Setting up your Display Press the power button (1) in quick succession twice (within 0.3 seconds) to access the setup menus. Use the UP / DOWN (2/3) buttons to change the parameter setting and to move to the next parameter. Press the power button (1) twice, to exit the menu. - Page 19 Flluid 1 USING YOUR FLLUID Setting up your Display System: System: Press the UP or DOWN Brightness: Press the UP or DOWN but- key to toggle between metric and English ton to adjust the brightness of the back- units. light. I is the darkest, IIIII the brightest.
- Page 20 Flluid 1 USING YOUR FLLUID Setting up your Display Automatic Shutoff: Press the UP or DOWN key to set the idle time until automatic Scenes: Analog Only (Default) shutoff. You can choose between 1 to 9 minutes to switch off or off. When set to OFF, the automatic shutdown is disabled.
- Page 21 Flluid 1 USING YOUR FLLUID Setting up your Display Battery Indicator: Use the UP or DOWN button to change the battery indicator: Power Display: With the up or down key Voltage / Percent / Off. you can change the power display: voltage / current.
- Page 22 Flluid 1 USING YOUR FLLUID Setting up your Display Clock: To set the clock, use the power button to call up the clock menu. Use the UP and DOWN buttons to set Year / Month / Day / Hour / Minute / Second.
- Page 23 Flluid 1 USING YOUR FLLUID Setting up your Display Power On: Press the power key to enter the password menu. If the option "Start input” ON you must enter the password that you have previously set when switching on. You will need to enter the password within 30 seconds when turning it on. If the password is wrong, the display switches off automatically.
-
Page 24: Display - Basic Info
Flluid 1 USING YOUR FLLUID Basic Settings Press the DOWN button until the red arrow reaches Wheel / Wheel. With the switch-on key you can then call up all the parameters of the basic settings. Wheel: The wheel diameter can be specified with the UP and DOWN keys; are available... - Page 25 Flluid 1 USING YOUR FLLUID Basic Settings USB-Port: Use the UP / DOWN buttons to select OFF / ON. When switched off, no volt- age or current is output.
- Page 26 Flluid 1 USING YOUR FLLUID Basic Settings Light Sensor: Select the menu item Light sensor and press the switches to call up the light sensor interface. Use the UP / DOWN buttons to select OFF or ON; With UP / DOWN you can adjust the sensitivity in three levels: HI / MID / LO.
-
Page 27: Product Information
Flluid 1 USING YOUR FLLUID Product Info Information Information: Information about the e-bike Product Info: This menu item displays the can be displayed here. hardware and software versions. -
Page 28: Battery Information
Flluid 1 USING YOUR FLLUID Battery Info Battery Info: Under this menu item all battery information can be viewed: Voltage, Capacity, Charge Cycles, Condition, Battery Tem- perature, Residual Capacity, Full Charge Capacity, Initial Capacity, Max. Charge Time. Informationen Batterieinformationen Batterieinformationen Spannung 42.0V... - Page 29 Flluid 1 USING YOUR FLLUID This page intentionally left blank...
-
Page 30: Error Codes
Flluid 1 USING YOUR FLLUID Error Code Definition The model 850C can display warning notice. The symbol is displayed along with the error code at the bottom of the screen. The table below explains the error codes 01 to 30. Error Code... -
Page 31: Seat Position
Flluid 1 USING YOUR FLLUID Seating Position In order to enable a comfortable, fatigue-free The handlebar height is correct when the and safe driving, the saddle and handlebar handlebar stem (2) with the upper edge height must be adapted to the size of the of the saddle (3) is level or slightly higher. -
Page 32: Seat Adjustment
Flluid 1 USING YOUR FLLUID Seat Height Adjustment Seat Adjustment - Release quick release lever (1), adjust seat height and tighten lock. - By adjusting the nut (2) on the quick release lever, the clamping force can be adjusted. 3 max. -
Page 33: Handlebar Position
Flluid 1 USING YOUR FLLUID Handlebar Adjustment Align handlebar stem with handlebar Loosen the 4 Allen screws (1) of the Align the stem with the handlebar and handlebar clamp with a 4 mm Allen key. tighten the two Allen screws (1) to 7-9 Nm with the 5 mm Allen key. -
Page 34: Front Suspension Adjustment
Flluid 1 USING YOUR FLLUID Front Suspension Adjustment Recommended air pressure psi / bar XCR-air Rider Weight Pounds <120 40-55 2,7-3,8 120-145 55-65 3,8-4,5 145-165 65-75 4,5-5,2 165-190 75-85 5,2-5,9 190-210 85-100 5,9-6,8 210> 100+ 6,8+ Preload Adjustment Fork Lock Factory 1. -
Page 35: Safety Note: Charger
Keep out of reach of children. To pre- The cable cross-section is large vent risk of injury, only charge Fuell Inc. Do not operate the charger with a dam- enough for the current rating of the Lithium Ion (Li-Ion) batteries. -
Page 36: Charger Features
Flluid 1 USING YOUR FLLUID Charger Function Charging cycle and LED indicators for Li-ion battery MODUS Green Battery not yet connected Charging Green Charging complete If the battery does not charge: Disorders - Check whether the outlet charger is This charger is suitable for Li-Ion batteries. -
Page 37: Safety Note: Battery
Flluid 1 USING YOUR FLLUID Important Safety Note for the Battery CAUTION NOTE - The vehicle's batteries and the charger A rechargeable battery must be recycled are matched. Never charge the batter- properly. It contains toxic heavy metals and is ies with another charger. - Page 38 Use a class ABC dry chemical fire FUELL Inc disclaims any liability for such Improper use of the battery may result in extinguisher or smother it with sand.
-
Page 39: Handling Of The Battery And Charger
Flluid 1 USING YOUR FLLUID Handling of the Battery and Charger Nevertheless, we recommend that you NOTE only leave the battery on the charger if the vehicle is to be used again in the Battery Temperatures: foreseeable future (several days). - Page 40 The batteries are secured to the frame and spare parts, which were not released with a lock. or approved by FUELL Inc. Service by a - Insert key (3) and while supporting the unqualified service center or failure to fol- battery with your hand turn to the left.
- Page 41 Flluid 1 USING YOUR FLLUID Installing the Battery - Insert the battery (1) with the connector - Turn key (3) clockwise and remove. - Insert the battery (1) into the frame. (4) into the receptacle (5). NOTE Do not attempt to install the battery with the lock in the locked position.
-
Page 42: Charging The Battery
Flluid 1 USING YOUR FLLUID Charging the Battery - First connect the plug (3) of the charger The battery is secured with a lock (2). NOTE (4) to the wall outlet 100-230 V, 50-60 - Unlock the battery and remove it. -
Page 43: Battery Charge Level
Flluid 1 USING YOUR FLLUID Battery State of Charge LED Battery is 100% charged. LED Battery is about 75% charged. LED Charge soon Battery is about 50% charged. -
Page 44: Ring Lock
Flluid 1 USING YOUR FLLUID Tire Pressure Ring lock Tires can be inflated with an air compressor. NOTE The key can be removed in this position, WARNING When inflating it cannot be removed when turned right. the tires with compressor air pressure... -
Page 45: Riding
Flluid 1 RIDING Start Up Riding in pedelec operation 4. When starting in the bend or on a When the auxiliary drive is switched on, tight turn, lightly apply the handbrake the motor takes over about half of the drive lever. -
Page 46: Range
Flluid 1 RIDING Driving - Brakes Range The achievable range with one charge of the two batteries depends on a variety of factors. These include the battery and vehicle condition and especially the route profile. Under normal conditions, the two Li-ion... -
Page 47: Turning Off Your E-Bike
Flluid 1 RIDING Parking Flluid NOTE If the bicycle is in the auxiliary drive mode, the display is switched off after approx. 10 minutes of inactivity. To reactivate the auxiliary drive, switch it on again. - Press the button (2) longer to switch off CAUTION the display and the battery. -
Page 48: Security Note
Flluid 1 RIDING SAFETY NOTES Road Safety This bicycle is equipped with two indepen- Owner assumes any risk and liability for use Road Safety dent, functional brakes, a clearly audible of non-approved parts. In some cases this Safe riding required the correct adjustment horn, headlight, tail light, rear reflector ped- may result in a non-compliance of local laws. - Page 49 Flluid 1 RIDING SAFETY NOTES What should I be aware of when riding? Please conduct safety checks at regular - Reaction time can be affected not only by intervals including but not limited to the Be certain the bike is in proper operating alcohol but also by drugs and medications.
-
Page 50: Transport
Flluid 1 RIDING Transporting by Car Antitheft Carrying Loads WARNING WARNING NOTE The bicycle may only be mounted on its Do not transport bulky loads. The optional GPS tracker installed in the wheels for transport on appropriate load- Do not cover the lighting. -
Page 51: Removing And Reinstalling Front Wheel
Flluid 1 RIDING Removing and installing front wheel for transport Removal: - Preload and close the quick release lever (1). - Completely open the quick release lever Close quick release lever (1). (1) and press the quick release axle (2) - The quick release lever (1) must point through the dropouts and pull out. -
Page 52: Bike Care
Flluid 1 MAINTENANCE Vehicle care / care products NOTE Regular and expert care serves to maintain the value of the bicycle and is one of the prerequisites for the recognition of warranty claims. Corrosion due to lack of care or win- ter operation is not covered by the warranty. - Page 53 Flluid 1 MAINTENANCE Winter operation and corrosion Vehicle Care / Care Products Tire Care protection If the bike is not going to be used for a long period of time, it is advisable to park the bike NOTE so that the tires are unloaded.
-
Page 54: Disposal
Flluid 1 MAINTENANCE Disposal Other Components By recycling,you make an important con- Electrical and electronic devices as well tribution to the protection of our environ- Dispose of the components in accordance as batteries may not be disposed of with ment. -
Page 55: Technical Changes, Accessories, Spare Parts
Technical modifications to the vehicle Approved accessories and original spare CAUTION may be in violation of federal and local parts are available from FUELL directly or laws. For your own safety and best interest, we through an authorized service center. -
Page 56: Maintenance And Care
Flluid 1 MAINTENANCE Maintenance and Care Please note the following: The maintenance plan describes the vari- WARNING ous tasks. Safety reasons prohibit repairs and - Maintenance work during the warranty adjustments outside of manufactures period and thereafter without exception H = By a qualified service center recommended specifications. - Page 57 Flluid 1 MAINTENANCE Maintenance and Care H = Maintenance by an authorized service center F = Examination by the owner/ rider Periodic inspection and maintenance Before Monthly Annually Riding Needed Check all nuts and bolts, which are important for driving safety and function, for tightness, tighten if necessary.
- Page 58 Flluid 1 MAINTENANCE Maintenance and Care H = Maintenance by a car. Service Center F = Examination by the owner/ rider Periodic inspection and maintenance Before Monthly Annually Riding Needed Brakes Check for proper brake function. Visit an authorized service center if needed Check rims and spokes for lateral and radial runout.
-
Page 59: Cranks, Pedals
Flluid 1 MAINTENANCE Pedals Cranks Follow: Retighten screws on (2) on both sides. NOTE If the cranks have already loosened, the inner square / alignment is mostly off. The cranks are replaced, the axle must then be replaced. Disassemble the fixed crank only with a crank puller, never knock down with force. -
Page 60: Gear Shifting
Flluid 1 MAINTENANCE Gear Shifting Flluid-1E (Enviolo) 0.5- 1.5 mm Adjusting the shift cable play Play on the shift cable (2) can be deter- The play on the shift cable can be adjusted mined by gently pulling on the outer ca-... - Page 61 Flluid 1 MAINTENANCE Gear Shifting Flluid-1/1S (Nexus) Setting of the shifting unit (A) Yellow adjustment lines 5-gear hub gear (A) Revoshift in (B) Revoshift in position 5 position 3 Make sure that the yellow adjustment lines NOTE on the shift unit bracket and pulley are Adjust the shifting unit gradually, using as aligned with each other.
- Page 62 Flluid 1 MAINTENANCE Gear Shifting Flluid-1/1S (Nexus) NOTE The yellow adjustment lines on the switch- ing unit are in two places. Use the one that is easiest to see. When the Flluid is standing: (A) Cable adjustment screw Must be aligned...
-
Page 63: Drive Belt Inspection
Flluid 1 MAINTENANCE Checking Drive Belt Tension Spokes 10 mm A tight fit of the spokes (1) is important for CAUTION the proper running of the wheels. Spokes Have the drive belt tension inspected by can loosen over time, tighten as needed. -
Page 64: Steering Bearing Inspection
Flluid 1 MAINTENANCE Steering Bearing Steering Bearing Adjustment Brake Inspection and Service To Adjust: At regular intervals, check the oil level in WARNING the reservoirs. - Remove the cover (5) and loosen the Pay attention to maintenance intervals. Lubricate the brake lever pivot with grease clamping screw underneath. -
Page 65: Battery Fuse Inspection
Flluid 1 MAINTENANCE Checking the Battery Fuse Checking the battery fuse Replacing a fuse - Open the cover (4) on the battery and CAUTION replace the fuse (5). NOTE - When replacing the fuse, ensure that Never use a higher rated fuse or repair it is correctly seated. -
Page 66: Chassis
Flluid 1 TECHNICAL DATA Modell FUELL Flluid 1 FUELL Flluid 1S FUELL Flluid 1E E-Bike Class Class 1 (Pedelec) Class 3 (SpeedPedelec) Class 3 (SpeedPedelec) General Weight depending on the About 31 kg / 69 lbs with battery equipment Perm. total weight max. - Page 67 5 Ride assist modes: Assist Level Power Assist % 150% 210% 300% and pedal assistance, until approx. 20mph/32 kmh for Flluid 1, and 28mph/45 kmh for Flluid 1S/1E Then the engine switches off progressively and there is then no more assist...
-
Page 68: Engine And Battery Charger
Flluid 1 SERVICE Model FUELL Flluid 1 FUELL Flluid 1S FUELL Flluid 1E Motor – Drive Unit Middle Motor Nominal voltage 48 Volt Rated capacity 500W 500W 500W Torque 100 Nm 100 Nm 100 Nm Transmission Planetary gear in the motor housing... -
Page 69: Warranty / Guarantee
Within the scope of its warranty obligations, 4. The following list gives an overview of All maintenance work or other work Fuell Inc. provides the following services to the respective wear parts excluded from related to accident or extreme operating... - Page 70 Flluid 1 SERVICE 10 Year Warranty on the Frame A warranty claim can only be asserted 5. Consequential damages as well as 4. A warranty service can only be carried upon presentation of the proof of purchase indirect and direct costs such as loss out by an authorized specialist work- and intended use.
-
Page 71: Maintenance Schedule
The work specified in the maintenance plan includes - as far as necessary - the cleaning, lubrication and adjustment of the respective components or the replacement of components in case of wear or damage. Fuell Inc. recommends that it be performed by an Authorized Service Center. -
Page 72: Maintenance Records
Flluid 1 SERVICE Maintenance 1. MAINTENANCE 2. MAINTENANCE 3. MAINTENANCE 4. MAINTENANCE Signature Signature Signature Signature or Stamp or Stamp or Stamp or Stamp Date ........ Date ........ Date ........ Date ........ 6. MAINTENANCE 8. MAINTENANCE 5. MAINTENANCE 7. MAINTENANCE... -
Page 73: Error Checklist
Turn the system off and on again; adjust the power settings, if there is still no improve- performance as immediately after product ment, the battery may require maintenance – please email FUELL. purchase The engine shuts off when driving uphill The max. - Page 74 Flluid 1 SERVICE Error Checklist Possible Errors Remedy Short range The battery was not fully charged The battery was charged when cold The range depends on many different factors, such as starting and stopping, selection of gear and assist mode, tire pressure, rider's weight, etc…...
-
Page 75: Bike Pass
Flluid 1 SERVICE Bike Pass To protect your property, we ask you to fill out this form. Keep the bicycle passport in your wallet. If your bike is stolen, using the bike passport details will help the police in finding your property. - Page 76 Flluid 1 FUELL Inc. 244 Fifth Avenue, Suite A209, New York, NY 10001, USA E-Mail: fuell@fuell.us · www.fuell.us 2021 06 006...
Need help?
Do you have a question about the Flluid 1 and is the answer not in the manual?
Questions and answers
Both batteries are charged but the bike will not turn on and display will not light up when I depress the switch
If your FUELL Flluid 1 bike won't turn on even though both batteries are charged, check the following:
- Ensure the battery is turned on.
- Check if the battery contacts are clean.
- Check if the fuse in the battery is blown.
- Make sure the plug connection to the display is secure.
- Verify that the control panel/display is not defective.
If the display is on but there's no assist:
- Ensure the assist mode is not set to "0".
- Ensure the speed is not higher than 20/28 mph.
- Check if the battery is almost empty (flashing last bar).
- Look for error codes (e.g., 23, 24, 25) and fix the related issues.
Also, confirm that the magnetic disc's distance to the sensor is not over 3mm. If problems persist, turn the system off and on again.
This answer is automatically generated