
Summary of Contents for SCRAPPER E-STRADA E-8400
- Page 1 E-8400 E-STRADA INSTRUCTIONS FOR USE AND MAINTENANCE MODE D'EMPLOI ET D'ENTRETIEN 1/40...
- Page 2 USER’S MANUAL FOR E-8400 E-STRADA 2/40...
- Page 3 Congratulations on your purchase of this E-8400 E-STRADA. It has been carefully designed and manufactured according to the latest international quality standards, including: EN 15194 Please read this instruction manual carefully and thoroughly before riding. It contains important information on safety, and maintenance. It is the owner’s responsibility to read this manual before riding.
- Page 4 Ⅰ. Conditions for riding: This E-8400 E-STRADA is designed for riding on road or riding on a paved surface where the tyres do not lose ground contact. It must be properly maintained according to the instructions found within this book; The maximum weight of the rider, bike and bags must to be less than 100kg.
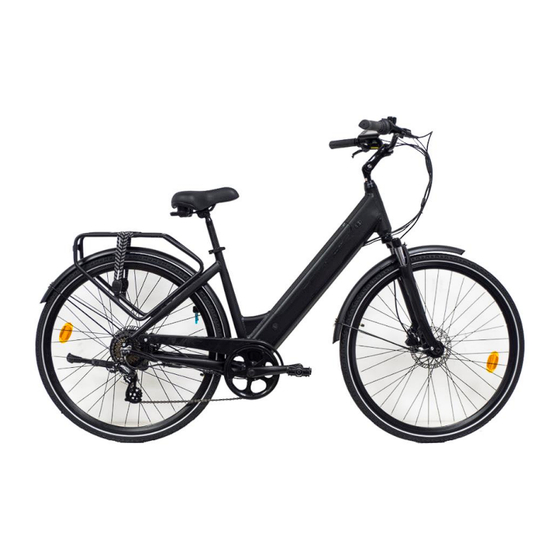
- Page 5 Ⅱ. Name E-8400 E-STRADA Components 1. Rim 15. Pedal 2. Tyre & tubes 16. Chain 3. Spokes 17. Display 4. Disc brake 18. Rear derailleur 5. Suspension fork 19. Rear hub 6. Front hub 20. Freewheel 7. Handlebar & stem 21.
-
Page 6: Table Of Contents
Ⅲ. MANUAL FOR THE ELECTRIC PARTS OF THE E-8400 E-STRADA The rider must pedal forward to obtain any assistance from the motor. This is an important safety feature. This electric pedal assistance bikes will provide assistance up to 25 Km/h, after that the motor will cut out. You may go faster but must do so under your own effort without the electric assistance. -
Page 7: Operation
3. Operation E-8400 E-STRADA is a revolutionary transport means, applying aluminum frame, Li-ion battery, a super high efficiency electric central motor and controller with electric pedal assistance system, to support normal pedaling. The above-mentioned equipment will ensure safe riding with excellent function and performance. - Page 8 For more information view the video at the following link https://www.youtube.com/watch?v=0PFLZDlmsPw Battery charge If an AC outlet is available within reach of your bike, you can charge your bike directly with the battery still attached to the bike. The charging port is covered by a plastic cap. Please open it then you will find one port for charge directly.
- Page 9 Button Definition There are three buttons ( ) on display. In this manual, we use words ON/OFF, UP, DOWN to represent these 3 symbols. 5.1 Power On/Off To switch on the E-bike system and provide the power supply to the controller, hold the On/Off button for 2s.
- Page 10 5.3 Speed mode switch& Mileage mode switch U represents unit settings, “1” is mile, and “2” is kilometer. The default value is “2”. To toggle the unit, press the UP/DOWN button until the desired unit is displayed. To store a changed setting, press the ON/OFF button and access trip distance clearance settings again or hold the ON/OFF button for 2s to exit General Settings.
- Page 11 Backlight settings bL represents backlight settings. Level “1” is the lowest brightness. Level “2” is the medium brightness. Level “3” is the highest brightness. The default value is “1”. To change the backlight brightness, press the UP/DOWN button to increase or decrease until the desired brightness is displayed.
- Page 12 5.6 Display Interface After switching on the E-bike system, the display shows Current Speed and ODO (total distance) by default. Press the ON/OFF button to switch between indication functions below: ODO (Km)→ Trip (Km) → Trip Time (Hour) → Motor Power (W)→ Max. Speed (Km/h) →...
- Page 13 5.8 Error code define The components of the E-bike system are continuously and automatically monitored. When an error is detected, the respective error code is indicated in text indication area. See the definition on the table here below. Error Code Error description Current Abnormality Throttle Abnormality...
-
Page 14: Using And Maintaining The Battery
Trip Distance Clearance Settings Interface 6. Using and maintaining the battery Advantages of Li-ion battery. this e-bikes is supplied with high quality Li-ion batteries, which are light and create no pollution to the environment, as a typical green energy source. As well as the above features, the Li-ion batteries have the following advantages: •... -
Page 15: Using And Maintaining The Charger
5) When the battery pack is removed from the bike, keep it out of reach of children, to avoid any unexpected accident. 6) The battery is forbidden to be disassembled. 7. Using and maintaining the battery charger Before charging the battery, please read the owner’s manual and the charger manual accompanied with your bike, if any. -
Page 16: Maintaining The Controller
9.Maintaining the controller For our electric bikes the controller is usually equipped inside the battery pack holder. It is very important to take care of this electronic component, according to the following guideline: 9.1 Pay attention to protect from ingress of water and immersion in water, which may damage the controller. - Page 17 The distance per charge 1) charging time is not enough; 2) the 1) please charge the battery according the becomes short (Note: environment temperature is so low instruction (chapter 7.3); 2) in winter or performance of the bike that it affects the battery working. 3) under 0°C, you’d better store the battery battery directly...
- Page 18 11. Diagram and specification We reserve the right, without further notice, makes modifications to the product. For further advice, please contact your vendor. Colour Function black Power + Battery Power - black green hall b blue hall a yellow hall c Motor white speed...
-
Page 19: Main Technical Specification Sheet
12. Main technical specification sheet Please find model name of your bike below: Model Remark (for reference) E-8400RM E-8400 E-STRADA Here is some of the general technical Data for these electric bikes: Maximum Speed with Electric Assistance: 25km/h ±5% Distance per full charge: 36V: 80~90km (total loading ≦75kgs) Weight ebike: 23Kg... - Page 20 Please find the crossed technical data battery and charger below: Battery Type: Lithium Voltage: Capacity: 13Ah Safety warnings Disposal of electrical-electronic devices: this symbol indicates that the product must not be disposed of as unselected waste but must be sent to separate collection facilities for recovery and correct recycling, supporting the disposal of materials and helping to prevent potential negative consequences for the environment and health general.
- Page 21 MODE D’EMPLOI UTILISATEUR POUR VÉLO À ASSISTANCE ÉLECTRIQUE E-8400 E-STRADA 21/40...
- Page 22 Nous vous félicitions d’avoir acheté votre vélo à assistance électrique E-8400 E-STRADA, soigneusement conçu et produit selon les derniers standards de qualité internationaux, y compris: EN 15194 Nous vous prions de lire attentivement et entièrement ce mode d’emploi avant l’utilisation du vélo. Ce mode d’emploi contient des informations importantes sur la sécurité...
- Page 23 Conditions pour l’utilisation de ce vélo à assistance électrique Ce vélo à assistance électrique est conçu pour être utilisé sur route ou sur surfaces pavées où les pneus ne perdent pas le contact avec le terrain. Il doit être entretenu selon les instructions présentes dans ce livret. Le poids maximum du cyclist, le vélo y compris le baggage doit être inférieur à...
- Page 24 Ⅱ. Noms des pièces du vélo à assistance électrique E-8400 E-STRADA (Fig 1) 1. Jante 15. Pedales 2. Pneus et chambres à air 16. Chaine 3. Rayons 17. Monitor LCD 4. Frein à disque 18. Derailleur arriere 5. Fourche à suspension 19.
- Page 25 Instructions L'ENTRETIEN "EXTRAORDINAIRE" DES COMPOSANTS MÉCANIQUES ET ÉLECTRIQUES DOIT ÊTRE EFFECTUÉ PAR UN TECHNICIEN QUALIFIÉ. MODE D'EMPLOI POUR LES PARTIES ÉLECTRIQUES DU E-8400 E-STRADA III. Le cycliste doit pédaler en avant pour obtenir l’assistance du moteur électrique. C’est une importante mesure de sécurité.
- Page 26 • Ne faites pas de sauts, de courses, de cascades ou d'usage non conforme à celui prévu avec votre vélo • Nous recommandons vivement d’utiliser un éclairage en cas d’utilisation dans la nuit, avec brouillard ou en cas de mauvaise visibilité •...
- Page 27 https://www.youtube.com/watch?v=0PFLZDlmsPw Pour plus d'informations, visionnez la vidéo sur le lien suivant 4. Chargement de le batterie Si vous avez à disposition une prise de courant à portée de votre vélo, vous pouvez recharger directement votre vélo avec le batterie encore montée sur le véhicule. La prise de branchement pour la recharge est couverte par un capuchon en plastique.
- Page 28 5. LCD avec fontion Il y a trois boutons ( ) sur l'affichage. Dans ce manuel, nous utilisons les mots ON / OFF, UP, DOWN pour représenter ces 3 symboles. Liste des Niveau de charge fonctions Niveau d’assistance de batterie Kit eclairage Information Unité...
- Page 29 automatiquement. 5.2 RÉGLAGE DU NIVEAU D’ASSISTANCE Le niveau d'assistance de la conduite du vélo électrique peut être modifié à tout moment, même pendant la conduite. Le niveau d'assistance varie de 0 à 3 (niveau 0 à niveau 3). Le niveau d'assistance par défaut est «1»...
- Page 30 5.4 Fond lumineux allumée / eteint Pour allumer le feu avant ou le feu arrière du vélo électrique, appuyez sur le bouton «UP» pendant 2s. La luminosité du rétroéclairage de l'écran est automatiquement réduite lorsque l'écran affiche « ». De même, appuyez à nouveau sur le bouton «UP» pendant 2 s, le feu avant et le feu arrière du vélo peuvent être éteints et le rétroéclairage de l'écran retrouve sa luminosité.
- Page 31 5.5 Bouton de DÉBUT AIDE ASSISTÉ à 6KM: Pour activer la fonction d'assistance à la poussée, maintenez enfoncé le bouton DOWN. Après 2 secondes, le vélo électrique est activé pour aller à une vitesse uniforme de 6 km / h tandis que l'écran affiche «P». La fonction d'assistance à...
- Page 32 5.7 Indicateur de batterie Les cinq barres d'alimentation de la batterie représentent la capacité de la batterie. Les cinq barres de batterie sont brillantes lorsque la batterie est à pleine tension. Lorsque la batterie est en basse tension, le cadre de la batterie clignote à la fréquence de 1 HZ pour indiquer que la batterie doit être rechargée immédiatement.
- Page 33 CODE DESCRIPTION D’ERREUR Anomalie courant Anomalie accélérateur Anomalie de phase moteur Anomalie du signal moteur Anomalie des freins Anomalie de la communication 5.9 Distance parcourue Après avoir allumé le système E-bike, appuyez et maintenez le bouton UP et le bouton DOWN en même temps 2s pour accéder au menu des réglages généraux.
- Page 34 Pour garantir une durée de vie de la batterie plus longue et la protéger contre les dommages, utilisez-la et faites-la entretenir selon les lignes guide suivantes: Pendant le trajet, lorsque vous constatez que la charge de la batterie est faible sur l'écran LCD, vous devez recharger la batterie rapidement! 6.2 Appuyez sur le bouton situé...
- Page 35 Procédure pour le chargement Charger le batterie du vélo selon la procédure suivante: 7.1 Le batterie peut être chargée par courant alternatif, l’interrupteur ne doit pas être nécessairement allumée. 7.2 Insérer la prise de sortie du chargeur de batterie dans le batterie de façon sure et ensuite brancher le câble principal du chargeur à...
- Page 36 10. Résolution des problemes simples Les informations suivantes sont fournies comme illustration et non comme une recommandation pour l’utilisateur sur la façon d’effectuer les réparation. Toute solution décrite doit être effectuée par une personne compétente qui est conscient des problèmes de sécurité et connait suffisamment l’entretien électrique.
- Page 37 Après 4 ou 5 heures de 1) La température de l’air est de 40°C 1) Charger la batterie dans une aire à une chargement, le voyant ou plus 2) La température de l’air est température inférieure à 40° C, ou selon les LED du chargeur est sous 0°C 3) Après l’utilisation le vélo instructions du Chap.7;...
- Page 38 11. Diagram and specification We reserve the right, without further notice, makes modifications to the product. For further advice, please contact your vendor. Couleur Fonction Noir Puissance + Batterie rouge Puissance - rouge noir vert hall b blue hall a jaune hall c Moteur...
- Page 39 12. Fiches des principales spécifications techniques Vous trouverez ci dessous le modèle de votre vélo: Modéle Observations E-8400RM E-8400 E-STRADA Quelques données techniques de ce vélo: Vitesse maximum et assistance électrique 25km/h ±5% 36V: 80~90km (chargement total ≦75kgs) Distance pour chargement complet Poids vélo 23Kg Valeur de protection sur tension...
- Page 40 Données techniques croisées de la batterie et du chargeur de batteries: Type de Batterie: Litio Voltage: Capacité: 13Ah LIISTR250 40/40...
Need help?
Do you have a question about the E-STRADA E-8400 and is the answer not in the manual?
Questions and answers
Remplacement du phare avant