Table of Contents
Advertisement
Quick Links
Advertisement
Table of Contents

Summary of Contents for Magicbit Core
- Page 1 STARTER GUIDE www.magicbit.cc...
- Page 2 Welcome to world of Magicbit Magicbit is a feature rich, easy to use and cost effective platform made for everyone. The inbuilt functionalities of Magicbit provide a unique advantage for users to learn and practice a wide range of application areas such as robotics, programming, Internet of Things(IoT) and electronics.
-
Page 3: Table Of Contents
Index Background....................Programming Magicbit.................. Magicbit Layout..................... Magicbit Modules..................Important....................... Getting Started....................Magicblocks.io....................Setup Magicblocks..................Configure Magicbit..................Playground....................Magicblocks Interface................... Hello Magicbit....................Smart Light....................Light meter....................Weather Station.................... Talking Bot....................What is Next....................Supported Platforms..................Magicbit Pinout..................... -
Page 4: Background
Microcontrollers or SoC get inputs from sensors and drive output according to pre programmed logic. As an example, a light sensor sends light level to Magicbit and it turns on a bulb when dark or you can use temperature sensor reading to turn on a fan. -
Page 5: Programming Magicbit
Programming Magicbit Magicblocks.io is an IoT platform to create IoT projects in minutes for both beginners and experts magicbit.cc/magicblocks Age 12+ Arduino is C/C++ based language with a large community all around the world with lot of free resources magicbit.cc/arduino... -
Page 6: Magicbit Layout
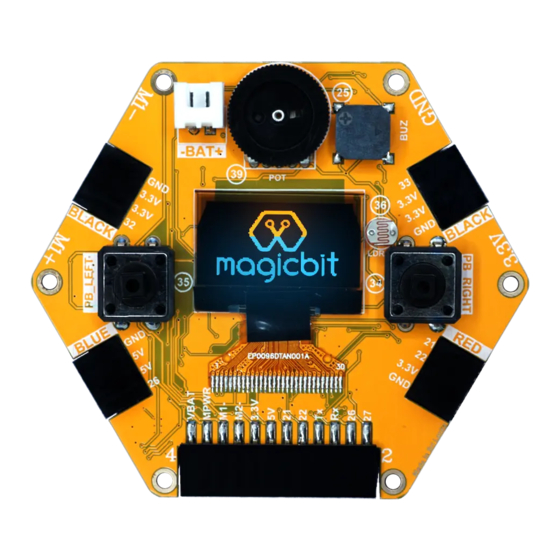
Front Potentiometer Buzzer Rotate to change a value Play sounds Battery Connector Light sensor Plug the battery holder OLED Display Crocodile Clip Holes 128x64 pixel display Attach crocodile clips Push Buttons Digital inputs for Magicbit Expansion Port More connectivity options... - Page 7 Magicbit Rear Micro USB Connect to computer & Power Magicbit Flash Button Reset Need for programming Button ESP32 Module Brain of the Magicbit Motor Driver Connect 2x Motors Indicators Module Connectors Plug modules...
-
Page 8: Magicbit Modules
Digital/Analog Signal Range :5cm Neo Pixel Black Ext Module Blue Ext Module Tilt Sensor Connector to plug the Connector to plug the Detect the incline or soil Moisture and ultrasonic servo motor to Magicbit motion of an object sensors to Magicbit Digital Signal... - Page 9 Magicbit Modules IR Receiver IR Emitter Temp.& Humi.Sensor Detect signals from Transmit IR signal Measure temperature and an IR remote patterns humidity in environment Temp- 0-50°C Humidity 20%-80% Servo Motor Ultrasonic Sensor Soil Moisture Sensor A motor to control the...
-
Page 10: Important
Important Recommended for age 8 years and above. Magicbit is operated with a Voltage of 3.3V and should be handled with care to avoid any damage to user and the device. Following batteries can be used based on your battery holder selection. -
Page 11: Getting Started
Getting Started Connect the Magicbit to the computer via USB cable. When using for the first time, Magicbit self-check program will run on the device displaying different features. Download and install Magicbit upload tool with drivers https://magicbit.cc/downloads/... -
Page 12: Magicblocks.io
This provides some powerful integrations to APIs, Social media, Google services and many more. The customized blocks for Magicbit can be used to integrate Magicbit easily. The software has device management function and it supports Magicbit and other ESP 32 based hardware as well. -
Page 13: Setup Magicblocks
Setup Magicblocks Sign Up & Login Visit https://magicblocks.io and click signup to register as a new user. When you fill & submit the basic details, you will get the activation link via email. Click on the link in the email to activate the account. Once activated, you can login to the account in magicblocks.io START PLAYGROUND... -
Page 14: Configure Magicbit
Click on the configure button and refer to the below instructions Upload magicblocks firmware using the uploader Add your WiFi network SSID (name) and password Connect to Magicbit WiFi network and wait for a beep sound Click on 'Finish' button to complete the configuration STEP 1 : If everything fine, you can see wireless mark on your Magicbit display. -
Page 15: Playground
Playground The playground is a hosted instance of a customized version of the open source, Node-Red . On the left you will find the palette with all the blocks. Once you have created your program, the Deploy button on the top right corner will be used to update and save all your changes. -
Page 16: Magicblocks Interface
Magicblocks Interface Palette Sidebar Workspace Playground Create logic using visual programming... - Page 17 Magicblocks Interface Device Manger Add, edit, configure & view hardware devices Dashboard Create dashboards to visualize data...
-
Page 18: Hello Magicbit
Change Payload to String and type Hello Magicbit. Click done. Display block sends text data to Magicbit OLED display. Open properties and set Device ID of your Magicbit. Device ID can be found on your account Device Manager. - Page 19 STEP 3 : Connect Inject block with Display block using a wire. Drag your mouse from small square on Inject to small square on Display block. Drag from here to display block STEP 4 : Click Deploy button to apply all changes. You can see the blue color dot on blocks disappearing after correctly deployed.
-
Page 20: Smart Light
Control the onboard LEDs on Magicbit via internet. Try different patterns with colors. STEP 1 : Power up your Magicbit using USB cable and get connected to Magicblocks cloud. Check page 11 to configure Magicbit for Magicblocks. STEP 2 : Open playground and drag following blocks to workspace from the block pallet. - Page 21 Digital Output - In digital electronics a pin can take a value such as High or Low. We call this as logic levels. Since Magicbit operates at 3.3V when a pin set to High state, the pin voltage will be 3.3V and when the pin is set to Low state pin voltage will be 0V.
-
Page 22: Light Meter
Develop web based Dashboards with Magicbit to display sensor or input values. STEP 1 : Power up your Magicbit using USB cable and get connected to Magicblocks cloud. Check page 11 to configure Magicbit for Magicblocks. STEP 2 : Open playground and drag following blocks to workspace from the block pallet. - Page 23 LDR (Light Dependent Resistor) is a sensor that changes resistance with the light level. Analog Input - Magicbit has 12bit ADC (Analog to Digital Converter) to get analog voltage input from 0 to 3.3V and convert to digital value of 0 to 4095. That means if you supply 3.3V to analog pin Magicbit gives value as 4095.
-
Page 24: Weather Station
Develop web based Dashboards with Magicbit to display sensor values from different modules. STEP 1 : Power up your Magicbit using USB cable and get connected to Magicblocks cloud. Check page 11 to configure Magicbit for Magicblocks. STEP 2 : Open playground and drag following blocks to workspace from the block pallet. - Page 25 Two DHT11 blocks to read sensor values. Open properties and set Device ID , Pin to 32 & Mode to Temperature in one block and Humidity in other block. STEP 3 : Connect Temperature & Humidity sensor module port with pin 32. STEP 4 : Click Deploy button to apply changes.
-
Page 26: Talking Bot
Try audio playing with Magicbit in different solutions such as text to speech. STEP 1 : Power up your Magicbit using USB cable and get connected to Magicblocks cloud. Check page 11 to configure Magicbit for Magicblocks. STEP 2 : Open playground and drag following blocks to workspace from the block pallet. - Page 27 Try again without switch block. Change template with diffrent text and observe. Do you know? Method in Digital In and Analog In blocks gives option to get data from Magicbit. When Poll option selected you need to request data from those blocks. You need to trigger it using a another block such as Inject Block .
-
Page 28: What Is Next
What is Next You have just started doing some magic with Magicbit. There are thousands of projects you can do. Here are some simple project ideas. Smart dustbin Personal assistant IR Remote Plant watering Water level monitoring Smart AC controller... -
Page 29: Supported Platforms
Supported Platforms Magicbit is supported by most ESP32 compatible platforms Cloud Platforms Blynk - blynk.io Arduino Cloud - create.arduino.cc Thingsboard - thingsboard.io Microsoft Azure - azure.microsoft.com Google Cloud Platform - cloud.google.com Thinger.io - thinger.io Thingspeak - thingspeak.com ESP Rainmaker - rainmaker.espressif.com Amazon Web Services - aws.amazon.com... -
Page 30: Magicbit Pinout
1,3,5,16,17,18,21,22 pins doesn't support analog in function When WiFi is enabled, Analog in working only for pin 32 to 39 Max input voltage for any pin is 3.3V / battery connector is 4.2V 2,4,5,12,15 are strapping pins. learn more at magicbit.cc/pinout... - Page 31 Magicbit Pro includes Magicbit Core and pluggable sensor modules to explore creativity with technology Magicbot Magicbot is a robotic platform developed to plug the Magicbit and program to learn the basics of robotics such as line following, obstacle avoiding and Bluetooth & WiFi controlling. Mobile App Magicbit mobile app supports to bring the sensor data in mobile to Magicblocks environment and provides an output interface for dashboards and notifications.
- Page 32 Magicbit is an innovation platform and a STEM tool made for Internet of Things (IoT), Robotics, Electronics & Programming. It's a great tool to explore creativity with technology. Magicbit was created to make innovation with technology easy for everyone. Whether you are a kid trying to blink a LED or you are an expert working on your next complex IoT project, Magicbit is a perfect tool to solve any problem with innovation.
Need help?
Do you have a question about the Core and is the answer not in the manual?
Questions and answers