
Summary of Contents for SUPERIOR CONTROLS STERLING CONTROLLERS
- Page 1 OWNERS MANUAL STERLING CONTROLLERS INCLUDING MISTING APPLICATIONS 23201 N ., T , CA 90501 ORMANDIE ORRANCE (800) 221-2525 (800) 221-2306 HONE...
-
Page 2: Table Of Contents
TABLE OF CONTENTS Selecting the Location for the Controller ..............3 Mounting the Controller ....................3 Wiring..........................4 Remote Control Interface ....................5 How the Backup System Works..................5 Changing the Battery....................5 Electronic Circuit Breaker....................6 Features List ........................8 Erasing Current Programs ..................10 Basic Programming Instructions ................11 Set Current Time ....................11 Set Today.........................11 Set Water Days .......................12... -
Page 3: Selecting The Location For The Controller
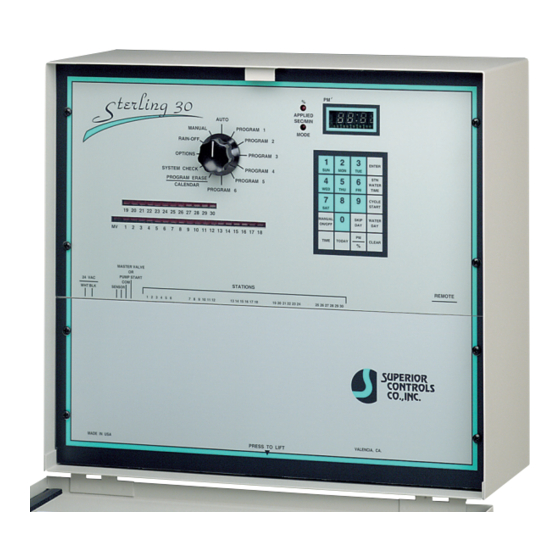
SELECTING THE PROPER LOCATION FOR YOUR CONTROLLER Indoor Wall Mount If possible, always select an indoor location for your controller where you are assured of maximum protection from environmental hazards, accidents, and van- dalism. Mount the controller on a solid, smooth surface shoulder high so the operator can easily see the display and read the faceplate graphics. -
Page 4: Wiring
WIRING Screw a 1/2” condulet to the threaded transformer mounting at bottom of case feeding transformer leads into condulet. Install and secure rigid conduit or armored cable as may be required by local electrical codes. Route two wires from 110 VAC source through condulet and connect one to black transformer lead and the other to the white transformer lead using approved wire nuts. -
Page 5: Remote Control Interface
REMOTE CONTROL INTERFACE The Sterling is designed for direct interface with TRC remote control system from Remote Control Technology, Redmond, Washington. The DC1-1 cable in- cluded with TRC connects directly to the six pin connector labeled Remote on the Sterling for quick and easy installation. When using the TRC , set the dial on the Sterling at the Rain-Off position. -
Page 6: Electronic Circuit Breaker
The battery is kept in a clip holder that is mounted to the rear side of the circuit board and is easily replaced as follows: Shut off the power supply to the controller. Remove the lower plate by removing the two screws that fasten it to the controller enclosure. - Page 7 Common conditions of the electronic circuit breaker include: Fuse and one or more stations alternately flash. CONDITION: Cause: Shorted solenoid coil and/or a short in the valve wires. Cause: Too many valves are operating at the same time. No more than three valves (including master valve) should operate simultaneously.
-
Page 8: Features List
FEATURES LIST In order to take full advantage of the Sterling’s versatility and programming flexibility, we recommend that you become familiar with the features listed below. • Six independent programs that can run concurrently. • Up to nine cycle starts per day in all six programs; or loop watering optional in all six programs for unlimited cycles. - Page 9 • Percentage function to simultaneously increase or decrease the station water time of all stations within a program. • Programmable Rain Off up to 14 days. The controller will resume auto- matic operation on the day following the last programmed “Off" day. •...
-
Page 10: Erasing Current Programs
ERASING CURRENT PROGRAMS All settings within each program (except for current day and current time) can be erased with a single entry. Programs can be erased individually or all at once: To Erase An Individual Program: a. Turn dial to desired program. b. -
Page 11: Basic Programming Instructions
BASIC PROGRAMMING INSTRUCTIONS For misting applications, see instructions beginning in on page 29. If you make a mistake while programming, the controller displays an error mes- sage. Press the Clear key, then repeat correctly the last programming step. Follow the instructions below to set your program(s); or to make changes, dele- tions, or additions to the current program(s). -
Page 12: Set Water Days
3. Set Water Days: Key in a day of the week that watering is to occur and then press the Water Day key. Repeat for all selected watering days. EXAMPLE: Selected watering days are Sunday, Monday, and Wednesday. To program, press: WATER WATER WATER... -
Page 13: Set Cycle Start Times
5. Set Cycle Start Time(s): The cycle start time is the time of day a program will begin watering. For each cycle start time that is set (up to 9), all stations as- signed to the program will water in sequence beginning with the lowest num- bered station. -
Page 14: Incomplete Program Alert
INCOMPLETE PROGRAM ALERT: To check if programming is complete, move the program dial out of its current position. A long beep signals that the programming is incomplete and the program will not run automatically. Move the program dial back to the position it was in to complete programming. To continue programming, turn the dial to the next desired program and follow steps 3 through 5 above. -
Page 15: Station Advance
Advancing To Another Station During A Watering Cycle To advance to another station, first turn dial to program in operation: a. Key in station to which advancement is desired. b. Press Manual On/Off key. c. Return dial to Auto position. Terminating a Watering Cycle Turn dial to program in operation and press Manual On/Off key Return dial to Auto position. -
Page 16: Activating A Station For Its Programmed Time
Activating One Station To Water For Its Programmed Duration To activate station: a. Turn dial to program in which station is included. b. Key in station number. c. Press Stn. Water Time key. d. Press Manual On/Off key. e. Return dial to Auto position. After watering, controller will not advance to the next programmed watering station. -
Page 17: Rain-Off
c. Press Stn. Water Time key. d. Key in number of station selected to initiate watering cycle. e. Press Manual On/Off key. f. Return the dial to Auto position. To terminate cycle prior to completion, press Manual On/Off key while the dial is in System Check position. -
Page 18: Programming A Block Of Stations With A Single Entry
PROGRAMMING WATER TIMES OF CONSECUTIVE STATIONS USING ONE ENTRY This feature is a short-cut method for programming station water time of con- secutive stations with the same watering duration. This procedure replaces step 4 of Basic Programming Instructions. With dial at desired program: a. -
Page 19: Displaying Current Program Settings
DISPLAYING CURRENT PROGRAM SETTINGS Any program setting can be recalled without affecting the program. To display any of the following settings, turn the dial to the desired program. TIME Press Time key and the display will show current time. (The current time is also displayed when the dial is in Auto position.) TODAY Press Today key and the display will show the current calendar... -
Page 20: Water Budgeting
CYCLE Scrolling Cycle Start And End Times Of START/END Programmed Cycle Starts: Press Cycle Start key and the controller will display in sequence all programmed cycle starts, first showing the cycle start number, then the cycle start time, and then the cycle end time. Note: Cycle end time will take into account the water budget percentage. -
Page 21: Programmable Watering Calendar
EXAMPLE A: The new watering duration of each station in Program 1 to be 75% of programmed settings. Turn dial to Program 1, then press: ENTER EXAMPLE B: The new watering duration of each station in Program 2 to be 150% (50% increase) of programmed settings. -
Page 22: Loop Watering
To change the watering calendar: Turn dial to Program Erase/Calendar position. Key in desired calendar length (1-32). Press Enter key. The calendar flashes the number of days in the new calendar. Note: The number entered for Today and Water Days (steps 2 and 3 of Basic Pro- gramming Instructions) cannot be greater than the selected calendar length. -
Page 23: Delay Between Loop Cycles
To set the time that watering will start (beginning of loop), turn dial to desired program. a. Press 9 key. b. Press Cycle Start key. c. Key in the time of day that watering is to start. If during p.m., the next step is to press the PM/% Key. -
Page 24: Manually Starting The Loop Cycle
EXAMPLE A: To schedule a 20 minute delay between cycles, press the follow- ing keys: WATER ENTER TIME EXAMPLE B: To schedule a delay of 2 hours and 30 minutes between cycles, press the following keys: WATER ENTER TIME To change the delay follow steps a thru d above entering the new time at step c. To delete the delay, enter 0 at step c. -
Page 25: Programmable Delay Between Stations
Programming A Delay Between Stations This feature allows for a delay of 1 to 59 seconds between the time one station turns off and the next one turns on during a watering cycle. The delay time is de- ducted from the previous station’s programmed watering time. For example, a station with 5 minutes of programmed watering time will turn off after 4 min- utes, 50 seconds if a 10 second delay is set. -
Page 26: Option 0: Single Program
USING THE OPTIONS Adding to the versatility of the Sterling are nine options, described below, that are used to make certain changes in operation of the controller. Option 0: Single Program This option gives you the flexibility of having two or more programs set, but limiting automatic operation to only that program at which the dial is set. -
Page 27: Option 7: Seconds Mode In System Check
Note: To determine the status of all 17 options (On or Off), turn dial to Options and press Enter key. The controller will scroll thru all options showing each as “On” or “Of ” (Of = OFF). Note: If the dial is turned to a program in which the seconds mode option is ac- tivated, an LED labeled “sec/min mode”... -
Page 28: Option 11-16: Disable Master Valve/Pump Start Circuit
Options 11 thru 16: Disable Master Valve/Pump Start Circuit Options 11 thru 16 are used to disable the master valve/pump start circuit dur- ing operation of a program. Option numbers correspond to program numbers with option #11 corresponding to program 1, option #12 corresponding to pro- gram 2, and so on. -
Page 29: Programming Instructions For Misting Applications
MISTING APPLICATIONS Designed with the greenhouse grower in mind, the Sterling is a highly flexible misting controller in addition to being an ideal controller for virtually all other irrigation applications. The following instructions are for misting applications only. For other watering applications, follow the instructions beginning on page Programming Features Include: •... - Page 30 sage. Press the Clear key, then repeat correctly the last programming step. Follow the instructions below to set your program(s); or to make changes, dele- tions, or additions to the current program(s). Any program setting can be changed without affecting the rest of the program. To erase existing program(s), follow in- structions on page 10.
- Page 31 each program that is intended to operate automatically. Set Water Days: Key in a day of the week that watering is to occur and then press the Water Day key. Repeat for all selected watering days. EXAMPLE: Selected watering days are Sunday, Monday, and Wednesday. To program, press: WATER WATER...
- Page 32 EXAMPLE A: Station 4 to water for 24 seconds, press: WATER ENTER TIME EXAMPLE B: Station 12 to water for 1 minute 40 seconds, press: WATER ENTER TIME To change the watering duration of a station, follow steps a thru d above enter- ing the new duration at step c To delete a programmed station, enter “0’...
- Page 33 EXAMPLE: If cycling is to end at 5:00 p.m., press the following keys: CYCLE ENTER START Set Delay Between Cycles: During the cycling period, watering cycles will repeat immediately unless a delay is scheduled. The “OFF” time between cycles can range from 1 minute to 4 hours and 15 minutes (regardless of whether the program is running in minutes mode or seconds mode).
-
Page 34: Manually Starting Loop Cycle
EXAMPLE To program a pause of 6 seconds, press: WATER ENTER TIME To delete pause, follow steps a through d above, entering “0” at step c. After programming has been completed, watering will begin automatically at the next scheduled start time (beginning of loop). To activate the loop cycle prior to then, follow the instructions below. -
Page 35: Program Review
PROGRAM REVIEW To recall any of the following functions without affecting the Program, turn Pro- gram Knob to the program to be reviewed. TIME Press Time key and display will show current time. TODAY Press Today key. The number shown will correspond to current day of week (Sun.
Need help?
Do you have a question about the STERLING CONTROLLERS and is the answer not in the manual?
Questions and answers
i have sterling 4 installed in year 2020.it is not operating the valves.i canot see any battery behind the board after opening it .what exactly i have to open can you send picture where is battery.
To locate and replace the battery in a SUPERIOR CONTROLS STERLING 4 controller, follow these steps:
1. Shut off the power supply to the controller.
2. Remove the lower plate by unscrewing the two screws that secure it to the enclosure.
3. Remove the four screws securing the main panel to the enclosure. Hold the panel, lower it about one inch, and tilt the top toward you.
4. Access the battery holder on the rear side of the circuit board.
5. Remove the old battery from the clip holder and replace it with a Panasonic 3M BR2325 or an equivalent battery.
6. Re-fasten the main panel and the lower plate to the enclosure.
7. Re-apply power to the controller and enter the current time and day.
This answer is automatically generated
there is no batery in this model.controler. time and programes are ok but master valve does not turn on
one station stays on, cannot change manually
A SUPERIOR CONTROLS STERLING CONTROLLER station may stay on and not change manually due to a short in the master valve or pump start circuit. This can cause the controller to display "Fuse" alternately with "0" and prevent automatic operation. Check the solenoid coil of the master valve, pump start relay, and wiring. After repairs, press CLEAR.
This answer is automatically generated
I tried to erase an individual program following the directions. I pushed 1379 enter and PE flashed on the panel. The following day, the program still started. Any ideas?