
Summary of Contents for MEAVO SOHO
- Page 1 SOHO PHONE BOOTH (A) OWNER’S MANUAL In English, Deutsch, Français & Español ● www.meavo.com ● hello@meavo.com ● (EN) +44 20 3488 5200 (DE) +49 30 8009 85344 (FR) +33 1 84 60 62 10...
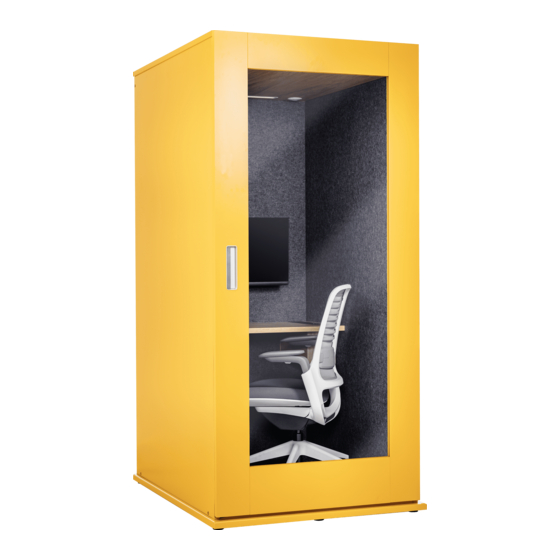
- Page 2 Phone Booths For The Modern Office...
- Page 3 We’re doing our bit for the environment, with every single booth shipped: recycled plastic bottles The acoustic felt in each booth contains over 800 recycled bottles solar lights donated to Zambia Via solar-aid.org/take-action/current-partners planted trees in Madagascar See our forest: ecologi.com/meavo ●...
- Page 5 I N D E X 01 Assembly Manual ......03 Montagehandbuch Manuel de montage Manual de montaje ● ● 02 Troubleshooting ......16 Fehlerbehebung Dépannage Solución de problemas ● ● 03 Care Instructions ......19 Pflegehinweise Instructions d’entretien Instrucciones de cuidado ●...
-
Page 6: Assembly Manual
ASSEMBLY MANUAL MONTAGEHANDBUCH ● MANUEL DE MONTAGE ● MANUAL DE MONTAJE... - Page 7 Hardware Name Part Number Description Quantity SOHO-Bottom Bottom panel What’s in the package SOHO-Back Back side panel SOHO-Right Right side panel (Hinges) SOHO-Shelf Shelf module SOHO-Left Left side panel (Magnets) SOHO-Top Ceiling panel SOHO-Door Door Number Part Number Description Quantity SOHO-FN-005 Screw 6.3x60 mm;...
- Page 9 Overview The assembly is easy – no special tools needed. However, please keep in mind: Tip 1 (EN) This thing is heavy! Use the help of two colleagues, teamwork rocks! (3 people required). (DE) Die Kabine ist schwer! Holen Sie sich Hilfe von zwei Kollegen, Teamwork rockt! (3 Personen erforderlich).
- Page 10 Step 1 (EN) Place the base on the floor and make sure it is level. Adjust the feet if needed. (DE) Stellen Sie die Basis auf den Boden und stellen Sie sicher, dass sie eben ist. Passen Sie die Füße bei Bedarf an. (FR) Placez le socle sur le sol et assurez-vous qu’il soit de niveau.
- Page 11 Step 3 (EN) Add the right side panel. Insert two screws at the bottom and one at the top. Tighten the corner screw in the middle. You can now let go of the backside panel. (DE) Fügen Sie die rechte Seite hinzu. Setzen Sie zwei Schrauben unten und eine oben ein.
- Page 12 Step 4 (EN) Screw in the shelf support bolt. (DE) Schrauben Sie die Regalträgerschraube ein. (FR) Vissez le boulon de support de tablette. (ES) Atornille el perno de soporte del estante. (EN) Slide on the shelf and make sure no cables are in the way. (DE) Schieben Sie das Regal auf und stellen Sie sicher, dass keine Kabel im Weg sind.
- Page 13 Step 5 (EN) Add the left side panel. Insert two screws at the bottom and one at the top. Tighten the corner screw in the middle. (DE) Fügen Sie die linke Seite hinzu. Setzen Sie zwei Schrauben unten und eine oben ein.
- Page 14 Step 6 (EN) Screw in the left bolt underneath the shelf. (DE) Schrauben Sie den Bolzen von der Unterseite des Regals auf der linken Seite ein. (FR) Vissez le boulon du dessous de l’étagère sur le côté gauche. (ES) Atornille el perno de debajo del estante en el lado izquierdo. (EN) Place 2 half-moon washers followed by the nuts on both sides.
-
Page 15: Power Supply
Step 7 (EN) Remove the box cover below the shelf. Plug in the cable coming from the bottom into the power strip in the box. It’s the 1st slot closest to the back panel. When you insert the plug you need to hear it click. - Page 16 Step 8 (EN) Put the ceiling panel on top of the booth in a resting position just be- fore it fits into place. Connect the cables from the backside panel to those of the ceiling panel. (DE) Legen Sie die Decke in Ruheposition auf die Kabine, kurz bevor sie einrastet.
- Page 17 Step 10 (EN) Insert the screws from the top once the ceiling panel is in place. Move the booth to its final position. Do this before sliding on the door (next step) as it will be easier doing so without the door attached.
-
Page 18: Door Handle
Door Handle Step 11 (EN) Slide on the door and attach the interior door handle (see individual steps on the right). (DE) Schieben Sie die Tür auf und bringen Sie den Türinnengriff an (siehe Einzelschritte rechts). (FR) Faites glisser la porte et fixez la poignée de porte intérieure (voir les étapes individuelles à droite). (ES) Deslice la puerta y coloque la manija interior de la puerta (vea los pasos individuales a la derecha). - Page 19 Voilà! Please continue to read the care instructions ►...
-
Page 20: Troubleshooting
TROUBLESHOOTING FEHLERBEHEBUNG ● DÉPANNAGE ● SOLUCIÓN DE PROBLEMAS ●... - Page 21 (EN) Issues (DE) Fehlerbehebung The door isn’t straight (left side hangs lower): Tür nicht gerade (linke Seite hängt tiefer): This can lead to the top magnet not latching (or the bottom magnet latching first). Dies kann dazu führen, dass der obere Magnet nicht einrastet (oder der un- When standing in front of the booth, increase the height of the front right adjust- tere Magnet zuerst einrastet).
- Page 22 (FR) Problèmes inattendus (ES) Problemas inesperados porte n’est droite côté gauche plus bas): La puerta no está recta (el lado izquierdo cuelga más abajo): Cela peut conduire à ce que l’aimant supérieur ne se verrouille pas Esto puede hacer que el imán superior no se enganche (o que el imán infe- (ou que l’aimant inférieur se verrouille en premier).
-
Page 23: Care Instructions
CARE INSTRUCTIONS PFLEGEHINWEISE ● INSTRUCTIONS D’ENTRETIEN ● INSTRUCCIONES DE CUIDADO ●... - Page 24 (EN) Perspex Cleaning Instructions ► Do NOT use regular window cleaning products as the chemicals make the Perspex cloudy over time. ► Do NOT use paper towels as they will scratch the Perspex. ► Use only a soft cotton or micro-fibre cloth. ►...
- Page 25 (EN) Motion Sensor Settings The motion sensor activates the lighting and the ventilation. The sun symbol dial controls the sensitivity. The clock symbol dial controls for how long the lighting and the ventilation stays on after the last detected motion. We recommend setting this to 10 minutes for better ventilation after usage of the booth. (DE) Bewegungssensor-Einstellungen Der Bewegungssensor aktiviert die Beleuchtung und die Belüftung.
-
Page 26: Specifications
SPECIFICATIONS SPEZIFIKATIONEN ● CARACTÉRISTIQUES ● ESPECIFICACIONES ●... - Page 27 (EN) Specifications (DE) Spezifikationen (FR) Caractéristiques (ES) Especificaciones Weight: ~200kg Gewicht: ~200kg Poids: ~200kg Peso: ~200kg Electrical input: 220-240V Elektrischer Eingang: 220-240V Entrée électrique : 220-240V Entrada eléctrica: 220-240 V Electrical output – socket: 220- Elektrische Leistung – Steckdose: Sortie électrique – prise: Salida eléctrica - toma de corriente: 220- 240V 220-240V...
- Page 28 (EN) WARNING ► Before obtaining access to terminals, all supply circuits must be disconnected. ► The appliance is only suitable for the marked values: 230V ► This appliance is not intended for use by persons (including children) with reduced physical, sensory or mental capabilities, or lack of experience and knowledge, unless they have been given supervision or instruction concern- ing use of the appliance by a person responsible for their safety.
- Page 29 (FR) AVERTISSEMENT ► Avant d’accéder aux bornes, tous les circuits d’alimentation doivent être déconnectés. ► L’appareil n’est adapté qu’aux valeurs marquées : 230V ► Cet appareil n’est pas destiné à être utilisé par des personnes (y compris des enfants) ayant des capacités physiques, sensorielles ou mentales réduites, ou un manque d’expérience et de connaissances, à...
- Page 30 The Camden Meeting Pod Ideal for face to face meetings or joining a video call as a group. Available in two sizes suitable for two and four people. Dimensions - Camden Two Exterior H:2150mm W:2100mm D:1000mm Interior H:1975mm W:2030mm D:940mm Dimensions - Camden Four Exterior H:2150mm...
- Page 32 The MEAVO Story All MEAVO office furniture has been carefully designed and crafted using the highest quality EU materials and engineering. Coupled with our British dedication to impeccable customer service, it means you’re getting a unique product that you can enjoy for years.
Need help?
Do you have a question about the SOHO and is the answer not in the manual?
Questions and answers