Advertisement
Quick Links
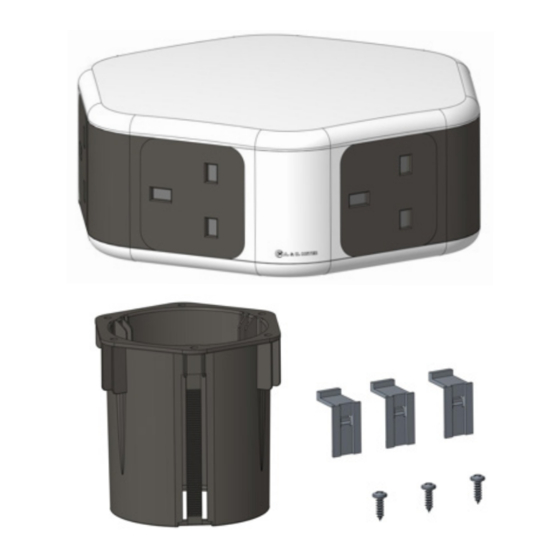
NETBOX Starfish
Installation Guide
1.
Fix the sleeve to the NETBOX Starfish by
fastening the 3 screws
3.
Secure the NETBOX Starfish into position by
inserting the 3 NETClips. Ensure the NETclips
are pushed until the end
Part List
NETBOX Starfish x 1
NETBOX Starfish Fixing Sleeve x 1
NETClip x 3
Pan Head Philip Screw (M2, 9x9.5) x 3
2.
Place the NETBOX Starfish into the pre-cut
80mm grommet hole
4.
Secure cable and insert into power source
or data outlet if required. NETBOX Starfish
is ready to use
A. & H. Meyer Sdn Bhd (528797-M)
No. 3, Jalan Astaka U8/84
Section U8, Bukit Jelutong
40150 Shah Alam, Selangor
Malaysia
T: +603 7845 7277
F: +603 7845 2155
W: www.ah-meyer.com.my
sales@ah-meyer.com.my
For dimensions
Please refer to the back.
Advertisement

Summary of Contents for A. & H. Meyer NETBOX Starfish
- Page 1 W: www.ah-meyer.com.my Pan Head Philip Screw (M2, 9x9.5) x 3 sales@ah-meyer.com.my Installation Guide Fix the sleeve to the NETBOX Starfish by Place the NETBOX Starfish into the pre-cut fastening the 3 screws 80mm grommet hole Secure the NETBOX Starfish into position by Secure cable and insert into power source inserting the 3 NETClips.
- Page 2 NETBOX Starfish A. & H. Meyer Sdn Bhd (528797-M) No. 3, Jalan Astaka U8/84 Section U8, Bukit Jelutong 40150 Shah Alam, Selangor Malaysia T: +603 7845 7277 F: +603 7845 2155 W: www.ah-meyer.com.my sales@ah-meyer.com.my Dimensions 170.7mm 67mm 140.8mm 159.9mm Maximum tabletop thickness: 40mm...
Need help?
Do you have a question about the NETBOX Starfish and is the answer not in the manual?
Questions and answers