Advertisement
Available languages
Available languages
Quick Links
INSTRUCTION
MANUAL
BEDIENUNGSANLEITUNG
MANUEL D'INSTRUCTIONS
MANUAL DE INSTRUCCIONES
MANUALE DI ISTRUZIONI
Rev02(A)
PIBTC02
Toilet Seat
EN
Toilleten Sitz
DE
Siège de toilette
FR
(US / CA) 1-800-556-9829
(UK) 44-808-196-3885
support@pipishell.net
supportjp@pipishell.net (JP)
www.pipishellav.com
WWW.
Asiento del baño
ES
Sedile del water
IT
AMZLAB GmbH
Laubenhof 23,45326 Essen
info@amz-lab.de
THEMIS AR support ltd.
85 Great Portland St, London, United Kingdom.
info@amz-lab.de
Manufacturer: BESTQI INNOVATION (HONG KONG) TECHNOLOGY CO., LIMITED
Address: FLAT/RM 185 G/F HANG WAI IND CENTRE 6 KIN TAI ST TUEN MUN NT
Advertisement

Related Manuals for Pipishell PIBTC02

Summary of Contents for Pipishell PIBTC02
- Page 1 INSTRUCTION MANUAL BEDIENUNGSANLEITUNG MANUEL D'INSTRUCTIONS MANUAL DE INSTRUCCIONES MANUALE DI ISTRUZIONI Rev02(A) PIBTC02 Toilet Seat Asiento del baño Toilleten Sitz Sedile del water Siège de toilette (US / CA) 1-800-556-9829 (UK) 44-808-196-3885 AMZLAB GmbH Laubenhof 23,45326 Essen info@amz-lab.de support@pipishell.net THEMIS AR support ltd.
- Page 2 INSTALLATION INSTRUCTION OF TOILET SEAT Do not exceed the maximum weight capacity indicated. Please do not expose the seat or cover to direct sunlight for too long. Avoid any direct strong light or high temperature. (to prevent Please do not close the seat or from fading)...
-
Page 3: Installation Instruction
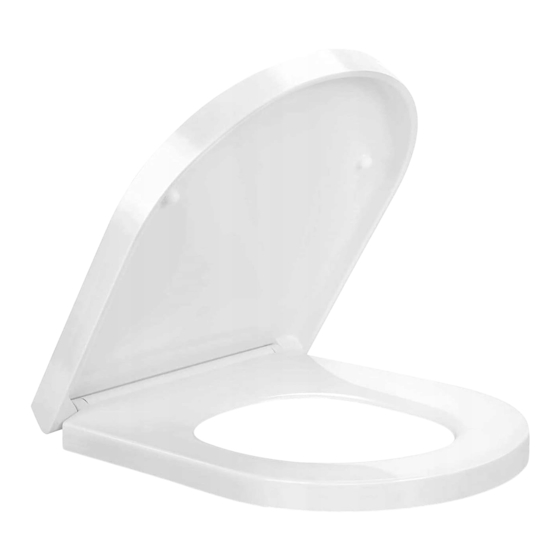
INSTALLATION INSTRUCTION Supplied Parts and Hardware ① Toilet Seat ② Decorative Cover ③ Bolt Included ④ Hinge ⑤ Expanding Grommet(φ12mm+φ14mm) Expanding Grommet Φ12mm fits blank holes between Φ12-15mm Φ14mm fits blank holes between Φ13-17mm ③ ④ ⑤ ②... - Page 4 MONTAGE ANLEITUNG FÜR DEN TOILETTENSITZ 1. Bitte lesen Sie die Anleitung durch und machen Sie sich mit unsrem Deckel vertraut, so dass Sie den Toilettendeckel richtig installieren können. 2. Nach dem Lesen können Sie die Anleitung behalten. Wenn Sie irgendwelches Problem mit unserem Produkt haben, können Sie uns in Verbindung mit dem gegebenen E-mails von Tech-Support setzen.
- Page 5 MONTAGEANLEITUNG Mitgelieferte Teile and Hardware Mitgelieferte Teile nicht im Dübel Schrauben Träger Kappen Lieferumfang A x2 B x2 C x2 D x2 enthalten Dübel A1x2 (Passt die Löcher zwischen Φ12-15mm). A2x2 (Passt die Löcher zwischen Φ13-17mm). Dübel (A) in die Löcher einsetzen. Träger (C) auf die Löcher setzen Die Schrauben (B) leicht anziehen und die Schrauben (B) durch die...
- Page 6 Mode d'Emploi d'Abattant de Cabinet d'Aisance Le Premier. Remarques avant l'Installation 1. Avant d'utiliser ce produit, veuillez lire attentivement ce mode d'emploi pour comprendre les caractéristiques de notre abattant de cabinet d'aisance en UF ou plaque en PP. Veuillez préparer les outils d'installation et installer l'abattant de cabinet d'aisance correcte ment pour éviter d'endommager votre propriété...
-
Page 7: Instruction D'installation
INSTRUCTION D’INSTALLATION Pièces et Matériel Inclus ① Siège de Toilettes ② Couvercle Décoratif ③ boulon ④ Jeu de Charnières ⑤ Œillet d'élargissement(φ12mm+φ14mm) pas compris Rondelle d'expansion Φ12mm s’adapte aux trous vides entre Φ12-15mm Φ14mm s’adapte aux trous vides entre Φ13-17mm ③... - Page 8 INSTRUCCIONES DE INSTALACIÓN DEL ASIENTO DE INODORO No exceder la capacidad de peso máxima. No exponer el asiento o la tapa a la luz solar directa durante mucho tiempo. Evitar cualquier fuerte luz directa o temperatura alta (para evitar que el asiento y la tapa se pierdan el color).
-
Page 9: Instrucciones De Instalación
INSTRUCCIONES DE INSTALACIÓN Piezas y Hardware Suministrados ① Asiento de Inodoro ② Cubierta Decorativa ③ Perno ④ Juego de Bisagras ⑤ ojal expansivo(φ12mm+φ14mm) no incluido Ojal expansible Φ12 mm encaja en agujeros en blanco entre Φ12-15 mm Φ14 mm encaja en agujeros en blanco entre Φ13-17 mm ③... - Page 10 Non superare la capacità massima di peso. Si prega di non esporre il sedile o il rivestimento alla luce diretta del sole per troppo tempo. Evitare la luce diretta forte o le alte temperature. (Evitare di far sbiadire sedile e fodera) Si prega di non chiudere forzatamente il sedile o il coperchio per prolungare la durata della funzione di chiusura...
-
Page 11: Istruzioni Per L'installazione
ISTRUZIONI PER L'INSTALLAZIONE Le parti e Hardware forniti ① Sedile WC ② Copertura decorativa ③ Bullone ④ Set cerniera ⑤ occhiello espandibile(φ12mm+φ14mm) non incluso Gommino Espandibile Φ12mm si adatta a fori vuoti tra Φ12-15mm Φ14mm si adatta a fori vuoti tra Φ13-17mm ③... - Page 12 (US/CA) 1-800-556-9829 (UK) 44-808-196-3885 support@pipishell.net WWW. www.pipishellav.com 860-00066-01 Rev02...
Need help?
Do you have a question about the PIBTC02 and is the answer not in the manual?
Questions and answers