Table of Contents
Advertisement
Quick Links
U
M
SER
ANUAL
A
I
SSEMBLY
NSTRUCTIONS
Dear user,
We have made every effort to ensure the accuracy of the contents of this man-
ual. Should any errors be detected, we would greatly appreciate to receive sug-
gestions to improve the quality of the contents of this manual.
For more detailed technical data about Beamex
station, please contact the manufacturer.
- B
MCS200 C
®
EAMEX
®
MCS200 Calibration Work-
8888000 / MCS200uEng / Version 1
W
ALIBRATION
© Beamex 2015
BEAMEX OY AB
Ristisuonraitti 10
FIN-68600 Pietarsaari
FINLAND
Tel
Fax
E-mail:
Internet:
,
ORKSTATION
+358 - 10 – 5505000
+358 - 10 – 5505404
sales@beamex.com
service@beamex.com
http://www.beamex.com
Advertisement
Table of Contents

Summary of Contents for BEAMEX MCS200
- Page 1 Should any errors be detected, we would greatly appreciate to receive sug- gestions to improve the quality of the contents of this manual. ® For more detailed technical data about Beamex MCS200 Calibration Work- station, please contact the manufacturer.
-
Page 3: Table Of Contents
Assembly Instructions Disposal of Waste Electrical and Electronic Equipment Standard Workstation, Part list ..........7 Beamex and WEEE ............. 35 How to Assemble MCS200 Standard Workstation ....9 Service Corner Unit ................14 How to Assemble the Corner Unit ........14 General ................ - Page 4 ® User Manual - Beamex MCS200 Calibration Workstation, Assembly Instructions - Contents...
- Page 5 Only the next page needs to be strictions; fill in the form when you feel like it (all items need not be answered). faxed to us. Then send it to Beamex using one of the possibilities listed to the right. Internet: http://www.beamex.com...
- Page 6 ____________________________________________ How helpful was the manual in using the product? (Tick a box in the percentage scale below) 10. Any ideas You want to propose to Beamex so that we can im- prove our products, operations and/or services. ____________________________________________ How well did the product suit your needs?
-
Page 7: Part 1, Introduction
Part 1 Things discussed in this part: About this manual. Unpacking MCS200. NTRODUCTION... -
Page 8: General
MCS200 consists of a Bench System. The modular construction of the system allows the user to customize the MCS200 System to practically any measure- ment and calibration application. The modules in the MCS200 System can be grouped into four main types: 1. Host modules (Calibrator modules): ... -
Page 9: About This Manual
MCS200 System. tion Systems available, not only the system at hand. HERE The header of each spread in MCS200 User Manual informs you of where you Example of even page header: User Manual – … – Part 1, Introduction are: The even page shows the part you are in and the odd page shows the main topic you are currently viewing. -
Page 10: Typographical Conventions
Part A, Appendix. If you have to return a module or another part of the MCS200 System to the factory for any reason, include a detailed description of the reason for the re-... -
Page 11: Part 2, Standard Workstations
Part 2 Things discussed in this part: How to assemble the Standard Workstation. How to assemble the Corner Unit. Internal connections inside the Module Rack. Taking the workstation into use. TANDARD ORKSTATIONS... -
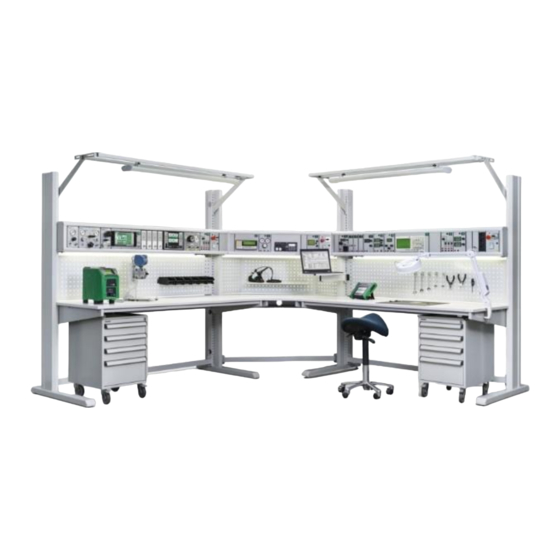
Page 12: General
® MCS200 Calibration Workstation, Assembly Instructions – Part 2, Standard Workstations User Manual - Beamex ENERAL In the Standard Workstation a Module Rack is located above the table top. Each workstation consists of The available widths of the workstations are as follows: a table frame, ... -
Page 13: Assembly Instructions Standard Workstation, Part List
NSTRUCTIONS We recommend that you read all assembly instructions before assembling any of the MCS200 tables. This especially if you have several tables delivered. The basic information is below, but the following chapters are useful when assem- bling several tables connected to each other: ... - Page 14 ® MCS200 Calibration Workstation, Assembly Instructions – Part 2, Standard Workstations User Manual - Beamex C-profiles, 2 pcs 1800 mm table: 890410-XX 1500 mm table: 890409-XX Module Rack supports, 2 pairs 820164-XX Module Rack (None) Table top Std 1800 mm:...
-
Page 15: How To Assemble Mcs200 Standard Workstation
Assembly Instructions - How to Assemble MCS200 Standard Workstation MCS200 S OW TO SSEMBLE TANDARD ORKSTATION How to Assemble the Corner Unit is on page 14. If your delivery includes a Corner Unit, it is recommended to assemble it first. - Page 16 ® MCS200 Calibration Workstation, Assembly Instructions – Part 2, Standard Workstations User Manual - Beamex Fix the table top supports to the legs using M8x30 screws, washers (diameter 16 mm) and M8 nuts. Place the sup- ports to the height shown in the pictures.
- Page 17 Assembly Instructions - How to Assemble MCS200 Standard Workstation Place the panel supports to the height shown in the pic- ture. Place the rubber insulation parts to the three holes under the Module Rack. Place the Module Rack above the panel supports.
- Page 18 Fix the 2 C-profile using M8x30 screws and washers (diameter 20 mm) If your MCS200 does not include the optional PC rack, skip to next page. Fix the PC rack to the C- profiles using M6x20 screws, washers and threaded nuts.
- Page 19 Assembly Instructions - How to Assemble MCS200 Standard Workstation Fix the table top using 5x20 wood screws. Two at the front, two at each table top support and three at the back. Fix the perforated plate on its place. Place the leg covers on top of the legs us- ing M6x12 bolts and washers.
-
Page 20: Corner Unit
® MCS200 Calibration Workstation, Assembly Instructions – Part 2, Standard Workstations User Manual - Beamex ORNER The Corner Unit differs from a Standard/Extension Workstation only by its spe- cial look. A Standard Workstation and an Extension Workstation in a 90 degree angle may be combined with the help of the Corner Unit. - Page 21 Assembly Instructions - Corner Unit Part List Note. CODE Just as for Standard Workstations, the list on the left contains Part name and, if more than one: amount (if applicable) the essential items for assembling the workstation, but it is not Extension leg Vertical part: an exhaustive part list.
- Page 22 ® MCS200 Calibration Workstation, Assembly Instructions – Part 2, Standard Workstations User Manual - Beamex Assembly Instructions For most parts, refer to How to As- semble MCS200 Standard Work- station on page 9. This description briefly presents the parts that are more specific for Corner Units.
-
Page 23: Connecting Several Workstations Together
Warning! module (presented in a separate manual). Before connecting the MCS200 Module Rack to the mains, 2. The frame of the table must never be earthed and it must not get into check that the mains voltage is as marked on the rear contact with a conductive material (for example a radiator or water panel of the MCS200 Module Rack. -
Page 24: Connecting The Workstation To The Pressure Supply
High pressure supply For high pressure output modules there’s a separate supply input connection. The maximum supply pressure is stated on the back panel of the MCS200. For the PO20 pressure output module the maximum supply pressure is 230 bar (3500 psi). -
Page 25: Module Rack's Internal Connections
Assembly Instructions - Connecting the Workstation to the Pressure Supply ODULE NTERNAL ONNECTIONS As the internal connections inside an MCS200 Module Rack depend on the Legend: 1. Main power supply module, including socket outputs for modules installed, it isn’t possible to present all the combinations. The following... - Page 26 ® MCS200 Calibration Workstation, Assembly Instructions – Part 2, Standard Workstations User Manual - Beamex When needed, a pressure filter is delivered with MCS200. Install it before the connection into MCS200, located where it suits your needs.
-
Page 27: Use Of The Workstation General
Use of the Workstation - General SE OF THE ORKSTATION ENERAL Pay attention to the things mentioned in the following list: 1. An appliance that you are going to open for service or maintenance must always be connected to an isolated outlet marked: “ISOLATED. - Page 28 ® MCS200 Calibration Workstation, Assembly Instructions – Part 2, Standard Workstations User Manual - Beamex...
-
Page 29: Part 3, Special Workstations
Part 3 Things discussed in this part: Presenting Special Workstations available for MCS200 system. PECIAL ORKSTATIONS... -
Page 30: General
® MCS200 Calibration Workstation, Assembly Instructions – Part 3, Special Workstations User Manual - Beamex ENERAL This part presents MCS200 Calibration System's Special Workstations. Please note that this part describes the basics of Special Workstations. Do also read the part describing the standard workstation and especially the last chap-... -
Page 31: Electrical Trolley
Electrical Trolley - General LECTRICAL ROLLEY Electrical Trolley is a movable workstation allowing the measuring and testing to be carried out outside a confined work area. When using the electrical trolley, the installation and uninstallation of modules is, in principle, done similarly as for standard Workstations. To uninstall a module: 1. -
Page 32: Heavy-Duty Workstation
® MCS200 Calibration Workstation, Assembly Instructions – Part 3, Special Workstations User Manual - Beamex EAVY DUTY ORKSTATION ENERAL The Heavy-duty Bench System is meant for laboratories where heavy devices are serviced and calibrated. Heavy-duty Workstation's features: Table top thickness 50 mm covered with a laminate surface ... -
Page 33: Appendix
Appendix Things discussed in this part: Safety Issues and Warnings Disposal of Waste Electrical and Electronic Equipment Servicing MCS200 Statements and Warranty Index PPENDIX... -
Page 34: Safety
® MCS200 Calibration Workstation, Assembly Instructions – Appendix User Manual - Beamex AFETY YMBOLS The following symbols concerning electrical safety are used in MCS200 Cali- bration Workstations. Alternating current, AC Direct current, DC Caution! See manual for further information NVIRONMENTAL PECIFICATIONS &... -
Page 35: Safety Precautions And Warnings
AFETY RECAUTIONS AND ARNINGS MCS200 contains precision tools that should be used by skilled people who Use MCS200 only if you are certain of that it can be have read and understood this and possible adjoining manuals. Working with used safely. Safe use is no longer possible in the fol- MCS200 involves the usage of pressure and/or electrical instruments. -
Page 36: General Warnings
ARNINGS Note. Do not use MCS200 in any other way than as described in this User Manual. If this If your MC200 also includes an MC6 Workstation, it contains equipment is used in a manner not specified by the manufacturer, the protection pro- Lithium-Polymer (LiPo) batteries. -
Page 37: General Warnings Concerning Pressure Measurement
Safety - Safety Precautions and Warnings ENERAL ARNINGS ONCERNING RESSURE EASUREMENT The optional pressure T-hose is rated to the maximum pressure of 20 bar at 21°C (290 External Pressure Modules: Use only the pressure media psi at 70°F). Applying higher pressure can be hazardous. We recommend the use of the stated on the pressure module. -
Page 38: Warnings Concerning High Pressure
® MCS200 Calibration Workstation, Assembly Instructions – Appendix User Manual - Beamex ARNINGS ONCERNING RESSURE High pressure is always dangerous. Only personnel with good experience and Check what the local regulations say about construction knowledge of high pressure liquid, air and nitrogen operations are allowed to work with and use of pressurized vessels. -
Page 39: Disposal Of Waste Electrical And Electronic Equipment Beamex And Weee
Disposal of Waste Electrical and Electronic Equipment - Beamex and WEEE ISPOSAL OF ASTE LECTRICAL AND LECTRONIC QUIPMENT WEEE EAMEX AND Beamex is an environmentally conscious company developing products with a view to ensure that they are easy to recycle and do not introduce hazardous materials into the environment. -
Page 40: Service
® MCS200 Calibration Workstation, Assembly Instructions – Appendix User Manual - Beamex ERVICE ENERAL A module that requires service or calibration must be carefully packed and should be accompanied with a letter or note with the following information: User’s name User’s address... -
Page 41: Instructions
6. Unscrew the module's upper fastening screws (see item in adjacent picture). 7. Pull out the module. To install a module, first turn off MCS200's power, remove the upper and low- er cover and push the module in place. Fasten it in the aluminum profiles and Aluminum replace the covers. -
Page 42: Statements
(including but not limited to damage for third par- ties and loss of use, loss of profit and loss of production) in relation with the use of this manual, even if Beamex has been advised of the possibility of such damages. -
Page 43: Intellectual Property Rights
RADEMARKS “Beamex”, “Beamex – World-Class Calibration Solu- The content of this manual is the property of Beamex Oy Ab and/or its subsidi- aries and affiliates (referred hereinafter as Beamex). This manual and its con- tions as well as the color combination of green and... - Page 44 ® MCS200 Calibration Workstation, Assembly Instructions – Appendix User Manual - Beamex...
-
Page 45: Index
Index Disclaimer ..........38 Safety ............33 Specifications NDEX Bench System, Generally ......30 Standard Accessories ....... 4 Headers, described ........3 Taking the Bench System in Use .... 21 About this manual ........3 Trademarks ..........39 Internal Connections Assembly Instructions ....... - Page 46 ® MCS200 Calibration Workstation, Assembly Instructions – Appendix User Manual - Beamex...
- Page 47 Notes Notes...
- Page 48 Notes...