Advertisement
TECHNICAL DATA
- Voltage: 2 x 1,5 V (alkaline batteries AA (LR03))
- Storage temperature: –10-70°C
- Operating temperature: 0-40°C
- Dimensions: 80 x 80 x 23 mm
- Protection degree: IP30
- Radius of action: 12 m
- Angle of emission: 40°
DTIR1 multifunctional remote controller is equipped with an IR transmitter that allows the user to control a number of TERMA-IR equipped heating elements fitted to radiators in one room at the same time. A built-in temperature sensor enables control and regulation of ambient temperature and it's modern construction guaranties easy installation and use. Equipped with a 24 hr timer this controller uses an advanced regulation algorithm to control the temperature requirements to suit all of your current needs.
GENERAL INFORMATION
Optimal location for the fitting of the device:
- Recommended height on the wall ~1.5-1.8 m
- Min. 20 cm from the door and away from all drafts
- Cold walls can decrease displayed ambient temp.
- Best position is the wall opposite to the TERMA-IR heating element.
- Before final installation check the connection quality using hints from 'Signal confirmation'.
- Do not cover the device with towels, clothes etc.
To see mounting holes take off the front panel and take the batteries out.

pic. 1
SIGNAL CONFIRMATION
IR transmitter emits special control signal:
- in cycles — every 10 minutes,
- when user presses any key,
- every time when modes are changed (i.e. AUTO changed to ANTIFREEZE).
Every TERMA-IR equipped heating element placed within the controller's reach and working in the remote mode will confirm every correctly received signal on its front panel (see details in the manual of your heating element).
OPERATING
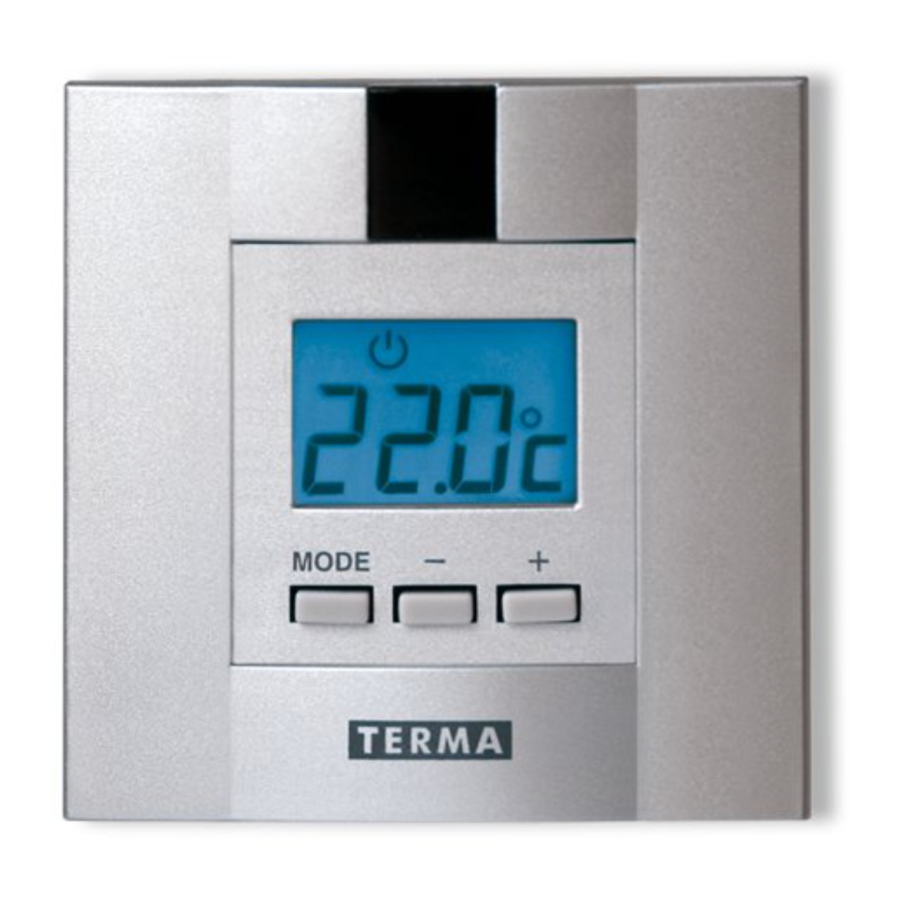
DTIR1 remote controller has an LCD display and 3 keys for operation and configuration (MODE, +, -).

pic.3
The user can define 2 levels of ambient temperature identified by easily remembered symbols:
 COMFORT (Higher temperatures)
 ECONOMY (Lower temperatures)
Each of these levels can be set with accuracy of up to 0.5°C. Both levels can be set according to your own needs and used during the day and night. They can also be changed at any time.
AVAILABLE WORKING MODES:
Manual mode: user changes manually settings of the controller.
Automatic mode (24 hr Timer)  : automatically switches between pre set program, changing between the settings
  or
or  or :
or :
Drying mode: heater is switched on with full power for the time set by user.
ANTIFREEZE  : prevents heating agent (in radiator) from freezing when temperature falls below set point.
BASIC FUNCTION

ATTENTION: A default configuration displays ambient temperature. To change it see paragraph ADVANCED FEATURES
MANUAL MODE
This mode is for the manual setting of the temperature. You can define two temperature levels and record them in the controller's memory as COMFORT and ECO settings. To set COMFORT: press MODE and choose  . Then set exact temperature pressing + and -. To set ECONOMY (ECO) temperature — press MODE and choose
  icon. Then set exact temperature pressing + and -. A thermostat controls the output of the heating element to achieve and sustain a set temperature. To change temperature press + or -.
All changes made in COMFORT and ECO settings will be recorded in controller's memory and later will be used in AUTOMATIC MODE.
DRYING MODE
Choose  symbol by pressing MODE key (other icons off). The time remaining to finish the DRYING mode is displayed on LCD. By pressing + and – set the time from 15 min. to 4 h. After having finished drying time the controller switches to automatic mode.
AUTOMATIC MODE (24 h TIMER)
Enables the heating element to switch on and off using the 24 hr timer and your preset COMFORT and ECO settings according to your programmed schedule. Automatic mode has 96 cells of memory, every single one covers time period of 15 minutes.
For every 15 min you can set one of three settings or or  . The COMFORT and ECO temperatures have to be set in Manual Mode before the AUTO Mode starts. Any manual change during AUTO mode (buttons +/-) lasts for 2 hours and then controller returns to its previous AUTO mode settings.
Default settings of AUTO mode shows picture 1.
TO MODIFY AUTO MODE PERMANENTLY:
|
ANTIFREEZE MODE
Protects the radiator from freezing — the minimum temperature setting is 5°C and the maximum temperature setting is 15°C (buttons + and -). In Antifreeze mode the heating element will stay in the OFF position until the temperature drops below the limit set. To set up ANTIFREEZE mode press MODE button until  appears.
TURNING OFF
To turn off the heating element press MODE button until symbol appears. In this state the ANTIFREEZE saver is off. To activate it you have to choose ANTIFREEZE mode (appears).
TIME SETTING
To set time:
- Press MODE key for 5 sec. (hour-diodes will flash),
- With + and - buttons change the hour then approve it by pressing MODE button.
- Change the minutes (+ and -) and then press MODE to finish.
CHANGE OF DISPLAY INFORMATION
As a default setting the controller displays the current ambient/room temperature. By pressing + or - you are able to display for 5 seconds the desired set temperature. It is possible to set the controller to display the 'set temperature' or 'current time' in- stead of the ambient/room temperature. (User can see other information by pressing + or - button). How to change the display information:
- Press both + and - at the same time for 5 seconds —
![]() icon will start flashing and
icon will start flashing and ![]() icon will appear.
icon will appear. - With + and - keys change the configuration. The changes will be set and displayed after 15 sec.
 icon will start flashing and
current ambient/room temperature

set ambient/room temperature

current time
ADVANCED FEATURES
CALIBRATION OF TEMPERATURE SENSOR
If you notice a difference between a thermometer temperature and your displayed ambient temperature then the temperature sensor has to be calibrated (regulation within +/-5°C, accuracy 0,1°C):
- press both + and - buttons, (the
![]() icon will start flashing)
icon will start flashing) - press MODE so
![]() is displayed,
is displayed, - with + and - keys set value of correction (preset value of correction is 0,0°C).
- after 15 sec. new settings will be written.

Example: Lowering displayed temperature by 1.5°C.

CHANGE OF COMMUNICATION CHANNEL
The TERMA-IR remote controller DTIR1 works with more than two devices (TERMA-IR heating elements) in the same room — in order to do this all of the devices have to be set on the same communications channel (default setting is 0). To change/set channel of communication in DTIR1 controller:
- Enter configuration change mode by pressing + and – key at the same time (
![]() icon is flashing),
icon is flashing), - press MODE until
![]() icon is displayed,
icon is displayed,

- with + and - to set the proper channel (from 0 to 3), the same one must be set in every receiver.
- wait 15 sec to overwrite new settings.
 icon is displayed,
CHANGE OF BATTERIES
The DTIR1 controller will identify when a battery is low by displaying the  icon. The device may work in this state for up to 1 month (dependant on use and until fully discharged). The LCD display works normally but its blue light is not active.
ATTENTION: DO NOT leave discharged batteries inside the device, as it can damage the device and cause in loss of warranty.


Documents / Resources
References
Download manual
Here you can download full pdf version of manual, it may contain additional safety instructions, warranty information, FCC rules, etc.
Advertisement
Need help?
Do you have a question about the DTIR1 and is the answer not in the manual?
Questions and answers