Advertisement
- 1 Introduction
- 2 Dimensional drawings
- 3 Features
- 4 Included items
- 5 Cleaning the unit
- 6 Using the TEAC Global Site
- 7 Product registration
- 8 About TASCAM customer support service
- 9 Names of parts
- 10 Using the unit
- 11 Setting and connecting the controller unit
- 12 Installing the controller unit
- 13 Specifications
- 14 Documents / Resources
Introduction
Before using this unit, read this Owner's Manual carefully so that you will be able to use it correctly and enjoy working with it for many years. After you have finished reading this manual, please keep it in a safe place for future reference.
IMPORTANT SAFETY INSTRUCTIONS

TO PREVENT FIRE OR SHOCK HAZARD, DO NOT EXPOSE THIS APPLIANCE TO RAIN OR MOISTURE.
Dimensional drawings
RC-W100-R120

RC-W100-R86

- Read these instructions.
- Keep these instructions.
- Heed all warnings.
- Follow all instructions.
- Do not use this apparatus near water.
- Clean only with dry cloth.
- Do not install near any heat sources such as radiators, heat registers, stoves, or other apparatus (including amplifiers) that produce heat.
- Only use attachments/accessories specified by the manufacturer.
- Refer all servicing to qualified service personnel. Servicing is required when the apparatus has been damaged in any way, such as powersupply cord or plug is damaged, liquid has been spilled or objects have fallen into the apparatus, the apparatus has been exposed to rain or moisture, does not operate normally, or has been dropped.
- If you are experiencing problems with this product, contact TEAC for a service referral. Do not use the product until it has been repaired.

- Do not expose this apparatus to drips or splashes.
- Do not place any objects filled with liquids, such as vases, on the apparatus.
Features
- Programmable controller with 1 multi-jog dial and 4 buttons that can be used with an MX-8A or another compatible TASCAM device p Enables switching sources and adjusting volume (including muting)
- Functions can be assigned to the multi-jog dial and the buttons using TASCAM MX CONNECT
Two source switching modes available- MODE 1: One mode for selecting sources directly by pushing buttons (up to 4 sources can be assigned)
- MODE 2: Custom source mode for selecting sources from a screen (up to 8 sources can be assigned)
- Easy-to-read display
- Name of the selected source and current volume can be checked
- Automatic backlight off function
- Daisy chaining of up to 8 units is possible using cables rated category 5e or higher (maximum length 200 m)
- Power can be supplied by an MX-8A or another mixer
Included items
This product includes the following items.
Take care when opening the package to avoid damaging the items. Keep the box and packing materials for transportation in the future.
Please contact the store where you purchased this unit if any of these items are missing or have been damaged during transportation.
- Controller unit x 1
- Front cover x 1
- Owner's manual (this document) including warranty x 1
Cleaning the unit
Use a soft dry cloth to wipe the unit clean.
Do not wipe with chemical cleaning cloths, thinner, alcohol or other chemical agents. Doing so could damage the surface or cause discoloration.
Using the TEAC Global Site
You can download updates for this unit from the TEAC Global Site: http://teac-global.com/
In the TASCAM Downloads section, select the desired language to open the Downloads website page for that language.
Product registration
Customers in the USA, please visit the following TASCAM website to register your TASCAM product online. https://tascam.com/us/
About TASCAM customer support service
TASCAM products are supported and warrantied only in their country/ region of purchase.
To receive support after purchase, on the TASCAM Distributors list page of the TEAC Global Site (http://teac-global.com/), search for the local company or representative for the region where you purchased the product and contact that organization.
When making inquiries, the address (URL) of the shop or web shop where it was purchased and the purchase date are required.
Moreover, the warranty card and proof of purchase might also be necessary.
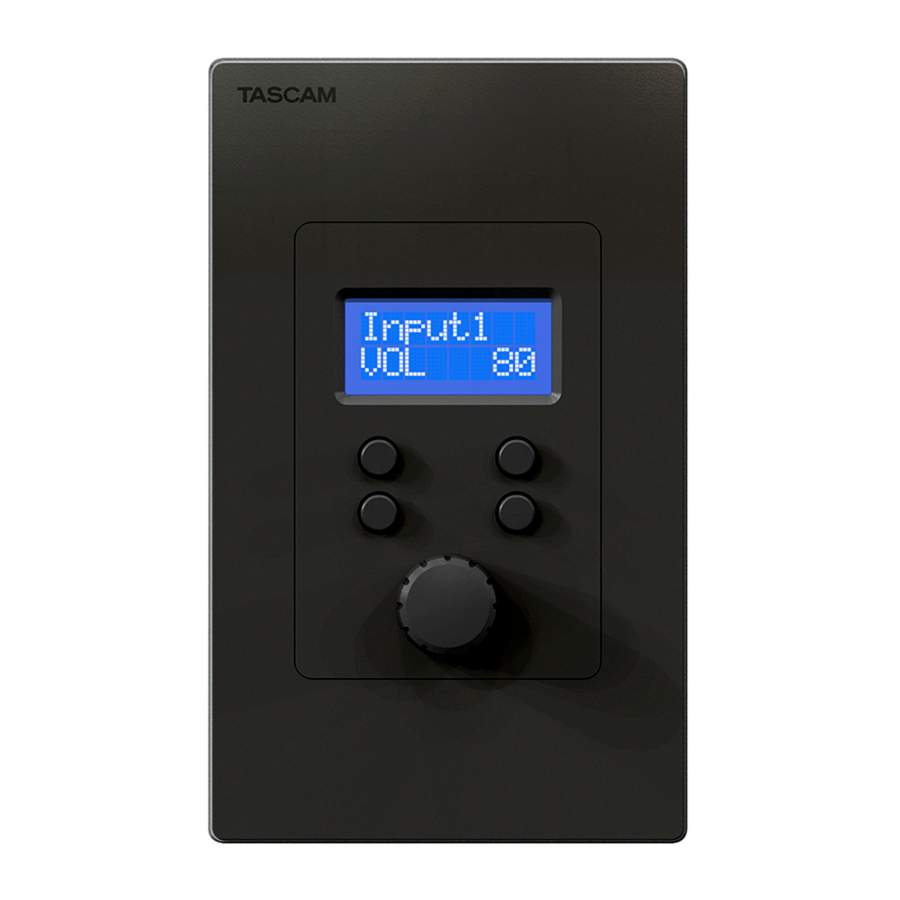
Names of parts

- Display
This shows the name of the selected source and the volume.
![]()
- Input source
- Volume setting

NOTE
- The screen appears as follows depending on the input source status.
When no input source is selected When the selected input source has not been selected by an application or other controller, etc. ![]()
![]()
- The screen will appear as follows depending on the volume setting.
Screen when volume adjustment is disabled Screen when volume is muted ![]()
![]()


- Source select buttons
Their functions change depending on the mode.
See the TASCAM MX CONNECT Owner's Manual for details about switching modes.
MODE 1
Press a source selection button to change the input source set with TASCAM MX CONNECT.
MODE 2
The source selection buttons function as follows.
![]()

- Use the
![]() and
and ![]() buttons to select input sources.
buttons to select input sources. - Press the
![]() button to confirm the selected input source.
button to confirm the selected input source. - Press the
![]() button when an import source is selected to cancel that selection and return to the regular screen. When an input source is selected, > appears before its name.
button when an import source is selected to cancel that selection and return to the regular screen. When an input source is selected, > appears before its name.
![]()
 and
and  buttons to select input sources.
 button to confirm the selected input source.
 button when an import source is selected to cancel that selection and return to the regular screen. When an input source is selected, > appears before its name.
- MULTI JOG dial
Turn the dial to adjust the volume.
Press the dial to mute/unmute the volume.
NOTE
The wheel and button functions of the multi-jog dial can be turned on/ off. See the TASCAM MX CONNECT Owner's Manual for details about changing this.
Using the unit
Do not connect this unit to any connectors other than those on an MX8A or the RS-485 connector on a TASCAM-compatible unit. If they are not compatible electrically, fire or malfunction could result.
NOTE
This product does not include a switchbox to install the controller or installation screws. Use a commercially-available switchbox and installation screws.
Setting and connecting the controller unit
NOTE
- This unit receives power from the connected mixer. Always turn the power of this unit and the connected mixer off before connecting them and always use cables that are category 5e or higher.
- When connecting multiple units in a daisy chain, set the ID of this unit so that it does not overlap with that of others.
- This unit cannot be connected to multiple MX-8A units or TASCAM- supported devices.
Setting the ID of the controller unit
- On the side of the controller with the connectors, set dip switches 1–3 as follows to set the ID to 1–8.

- Set the termination of the controller unit that will be the final one in the chain.
![]()


- When connecting a mixer to only one of these units, set dip switch 4 for that controller to ON.
- When connecting a mixer to multiple controllers, set dip switch 4 for the final controller to ON.
Set dip switch 4 for the other controllers to OFF.
Connecting a mixer to this unit
Use a category 5e or higher cable to connect the RS-485 connector on the mixer to the connector on this unit.
Either of the two connectors can be used for the connection.
- Connecting a mixer to 2 or more units
To connect the mixer using its RS-485 connector to multiple units, connect the units sequentially in a daisy chain.
 ATTENTION
Set dip switch 4 for the final controller to ON.
NOTE
- Up to 8 units can be connected.
- The maximum total cable length from the mixer unit to the last controller unit is 200 m.
- When connecting multiple units in a daisy chain, set the ID of this unit so that it does not overlap with that of others.

Installing the controller unit
- Use screws to attach the controller unit to the switchbox.
NOTE
- For installing an RC-W100-R120, use a switchbox that is compliant with JIS C8340 for a single unit and has a depth of at least 44 mm.
- For installing an RC-W100-R86, use a switchbox that is compatible with a single US type unit and has a depth of at least 44 mm.
- Use screws of a size that matches the switchbox.
- Put the front cover on to the controller unit.
Press it until it clicks into place.
RC-W100-R120

RC-W100-R86


NOTE
To remove the front cover, insert a flat head screwdriver, for example, into the cutouts at its top and the bottom to pry it off. Be careful not to damage the front cover when doing this.
Specifications
Input/output ratings
RS-485 connector
Connector: RJ-45 x2
Cables: category 5e or faster STP cables
Other
Power consumption
0.24 W
Dimensions
RC-W100-R120: 70 x 114 x 54 mm (W x H x D, including protrusions) RC-W100-R86: 87 x 87 x 54 mm (W x H x D, including protrusions)
Weight
RC-W100-R120: 140 g
RC-W100-R86: 140 g
Operating temperature range
0 - 40°C (32 - 104°F)
Trademarks
- TASCAM is a trademark of TEAC Corporation, registered in the U.S. and other countries.
- Other company names, product names and logos in this document are the trademarks or registered trademarks of their respective owners.

Documents / Resources
References
Download manual
Here you can download full pdf version of manual, it may contain additional safety instructions, warranty information, FCC rules, etc.
Download Tascam RC-W100-R120, RC-W100-R86 - Wall Mounted Controller Manual
Advertisement

Need help?
Do you have a question about the RC-W100-R120 and is the answer not in the manual?
Questions and answers