Advertisement
- 1 What's in the box?
- 2 Charging the 6000S
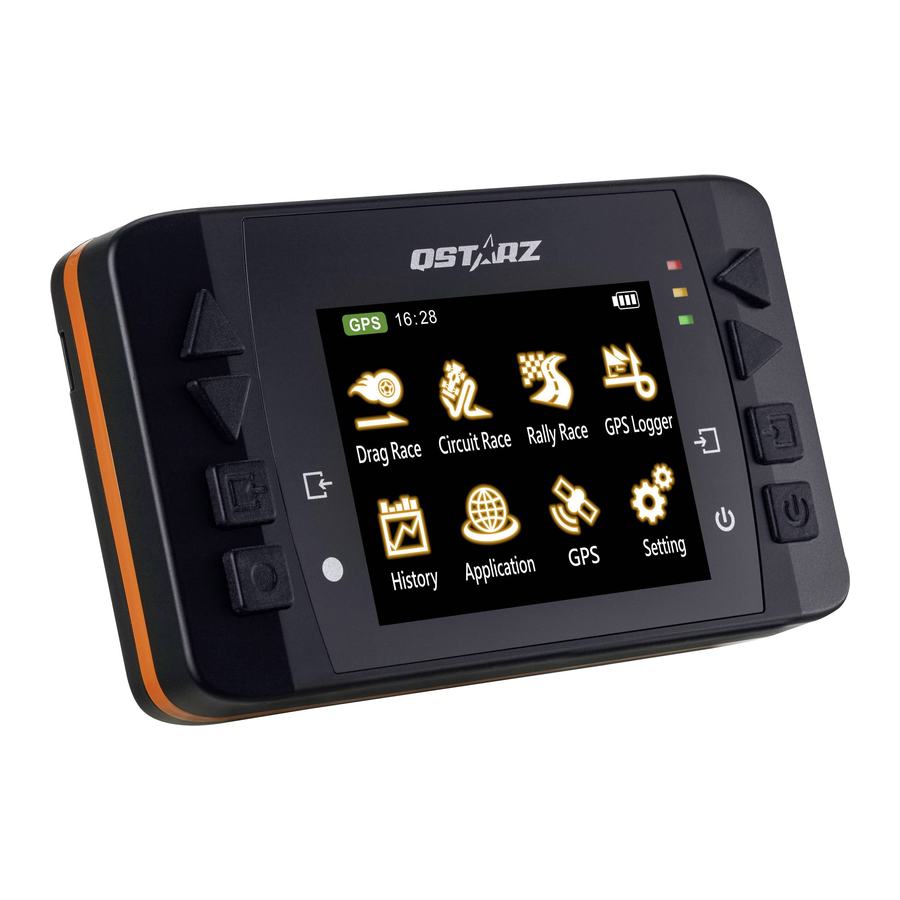
- 3 6000S Function Buttons
- 4 6000S Car Mount Installation
- 5 Install External GPS antenna (Optional accessory)
- 6 Use 6000S on the Circuit Race
- 7 Use 6000S on Drag Race/Performance test
- 8 Operation
- 9 QRacing software
- 10 Product Safety Notice
- 11 Documents / Resources
What's in the box?
Please make sure that you have everything included in the package:

Note: Optional Accessory type is subject to change without prior notice.
Charging the 6000S
Please FULLY charge the 6000S for the first time use by connecting the supplied USB cable through computer or car's cigarette adaptor.

 Orange LED On: On Charging
 Orange LED Off: Fully Charged
※ Charging time is typically 5 hours when device power is Off. A fully charged battery will last about 10 hours operation.
6000S Function Buttons

- Power button: Press 3 seconds to power On/Off.
- Enter/Set button: Press to confirm the selected option.
- Navigation buttons: Press to switch among different options.
- Navigation buttons: Press to switch among different options.
- Back/Cancel button: Press to cancel function and go back to previous screen.
- Multi-function button: Press to start the race and record.
- USB Jack: Device charging/downloading/firmware upgrade.
Reset Button: Shut down the device. (Inside the rubber cover) - External GPS antenna MCX jack (Inside the rubber cover)
6000S Car Mount Installation
Line up the bracket with the screw hole and secure the mounting bracket in place with the provided screw.


Step 1: Line up the suction cup arm with the mounting bracket holes.
Step 2: Snap the mounting bracket onto the suction cup arm.
Step 3: Locate the area on the vehicle windshield where you want to mount the 6000S and lower the locking lever into place to secure the mount to the windshield firmly.
Install External GPS antenna (Optional accessory)
6000S has built-in GPS antenna. You can increase GPS precision and reception quality by installing External GPS antenna. Open the Rubber cover and plug in the GPS antenna connector to antenna jack on the back of 6000S. Make sure to mount the External GPS antenna on the car roof or any metallic surface.

- MCX Plug for connecting to 6000S
- GPS Antenna for receiving GPS Signal. Magnet design can stick to car roof or metallic surface.
Best location to install the External GPS Antenna:

Use 6000S on the Circuit Race
- Use the Navigation buttons to select Circuit Race mode and press Enter button.
![]()
- Select one of the preset Profiles (Practice, Prediction, Race, Challenge, or Custom) you want to use and press Next button.
![]()
- 6000S will auto-detect and display the tracks nearby, select the track and press Next button.
![]()
- Set the track's Beacon Width and other settings. Then press Start button.
![]()
- Once the screen displays Ready you can start timing your race.
![]()


Acquiring GPS Satellite Signals
6000S is for outdoor use; an open sky outdoor environment will enable faster satellite acquisition and provide better positioning accuracy.
If 6000S cannot detect your track's Start/Finish line, you can use attached QRacing software or go to Qstarz website to check and update the latest version.

Use 6000S on Drag Race/Performance test
- Use the Navigation buttons to select Drag Race mode and press Enter button.
![]()
- Select one of the preset Profiles (0-100 km/h, 400 m, 10 sec, or Custom) you want to use and press Next button.
![]()
- Select Compare (Best or Last) & Field option, and press Start button.
![]()


Operation
- Turn off 6000S and connect to computer with USB cable under Internet connection, then QRacing will check and update software version, QRacing trackmap, 6000S firmware, and 6000S AutoMap to the latest version automatically. (Please DO NOT unplug the USB during checking and update process to make sure 6000S can work properly.)

- Download your 6000S racing data into the QRacing software. Select the track you want to analyze.

- In Beacon section, mark the Start/Finish and Split line on the track. Some of the tracks will automatically show the Start/Finish line on the track. You can mark split lines depending on the track size.

- Switch to Analysis section to view and analyze your lap time, the best result will be highlighted in blue.
e.g. Fastest lap is the lap 6
Fastest time from S-1 is lap 7
Fastest time from 1-2 is lap 5
Fastest time from 2-f is lap 6

- The best lap is lap 6 with 01:40 879, but the Best Theoretical Time is 01:40 086, which means there's a 0.793 time difference that you can improve.

- Go to Track section, and analyze the difference of sector S-1 between lap 6 and lap 7.

- Use the replay function to analyze the Track line between lap 6 and lap 7, and compare the difference.
Green track: Lap 6 Orange track: Lap 7

- By zooming the data graph, you can compare the difference between speed, acceleration and deceleration.
You can move the mouse over graph line and left click to mark a red, green or white point.

- It will show a mark on both the graph line and the track line. You can easily see the difference between laps.
When moving the mouse over the track line, it will show the Speed, G value, Time and Distance of that position.

- By comparing the data of red mark and green mark, you can easily compare the track lines and the difference in acceleration/deceleration point, thus find out the reason why lap 7 S-1 is faster than lap 6.


QRacing software
6000S is bundled with QRacing lap timing analysis software for PC Windows OS. Install QRacing software from Qstarz website (http://racing.qstarz.com/Download.html). Input product key at first time use. (The product key is located at Qstarz Warranty Card)

Product Safety Notice
- Keep the 6000S away from heat or high temperature environment. Do not operate the device outside temperature range of -10°C to 60°C.
- To prevent damage, remove the device from the vehicle after use or store it in the glove box and keep away from direct sunlight.
- To reduce the risk of fire or shock hazard, do not expose the device to rain or moisture.
- Do not mount the device in a place where the driver or passengers may receive injury during vehicle operation or collision.
- Clean the unit with a dry and clean soft cloth. Do not use harsh cleaning solvents, chemicals, or strong detergents.
- Do not attempt to open up 6000S by yourself. Unauthorized hacking may damage the unit, and void your warranty.
You can check out Qstarz website to get more information of 6000S.

Ver. C EN 2018-12

Documents / Resources
References
Download manual
Here you can download full pdf version of manual, it may contain additional safety instructions, warranty information, FCC rules, etc.
Advertisement

Need help?
Do you have a question about the 6000S and is the answer not in the manual?
Questions and answers