Advertisement
Overview
This manual contains important information on the safe operation of the device. Read and follow carefully the given operating instructions. Retain the manual for future reference.

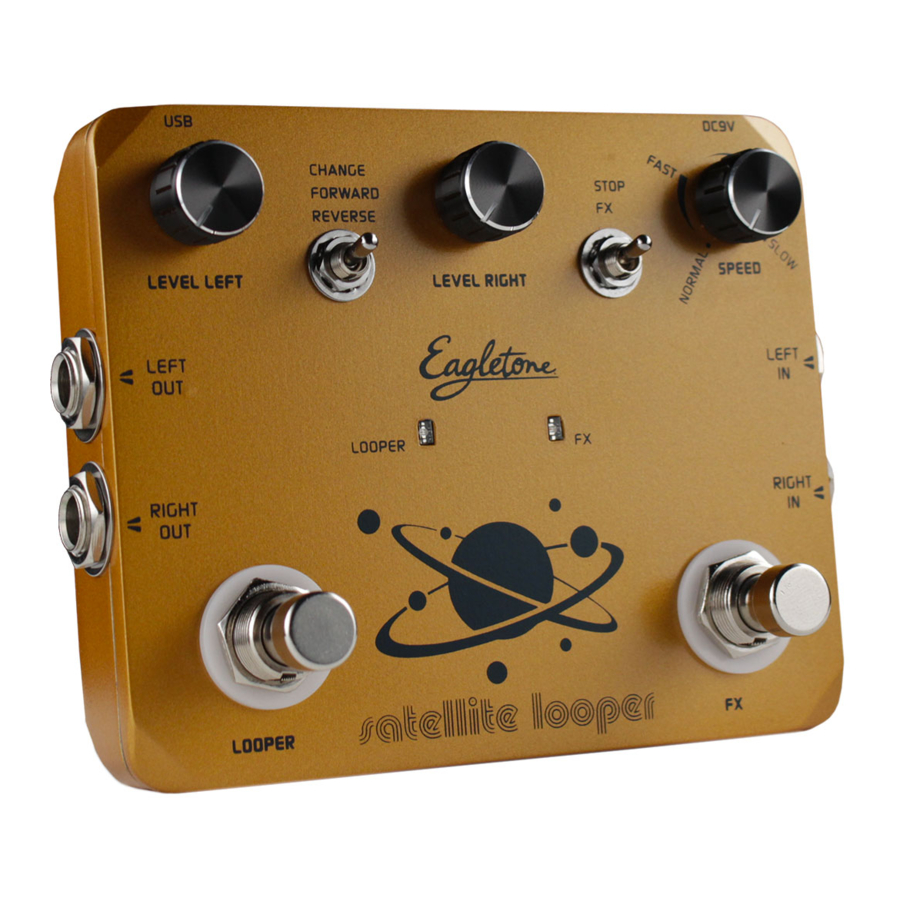
- FX footswitch
- STOP/FX selector controlling the function of the right footswitch
- FX LED indicator
- LOOPER footswitch
- Looper LED indicator
- CHANGE/FORWARD/REVERSE controlling the output of the recorded loop
- Controls the playback speed and pitch of the loop
- Volume control for the left channel
- Volume control for the right channel
- USB
- Voltage supply connector
- Right channel input socket for connecting the instrument
- Right channel output socket for connecting an amplifier, another effect pedal
- Be Left channel input socket for connecting the instrument
- Left channel output socket for connecting an amplifier, another effect pedal.
FX Switch
Use this footswitch to control SATELLITE LOOPER effects or to stop loop playback. The assignment of this footswitch is determined by the setting of the FX selector switch.
FX Selector

This switch determines the function of the FX footswitch.
- STOP position: the FX footswitch is used to stop the recording, the playback or to delete the data.
- In recording mode (LOOPER LED indicator lights up in red) or playback (LOOPER LED indicator lights up in green), press the FX footswitch to stop the recording or the playback. The FX LED indicator will start flashing in green. Once stopped, hold FX footswitch down for 2 seconds until the LED blinks twice quickly. All the recorded data will be deleted.

- FX position: if the FX LED indicator is off, press the FX footswitch to activate the effect. Press again to stop the effect. The FX LED indicator lights up when the effect is on.

FX LED indicator
The colour of the LED is determined by the setting of the FX selector switch and the FX footswitch.
The LED lights up in red when the FX function is activated.
The LED lights up in green when the loop is played backwards.
The light is off if no effect is used.
Looper Footswitch
This footswitch controls all the functions related to the loop (record, playback, undo/redo, clear).
To start recording, press the LOOPER footswitch once. The looper LED indicator will light up in red to indicate that the looper is in recording mode.
Press the LOOPER footswitch again to stop recording. The LED will turn green to indicate that the SATELLITE LOOPER is in playback mode. SATELLITE LOOPER will repeat the loop continuously and the LED will blink green every time the looper reaches the starting point of the loop.
Overdub

Press the LOOPER footswitch while the original loop is playing back. The looper LED turns red to indicate that you are in overdub mode. Press again the LOOPER footswitch to stop the recording mode. The looper LED indicator lights up in green.
You can record as many overdubs as you like.
Undo

In recording mode, hold the loop footswitch down for 2 seconds until the looper LED indicator blinks twice. The undergoing recording has been deleted.
Under playback or overdub mode, hold the loop footswitch down for 2 seconds until the looper LED indicator blinks twice. The last recording has been deleted.
Redo

To restore the last recording, hold the footswitch down for at least 2 seconds until the LED blinks twice quickly. The last recording has been restored.
Stop/Clear
Press twice quickly the LOOPER footswitch in any available mode, the looper LED indicator turns into green.
To stop loop playback/recording and delete everything you have recorded, press the LOOPER footswitch twice in short succession and hold down on the second tap.
The looper LED indicator turns off to confirm that the loop has been cleared.
Looper LED Indicator
The colour of the LED is determined by the setting of the LOOPER footswitch.
- In recording mode: the looper LED indicator turns red.
- In playback mode: the looper LED indicator turns green.
- In overdub mode: the looper LED indicator turns red.
- In stop mode: the looper LED indicator blinks in green, if a recording was made, otherwise the LED remains off.
- In UNDO/REDO mode: the LED indicator blinks green twice to confirm that the operation has been successful.
Change / Forward / Reverse Switch
In normal position: the recorded loop outputs in the same channel as it was recorded (figure 1).

In CHANGE position: the recorded loop outputs in the other channel as it was recorded (figure 2).

In FORWARD position: when the FX selector is in FX mode, the recorded loop outputs forwards in the same channel as it was recorded in.
In REVERSE position: when the FX selector is in FX mode, the recorded loop outputs backwards in the same channel as it was recorded in.
Playback speed
This button controls the playback speed. 11 levels of speed are available.
Normal speed: normal speed.
FAST: different levels. The fastest is 1.5 faster than the normal speed.
SLOW: different levels. The slowest is 2 times slower than the normal speed.
To recalibrate the 11 levels of speed:
- Hold the LOOPER and FX footswitches at the same time.
- Plug the power supply in, the LED indicator turns yellow.
- Turn the speed button to the minimum (normal speed), press the right footswitch once and the green light turns yellow. The first level has been recalibrated.
- Repeat the same process for each level.
Level Left
Use the level control knob to control the left output level of your loops.
Level Right
Use the level control knob to control the right output level of your loops.
USB
Once connected to the computer with a USB cable, two yellow LEDs will light up, indicating that the SATELLITE LOOPER is in USB transfer mode.
You can tranfer audio files but you can't play back at the same time. Please download the software on the product sheet on woodbrass.com.
Only WAV files can be uploaded.
Voltage Supply Connector
9V
Technical specifications
Maximum recording time: 10 minutes
Unlimited overdubs
Input: ¼" phone socket (impedance: 470 kΩ)
Output: ¼" phone socket (impedance: 100 Ω)
Audio format for file exchange via USB: WAV audio, 48 kHz/24 bit
Power supply: DC 9V
Dimensions: 108×90×43 mm
Weight: 362g
Accessories: USB cable.

Documents / ResourcesDownload manual
Here you can download full pdf version of manual, it may contain additional safety instructions, warranty information, FCC rules, etc.
Advertisement


Need help?
Do you have a question about the satellite looper and is the answer not in the manual?
Questions and answers