Newa Mirror NM UVC, Mirror NMHO UVC - UV Sterilizer Instructions
- Also fits for
- Mirror uvc hang on
- Mirror nm uvc 7w
- Mirror nm uvc 9w
- Mirror nm uvc 11w
- Mirror nm uvc 18w
- Mirror nmho uvc 7w
- Mirror nmho uvc 9w
- Mirror nmho uvc 11w
- Mirror nmho uvc 18w
Advertisement
Introduction
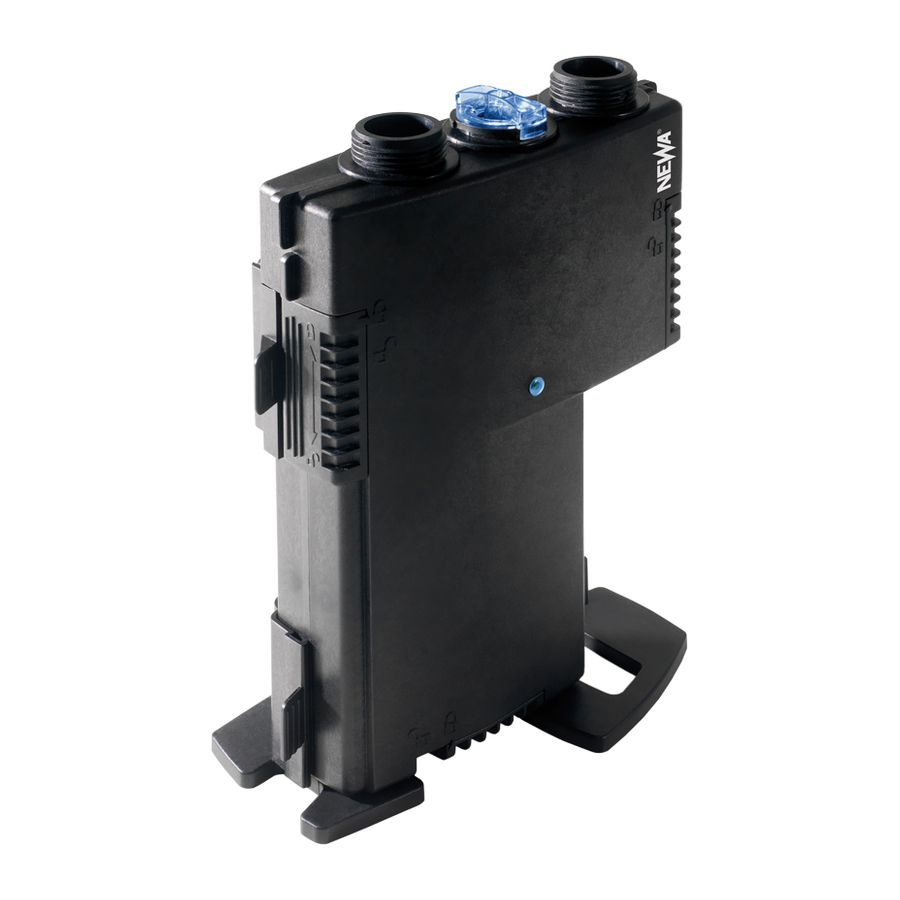
NEWA Mirror uvc and NEWA Mirror uvc hang on are appliances for sterilizing using an integrated UVC lamp for exclusive internal use in marine or fresh water aquariums.
In particular, NEWA Mirror uvc hang on filter is equipped with an integrated pump that is ready to use, whereas NEWA Mirror uvc must be supplied by a specific pump (not provided). These filters remove algae and protect fish from pathogenic bacteria, making the water clean and crystal clear without using chemical products. Any other application is prohibited and, as a consequence, the manufacturer shall not be liable. NEWA Mirror uvc and NEWA Mirror uvc hang on are complied with EU (EN 60335-2-109) safety regulations.
The pump attached to NEWA Mirror uvc hang on filter complies with EU (EN 60335-2-109) safety regulations in force.
IMPORTANT SAFETY REGULATIONS

to avoid any type of accident carefully follow, in addition to the simplest safety measures, the following warnings:

the current symbol on the product label indicates that it is necessary to carefully read this operating instruction manual before operating, using and carrying out maintenance on the appliance.
![]()
disconnect all the electrical appliances in the aquarium before carrying out any installation and maintenance operations. If the connecting plugs of the appliances or the electrical sockets should become wet, disconnect the master switch before disconnecting the power supply cables.- Check that the voltage on the label of the appliances corresponds to the mains voltage.
- Before connecting to the electrical mains, check that the appliances and the related cables are not damaged in any way.
- The power supply lines cannot be repaired or replaced. If damaged, replace the appliances.
- The power supply cables of the appliances must form an appropriate loop facing downwards (DRIP LOOP Fig. 1). This is in order to prevent water from running along the cables and reaching the respective sockets.

- The appliances must be protected up the line by a special differential safety switch (safety cutout) with a maximum trip current of 30mA (Idn≤30mA).
- During installation and using the appliances avoid lifting them by their power supply cables.
- Before putting each appliance into operation, check that it has been correctly installed.
- The appliances must not operate without water.
- It is prohibited to operate the appliances with corrosive or abrasive liquids.
- The maximum temperature of the liquid conveyed must not exceed 35°C.
![]()
the symbol![]() means that the appliances must only be used inside homes.
means that the appliances must only be used inside homes.
![]()
these appliances contain an emitter with UVC rays, which may damage the eyes and skin. Improper use or damage to their protective casing may cause harmful UVC radiation to leak out. If clearly damaged, the appliances must not be used.![]()
the filters are equipped with a safety switch that operates when its housing is opened by switching off the UVC lamp.![]()
It is prohibited to use the UVC lamp on the outside of the appliance.![]()
Never look directly at the UVC lamp when it is switched on.![]()
these appliances contain glass. Handle with due care.- Never connect the filters to the public water supply network.
- For the NEWA Mirror uvc: place it and anchor it firmly near the aquarium with the supplied supports (Fig. 2). For the NEWA Mirror uvc hang on: hang it on the tank through the special recess under the water conveyor (Fig. 3). Make sure that the appliances are secured so that they cannot fall into the water, not even accidentally.
![]()
![]()
these UVC filters must not operate immersed in water. If they should accidentally fall into it, before recovering them, disconnect the plugs from the power supply socket. Take the same care if you should notice that any parts of the appliance are wet.![]()
the appliances are not intended to be used by people (including children) with reduced physical, sensory or mental abilities, or lack of experience or knowledge, unless they have been given, through an intermediary responsible for their safety, supervision or instructions concerning the use of the appliances.![]()
children must be supervised to ensure that they do not play with the appliances, since they are not toys.

 means that the appliances must only be used inside homes.
CAREFULLY KEEP THESE INSTRUCTIONS
INSTALLATION
To prevent any damage, the UVC lamp is supplied ready for assembly in its packaging. Before installing the filter, insert the UVC lamp inside the appliance, following the instructions specified in the paragraph "REPLACING THE LAMP".
It is advisable to use a screwdriver to tighten the two screws, in fixings bag supplied, to the housing in the upper closing hooks.
NEWA Mirror uvc: Attach a pump with a maximum operating pressure of 0.2 bar in the position indicated (Fig. 7). Screw the pipe connectors into their housing, making sure that you correctly mount the seals (Fig. 4). Cut the pipe connector according to the diameter of the pipe used (Fig.5). Position the appliance using the base plate or the "wall" support supplied as required so that they do not enter the water, not even accidentally. The filter must be connected to the aquarium via two hoses (not supplied) and operate with a pump (not supplied).
Switch on the filter by connecting the plug to the power supply socket.


NEWA Mirror uvc hang on: Fasten the telescopic intake tube to the pump and install the appliance on the aquarium as shown in Figure 3, positioning the part with the pump inside the tank. Adjust the length of the telescopic tube according to the depth of the aquarium, and connect both the plugs to the power supply socket.
the UVC filters must not be immersed in water, and the area where they are positioned must not be subject to flooding or overflowing. These appliances can operate as a single filtering system or with other mechanical or biological filters.
ADJUSTMENT
The knob on the top of the filter allows filtering adjustment (Fig. 6). When the adjuster is turned to the maximum position, a high level of UVC filtering is obtained (sterilization). This process is mainly curative, as it is designed to eliminate all types of pathogenic or non-pathogenic living microbe from the water. Instead, when the adjuster is turned to the minimum position, a low level of UVC filtering is obtained (clarification). This procedure is intended to prevent pathogenic conditions and the proliferation of single-celled organisms responsible for forming filamentous algae.

MAINTENANCE
before carrying out any maintenance operations on appliances, carefully read the instructions and disconnect any plugs from the power supply sockets. For excellent filter performance, it is advisable to replace the lamp about every 6000 - 8000 hours (8-12 months).
These filters do not require any special maintenance. It is advisable to clean the quartz pipe if it should be particularly dirty. In this case, proceed as follows:
- Disconnect the plug of the UVC filter from the power supply socket and the plug of the pump that powers the filter;
- Move the unit away from the aquarium;
- Open the casing, following the instructions given in the paragraph "REPLACING THE LAMP";
- Remove the front and rear casing, leaving the manifold on the tank housing and empty the water circuit;
- Completely loosen the two ring tightening nuts (Fig. 8) of the quartz pipe and remove it from its housing;

- Proceed with cleaning the inside. Any limescale may be removed with vinegar, lemon juice or a few drops of muriatic acid diluted with water. Do not use solvents.
- First insert the ring nuts and then the seals of the tube. Then insert the tube into the manifold and securely tighten the ring nuts to prevent water from leaking (Fig. 9).

- Reassemble everything by reversing the operations.
- Before closing the appliance with the front casing (the one with the hooks), it is advisable to carry out an operating test, with a power supply to the pump only, observing for a few minutes that the water circuit fills up and that there are no leaks (Fig. 10).
 ( * ) Components subject to wear and tear.
- If there are any leaks, check that you have carried out the aforesaid operations in the correct manner and try again. Any leaks due to nonobservance of these warnings shall not be any cause for allegations or claims due to loss of water.
- If it is operating correctly, mount the front casing, close the hooks and tighten the two safety screws.
- It is advisable to replace the seals (O-Rings) with original spare parts each time you remove the tube from the manifold to clean it.


 ( * ) Components subject to wear and tear.
LAMP REPLACEMENT
To replace the lamp or install it for the first time, proceed as follows:
- Disconnect the plugs from the sockets;
- Loosen the two screws that anchor the two upper hooks using an appropriate screwdriver;
- Move the three hooks towards the position
![]() ;
; - Open the casing using the special supports for your fingers (Fig. 11);

- Remove the old lamp by pulling it gently downwards.
- Replace the protective support (Fig.12) supplied with the new lamp and mount it by pushing it into the lamp housing until completely inserted.

- Close the housing, move the hooks towards the position
![]() and tighten the two screws.
and tighten the two screws. - Re-connect the plugs to the sockets.
 ;
;

 and tighten the two screws.
to guarantee the correct operation of the appliance, it is advisable to replace the lamp only with original spare parts.
if the appliance is opened without disconnecting the plug, a safety switch will come into operation for user protection. To restore normal operation of the lamp, close the appliance, remove the plug from the socket and put it back in after at least 30 seconds.
WARRANTY
This product is guaranteed, in compliance to European directive 1999/44. as fee from faults both in materials and workmanship for a period of 24 months from date of purchase. If the product fails to operatecorrectly within the first two years of the date of purchase, return it to the retailer where it was purchased. The product shall be replaced free of charge. During the period of warranty the product shall be replaced if:
- The product is returned carefully packaged and has not been damaged intransport.
- Proof of purchase is supplied along with a detailed explanation of reasons for the claim.
The warranty is subject to the following restrictions and conditions:
- The warranty does not cover accidental damage or breakage.
- Replacement of the product in no way represents admission of responsibility.
- The warranty is not valid in the case of improper use, and does not cover damage caused by tempering or negligence on the part of the purchaser.
- The warranty is not valid for components subject to wear and tear [ see (*) ].
ITALY:
NEWA TECNO INDUSTRIA Srl
Via dell'Artigianato 2 - 35010 Loreggia (PD)
Tel. +39 049 5794069
Fax +39 049 5794699
Numero Verde 800-860306
www.newa.it
| MODELS | STERILISATION | CLOUDINESS |
| NM NM HO | For Aquariums Lt | For Aquariums Lt |
| 7 W | 30 - 80 | 60 - 350 |
| 9 W | 60 - 140 | 100 - 550 |
| 11 W | 120 - 200 | 160 - 800 |
| 18 W | 190 - 320 | 250 - 1100 |
SPARE PARTS
| NM NM HO | LAMP | O RING FOR QUARTZ TUBE (2 pcs) |
| 7 W | 00.184.001 | 00.184.005 |
| 9 W | 00.184.002 | |
| 11 W | 00.184.003 | |
| 18 W | 00.184.004 |
MADE IN ITALY

Documents / Resources
References
Download manual
Here you can download full pdf version of manual, it may contain additional safety instructions, warranty information, FCC rules, etc.
Download Newa Mirror NM UVC, Mirror NMHO UVC - UV Sterilizer Instructions
Advertisement
Need help?
Do you have a question about the Mirror uvc and is the answer not in the manual?
Questions and answers