Advertisement
SG6000 RF Signal Generator User Manual
DS Instruments' various signal generator models are all designed to be as intuitive as possible, ether being
controlled by the front panel, or from the USB/Ethernet interface. Buttons and front panel modes are similar
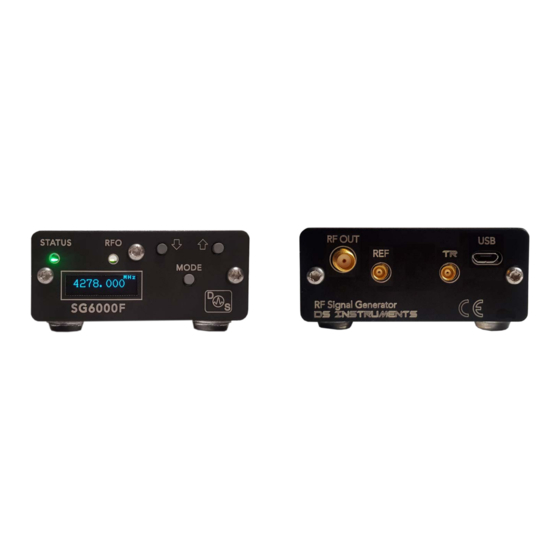
Stand-Alone Use Quick Setup:
Connect your device to a standard USB port or 5 Volt power source using the included USB cable. A desktop,
•
laptop computer, or smart-phone charger should work. Avoid using unpowered USB hubs or long USB cables.
Blue USB 3.0 ports are preferred due to their high current capabilities.
Connect an external 10MHz reference source to the rear reference MCX connector if desired. If no external
•
source is detected, the unit will use its own internal source. Searching for an external frequency only occurs at
boot-up, do not connect an external reference after the unit is already powered up.
Press the red power button if available on your device. The screen will display the model number and firmware
•
version. The unit will beep indicating boot-up and the green power LED should light up.
The unit is now ready to accept front panel changes or a data connection from the control software.
•
To cycle between front control modes, hold the MODE button down until there is a beep (~0.5 seconds). The
•
default mode is integer frequency, followed by fractional frequency, power output level, power vernier, RF
output on-off, and save system state.
The RFO led indicates that the device is successfully locked to the reference and providing the desired frequency
•
on the rear SMA output port.
SCPI/COM/Computer Control Use Quick Setup:
•
Connect your device to a standard computer USB port using a high-quality USB cable.
Connect an external 10MHz reference source to the rear MCX connector if desired. If no external source is
•
detected, the unit will use its own internal source. Reference auto-detection can be overridden in the GUI if
desired.
•
Press the red power button if available on your device. The screen will display the model number and firmware
version. The unit will beep indicating boot-up and the green power LED should light up.
•
Windows should now install the standard virtual COM port driver. Wait for this to complete.
Version 4.0 – DS Instruments 2022 – www.dsinstruments.com
across all models.
Advertisement
Table of Contents

Summary of Contents for DS SG6000
- Page 1 SG6000 RF Signal Generator User Manual DS Instruments’ various signal generator models are all designed to be as intuitive as possible, ether being controlled by the front panel, or from the USB/Ethernet interface. Buttons and front panel modes are similar across all models.
- Page 2 • Download and open the DS Instruments Signal Generator Control GUI from the website. Install any .NET framework updates from Microsoft if needed. • Select a COM port from the top select list and press CONNECT to try to control the unit. If the select box turns green then a connection has been established.
- Page 3 • The Abort button immediately stops the device mid sweep. • The Trigger button emulates the physical trigger input pin by sending a command to start the sweep now. Version 4.0 – DS Instruments 2022 – www.dsinstruments.com...
- Page 4 Notes A complete SCPI command list is located on the website (https://www.dsinstruments.com/downloads/) • Tech support email can be reached at support@dsinstruments.com • Version 4.0 – DS Instruments 2022 – www.dsinstruments.com...
Need help?
Do you have a question about the SG6000 and is the answer not in the manual?
Questions and answers