Table of Contents
Advertisement
Quick Links
Advertisement
Table of Contents

Summary of Contents for Cima CONTROL PIG
- Page 1 NSTRUCTION ANUAL CIMA CONTROL PIG Rev. 1.58 C of 09/2019...
-
Page 2: Table Of Contents
EXAMPLES OF .CSV FILES ........................22 CONNECTORS PLAN ..........................26 CONNECTION SCHEME ........................... 28 TAGS AND MARKER SYSTEM ......................... 29 TROUBLE SHOOTING ..........................31 Serial No CIMA CONTROL PIG Serial No : ..Electronics Control Units Telescopic Tube Support Antenna... -
Page 3: Functions And Features
FUNCTIONS AND FEATURES The CIMA CONTROL PIG indicator weighs the animals during their passage on the platform and has memory functions of the detected weights. It allows acquiring and storing more weight data, supplying the total amount and the average of weighed animals. This electronics allows to store up to 200 acquisitions that can be saved in special files in a format compatible to Excel and downloaded on SUB Pen Drive. -
Page 4: Technical Features
➢ Weighing system for pig in motion. ➢ Surcharges control system ➢ Total calculation of weighed animals. ➢ Possibility manage International ➢ Average calculation of the weighed animals. measurement units ➢ Weighing storage in an archive menu. ➢ Calibration through sample weight ➢... -
Page 5: Keys Functions
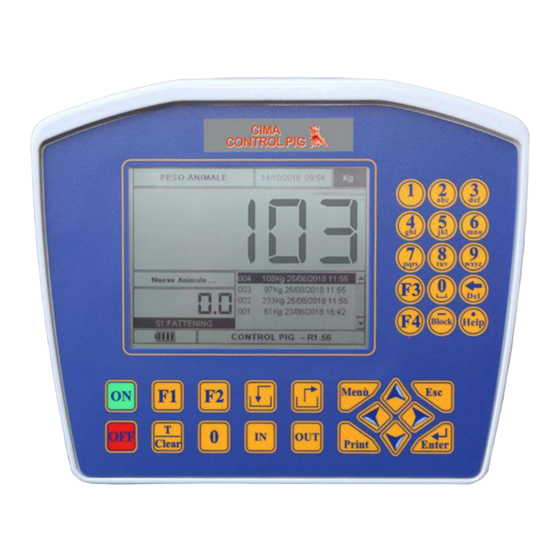
KEYS FUNCTIONS ➢ ON ➢ OFF ➢ ACCESS TO USER MENU ➢ ENTER ➢ SET THE NAME OF THE WEIGHING ➢ EXIT ➢ SET TIME FOR SPRAY MARKER ➢ SHIFTING THE CURSOR UPWARDS ➢ SHIFTING THE CURSOR DOWNWARDS ➢ PASS TO THE PREVIOUS PAGE ➢... -
Page 6: Use Of Directional And Numeric Keyboard Keys
USE OF DIRECTIONAL AND NUMERIC KEYBOARD KEYS FUNCTION OPERATION DISPLAY To use the scale function in the best way, it is better to know the keys to move in all menus and submenus. Please find here below all functions of different keys to move. To move the cursor highlighted on the display, please use the following keys: ➢... - Page 7 ENTRY OF TEXT AND NUMBERS It is possible to enter text and numbers by means of the numeric keyboard. By repeatedly pressing the keys, it is possible to enter other characters than the ones present on the keyboard. If the weighing indicator is used in Russian language, the representation in this language is displayed on the numerical keyboard.
- Page 8 ANIMALS IDENTIFICATION TRANSPONDER READING (OPTIONAL) With the CONTROL PIG series weighing indicators it is possible to associate the weighs of each animal with a unique identifier. The identification of the animals through the use of Transponder (Optional) allows to keep the weight value under control throughout the life of the animal, therefore to evaluate the daily weight variations.
-
Page 9: To Start - Basic Functions
TO START – BASIC FUNCTIONS FUNCTION OPERATION DISPLAY The operations described below concern the basic functioning of the weighing indicator. For extra information, please go on reading this document. Press The weighing indicator is equipped with an internal Switching ON battery that can operate for 8 hours. - Page 10 FUNCTION OPERATION DISPLAY In the MOMENTARY WEIGHT page screen it is displayed the measured weight value of the animal on the weighing indicator. To reset the measured weight value please keep MOMENTARY WEIGHT pressed the key for 3 seconds until the confirmation message appears.
- Page 11 FUNCTION OPERATION DISPLAY Once the "STILL ANIMALS" WEIGHING MODE has been started, you need to press to end it up. Once the key is pressed, a message confirming the closure will appear and the request to provide a label (name) which, in the WEIGHINGS HISTORY menu, will be associated with all the acquisitions of the current "STILL ANIMALS"...
- Page 12 FUNCTION OPERATION DISPLAY To start the "ANIMALS IN MOTION" WEIGHING MODE and display the weight value of the animal it is necessary that this passes by on the platform. At the top of the screen the weight of the last animal passed by on the platform will be displayed.
- Page 13 FUNCTION OPERATION DISPLAY Once the "ANIMALS IN MOTION" WEIGHING MODE has been started, press to end it. Once the key is pressed, a message confirming the closure will appear and the request to provide a label (name) which, in the WEIGHINGS HISTORY menu, will be associated with all the acquisitions of the current "...
- Page 14 FUNCTION OPERATION DISPLAY MENU Press to enter the main menu. Access to the Main Please remind that it is not possible to enter any menu Menu until the weighing in progress is not stored.
- Page 15 HELP In the CONTROL PIG weighing computer there are screens to help the user to understand better: ➢ the functionality of the keys ➢ operation, settings and any options. The Help screens are contextual and show descriptions of the menu that the user is viewing.
-
Page 16: Main Menu
MAIN MENU FUNCTION OPERATION DISPLAY In this MENU is reported the list of the submenus that can be selected to enter a part of the weighing indicator functions. MAIN MENU In this screen page you can enter from the WORKING MENU by pressing Inside the main menu the following submenus are available:... -
Page 17: Submenu
SUBMENU FUNCTION OPERATION DISPLAY The ANIMALS CHART submenu displays all the WITHOUT TRANSPONDER acquisitions of the CURRENT WEIGHING. READER If no weighing has been started, the ANIMAL CHART will be empty. Using keys it is possible to scroll through the various weighings starting from the most recent. In addition to the data in the table: ➢... - Page 18 FUNCTION OPERATION DISPLAY In this submenu it is possible to conclude the AUTOMATIC WEIGHING by pressing After pressing the key you will see a closure confirmation message and the request to provide a label (name). Once the AUTOMATIC WEIGHING has been completed, the ANIMAL TABLE is reset.
- Page 19 FUNCTION OPERATION DISPLAY It is possible to reset the weighings history; to do this it is necessary to hold down the keys for a few WEIGHINGS seconds until the operation confirmation screen appears. ARCHIVE Once the screen appears, confirm the operation or cancel everything.
- Page 20 FUNCTION OPERATION DISPLAY The PROGRAMMABLE OUTPUT submenu can only be used in ANIMALS IN MOTION mode. It is also necessary to have the device Multilink DRIVE 8 / CP to use this feature. In the submenu it is possible to set the intervention thresholds of the COLOR SPRAY RELAYS and the direction of the thresholds.
- Page 21 FUNCTION OPERATION DISPLAY This feature is only available when the indicator is powered by internal lithium batteries (version with internal batteries) and allows to lengthen the discharge time of the batteries. In the scales with internal battery, the BRIGHTNESS REDUCTION function can be accessed by pressing key BACKLIGHT You can set a time in seconds after which the display BRIGHTNESS...
- Page 22 FUNCTION OPERATION DISPLAY In the submenu WEIGHT IN REVERSE it is possible to set out the "Reverse" visualization of the weight values. In order to modify the visualization setting "Weight in reverse" from ON to OFF, and on the contrary, use the keys WEIGHT IN Press...
- Page 23 FUNCTION OPERATION DISPLAY In the USB BACKUP submenu it is possible to manually export all the data related to the WEIGHINGS HISTORY on the USB Pen Drive. In particular, this menu has the function of recovering previously downloaded data on the USB Pen Drive. USB BACKUP To start the data backup procedure, press NOTE: the file is created in .CSV format (can be...
-
Page 24: Examples Of .Csv Files
EXAMPLES OF .CSV FILES .CSV FILE CONTENT In this paragraph is analyzed the content of the .CSV files, which can be downloaded on a Pen Drive through the special connector. This special format can be opened by a program of calculation spreadsheet (for example Microsoft Excel), in order to allow the data elaboration from PC. - Page 25 PRINT EXAMPLES ON .CSV FILE WITHOUT ACTIVE TRANSPONDER Firstly the different acquisitions are analyzed (they are visualized chronologically). For each one the following data are specified: A. Progressive number of the current weighing (N.) B. Recorded animal weight (Kg) C. Acquisition date of the animal weighing D.
- Page 26 PRINTING EXAMPLES ON .CSV FILE WITH ACTIVE TRANSPONDER First the different acquisitions are analyzed, displayed in chronological order. For each of them is specified: A. Current weighing progressive number (N.) B. Animal detected weight (Kg) C. Transponder ID D. Animal weighing acquisition date E.
-
Page 27: Connectors Plan
CONNECTORS PLAN Connector “A”: USB connector to insert the pendrive Connector “B”: 5-pin female connector for the connection of load cells. Connector “C”: 2-pin female connector for power supply. Connector “D”: 7-pin female connector for optionals and accessories CONNECTOR “B” – 5-PIN FEMALE CONNECTOR FOR LOAD CELLS CONNECTION CONTACT FUNCTION Negative signal... - Page 28 CONNECTION CABLES Please find here below the description of all types of standard cables to be connected to the scale connectors. JUNCTION CABLE WITH 5 PINS CONNECTOR In the junction cable with 5 pins connector, on one side there is a 5 pins male connector to connect to the "B" connector of the scale, while on the opposite side the are some conductors available to be used for the connection to the load cells (without 5 pins connector), inside a junction box.
- Page 29 CONNECTION CABLES - “D” CONNECTOR (7-PINS PANEL FEMALE FOR OPTIONALS) The AUTOMATIK MARKER module connection cable can be connected to the "D" connector Cable Type: 6x0,5 mm Cable Length: 3 m 7-pins male connector Front sight 5 pins panel female connector Front sight The "...
-
Page 30: Connection Scheme
CONNECTION SCHEME Load cells junction 1° 2° Load cells junction... - Page 31 TAGS SYSTEM OPTIONAL Electronic Control Unit TAGS Antenna Tags DESCRIPTION FUNCTION Connector 4 Pins For connection to a battery charger. Antenna Cable For connection to tags antenna. Cable and Connector 7Pins For interfaces between electronics control units. On/Off Switching on and off the electronics control unit Tags. Reset magnetic field antenna, to be operated at every start and Tune weighing cycle.
- Page 32 MARKER SYSTEM OPTIONAL DESCRIPTION FUNCTION Connector 5 Pins For interfaces between electronics control units. Connector Yellow For connection Automatic Marking to Marker 1 Connector Black For connection Automatic Marking to Marker 2 Marker Marker 1 Marker Marker 2...
-
Page 33: Trouble Shooting
TROUBLE SHOOTING ERROR ACTION TO CARRY OUT EFFECT SOLUTION DESCRIPTION The message ERROR The scale was out of range; by pressing disappears and the the key T/CLEAR the problem was solved weight becomes stable. through the scale software. Press T/CLEAR and then Either message Check the integrity of the weighing system... - Page 34 ERROR ACTION TO CARRY OUT EFFECT SOLUTION DESCRIPTION The scale still switches Disconnect the cable controlling Contact service. off. the alarm of the scale, by means of the 7-pin connector. The weight shown is The calibration of the system was The weight shown by Carry out a new calibration of correct.
Need help?
Do you have a question about the CONTROL PIG and is the answer not in the manual?
Questions and answers