
Summary of Contents for NICEDAY 305M
- Page 1 NICEDAY INDOOR CYCLING BIKE MANUAL MODEL:305M Please read this manual carefully before installing and using the bike, and save for further use.
-
Page 2: Table Of Contents
Contents WARNING DECAL PLACEMENT..............CUSTOMER SERVICE ................. SAFETY INSTRUCTIONS ................3 PRODUCT OVERVIEW ................5 ASSEMBLY INSTRUCTIONS ..............7 ADJUSTMENT INSTRUCTIONS ............. 13 MONITOR SPECIFICATION ..............15 APPLICATION .....................18 WARRANTY....................26 WARM UP..................... 27 MAINTENANCE..................28... -
Page 3: Warning Decal Placement
Warning Decal Placement... -
Page 4: Customer Service
Customer Service If you have any concerns, please feel free to contact our customer service at: >> Email address: NicedayCycling@outlook.com >> Contact us via Amazon: Login to your Amazon account > choose "Your orders" > find the order ID > click "Contact seller"... -
Page 5: Safety Instructions
Safety Instructions ATTENTION Please read through the manual carefully before installing and using the bike, only correctly installed, proper maintenance and using correctly can reach the safe and efficient result. All EXERCISERS MUST READ ALL INSTRUCTIONS BEFORE USING THE BIKE. 1) Before using this exercise bike, please consult your doctor to confirm whether your physical conditions allows or they might be some potential injuries that may endanger your health and safety. - Page 6 6) Warning: Please put this machine on stable and horizontal level ground to install. And follow the installing instructions to assemble this machine. If any parts found missing, or any noise found, please stop use this bike, please contact our customer immediately.
-
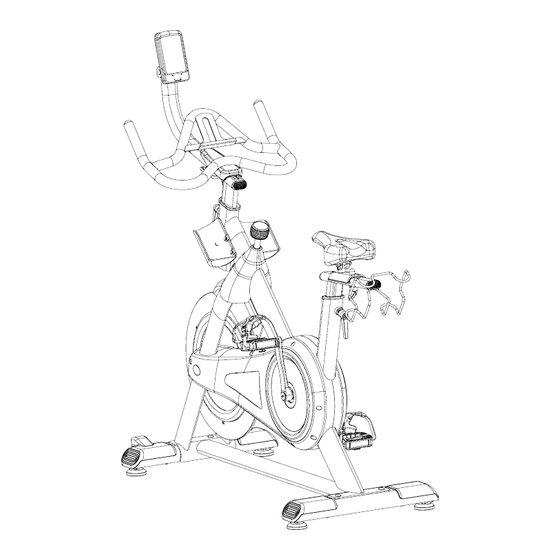
Page 7: Product Overview
Product Overview Below picture is the main parts of this bike, please take it as a reference, and make sure all the parts are included before you install the bike. - Page 8 Main Components Name Specification Monitor Holder Handlebar Handlebar Post Screw M5*10 Screw M6*13 Washer ¢19 Screw M8*16 Handlebar Bracket L-Shaped Knob Seat Seat Post Dumbbell Rack L-Shape Pull Pin Knob Main Frame Front Stabilizer Rear Stabilizer Screw M10*60 Left Pedal Right Pedal Left Bottle Holder Right Bottle Holder...
-
Page 9: Assembly Instructions
Assembly Instructions Step 1:Attach #15 Front Stabilizer to Main Frame, insert two #17 Screws, and tighten and secure them with A: Allen Key with Phillips Screwdriver. Step 2:Attach #16-Rear Stabilizer to Main Frame, insert two #17 Screws, and tighten and secure them with A:Allen Key with Phillips Screwdriver. - Page 10 Step 4:Place #2 Handlebar on #3 Handlebar Post. Place #8 Handlebar Bracket to #3 Handlebar Post, screw in #9 L-Shaped Knob, and lock and secure this knob tightly. YouTube search Niceday L-Shaped Knob Adjustment for detailed instructions.
- Page 11 Step 5:Insert #1 Monitor Holder into #2 Handlebar, and tighten and secure two #7 Screws and two #6 Washers to #2 Handlebar with A:Allen Key with Phillips Screwdriver. Step 6:Unscrew #13 L-Shaped Pull Pin Knob in counter clockwise, insert and slide #11 Seat Post to #14 Main Frame, move #11 Seat Post upward or downward to the desired position, release #13 L-Shaped Pull Pin Knob...
- Page 12 Step 7: Align #12 Dumbbell Rack to #11 Seat Post, and tighten two #5 Screws with A: Allen Key with Phillips Screwdriver. Step 8:Align the two holes on #19L Left Bottle Holder to the two holes on the left side of the #14 Main Frame, insert two #4 Screws to the holes and secure them with A: Allen Key with Phillips Screwdriver.
- Page 13 Step 9:Remove the nut on #18L Left Pedal by turning CLOCKWISE, than insert #18L Left Pedal into left crank with hand in COUNTER-CLOCKWISE firstly, and use B: Open-end Wrench 14-15 to secure the pedal. Finger tighten the nut COUNTER-CLOCKWISE back onto #18L Left Pedal. Hold #18L Left Pedal with B: Open-end Wrench 14-15 and use C: Open-end Wrench 13-24 to lock the pedal CLOCKWISE to the crank.
- Page 14 Dismantle Flywheel Protection Auxiliary Accessory Below are protections for the flywheel during transporting, please REMOVE these before using this machine. 1. Cut the ribbon off, and then remove the rubber block. 2. Loosen the resistance knob by turning Counterclockwise, then remove the insert from the flywheel cover.
-
Page 15: Adjustment Instructions
Adjustment Instructions You can adjust your 305M indoor cycling bike as a normal used road bike, which you can form the correct postures and make sure your muscles can get proper exercise. But comfort level varies from person to person. Here we have some adjustment tips to meet your expectations. - Page 16 Lock the knob Pull out knob to control the seat post Loose Attn: Please do NOT over lift the seat post, the MAX is the maximum height. If you’ve any questions, please do not lock it by force, and contact us at the first time. III-Brake Resistance Knob Adjustment As the arrow shows: increase the resistance by turning clockwise, and lower the resistance by turning...
-
Page 17: Monitor Specification
Monitor Specification ITEM DESCRIPTION . Without setting the target value, time will count up. . When setting the target value, time will count down from your target time to 0 and alarm will ring(8 beeps of BIBI),then turn to counting. TIME . - Page 18 KEY FUNCTION: ITEM DESCRIPTION . Press SET key to increase value. Press and hold the key to increase value faster. . TIME setting range: 00:00~99:00 (Each increment is 1:00) . CAL setting range: 0~9999 (Each increment is 10) . DIST setting range: 0.00~99.50 (Each increment is 0.5) .
- Page 19 OPERATION I-Workout setting Press MODE key to select the function of TIME, DISTANCE, CALORIES. Use SET Key for setting and press MODE key for confirmation. For instance, the time set-up, when the time value is blinking, you can use SET Key to adjust ...
-
Page 20: Application
APP Instructions for Use (Note: The scenario simulation function in the KINOMAP & Zwift APP is free for a limited time. The final right of interpretation belongs to the official KINOMAP & Zwift APP. ) 1.FUNCTIONS OF THE BLUETOOTH : 1.1 Working frequency: This wireless transmitter is a Bluetooth 4.2 device. - Page 21 APP OPERATING INSTRUCTIONS : Note: 1.When the bluetooth pairing is successful, the screen will display the Bluetooth symbol, the rest will be turned off, and the "bibi "will be cut twice, representing the Bluetooth connection 2.With "iconsole" "Kinomap" "Ziwft"and"Pelton"and other Apps. 3.After the Bluetooth is disconnected or the APP ends, the monitor "BI"...
- Page 22 2.Description of "Kinomap" connection: 2.1 Open the "Kinomap" to enter the home page, click the button in the lower right corner to add a new device. 2.2 Click fitness equipment management, then click the "+" symbol in the upper right corner to start adding equipment.
- Page 23 2.3 Click on the Bike graphic, then enter various brand connection screens, select SENSORS or iConsole. 2.4 Select iBiking 10 levels, then select the Bluetooth device.Complete the new device, press the Home button to return to the home page.
- Page 24 2.6 Select a motion video, you must select the type of Bike, and press the button to enter the motion picture. 2.7 Start pedaling, if you want to stop, you can press the pause button at the top of the screen.Entering the pause screen can choose to continue or exit to end the exercise.
- Page 25 3.Description of "Zwift" connection: 3.1 Open the Zwift app, select the user. 3.2 Enter the device connection screen, select SPEED SENSOR. 3.3 Select bluetooth device,select Other.
- Page 26 3.4 Select SPEED SENSOR&CADENCE and press LET’S GO. 3.5 Press the cycling button to enter the sports screen.Enter the motion picture and start pedaling. 3.6 Press anywhere on the screen to display options, click the option button in the lower left corner to enter pause.You can choose to continue or end the exercise.
- Page 27 4.Description of "Peloton" connection: 4.1 After logging in to the account, enter the selection mode and select Cycling.Choose an exercise class. 4.2 Press START.Click to connect device.Click CADENCE + Find Bluetooth Device...
-
Page 28: Warranty
4.3 Pairing a Bluetooth device,start cycling. 4.4 Click on the video to appear END, press END to leave the sports mode;END leave the movement. Warranty If our indoor cycling bike fails due to a defect in material or workmanship within 3 years of the date of your purchase, please reach us to get free replacement parts (or replacement if repair proves impossible).This warranty does not apply when the bike is used for rental purposes. -
Page 29: Warm Up
Warm Up Before exercise, it is better Warm muscles stretch more easily, so the first of 5 ~ 10 minutes to warm up. Then in accordance with the following methods to stop and do stretching exercises - do five times, each leg every time 10 seconds or more time to do it again after the end of the exercise. -
Page 30: Maintenance
Maintenance This general information for daily, weekly, and monthly maintenance to be performed on your bike. I-Daily Maintenance After each exercise session, wipe down all the equipment: seat, frame, and handlebars. Pay special attention to the seat post, handlebar post, and belt guard. Sweat is very corrosive and may cause problems that require parts replacement later. - Page 31 III-Monthly Maintenance 10.Check if all hardware is secure, such as: water bottle holder, flywheel nuts, belt guard bolts, brake caliper lock nuts, and brake caliper tension rod nuts. 11.Inspect the brake tension rod for signs of wear such as missing threads. Clean and lubricate the brake tension rod.
Need help?
Do you have a question about the 305M and is the answer not in the manual?
Questions and answers
how do I change the km to miles on the monitor screen?