
Related Manuals for Nikon CoolPix 900


Summary of Contents for Nikon CoolPix 900
-
Page 1: Table Of Contents
A Note on Memory Cards Other Cautions Overview Parts and Accessories What’s in this Package Optional Accessories Parts of the COOLPIX 900 The Control Panel and Color LCD Monitor Through the Viewfinder First Steps Attaching the Camera Strap Putting Batteries in Your Camera... - Page 2 Advanced Settings (M-REC) The Shooting Menu Exposure Compensation Metering Method Continuous (Digital Motor Drive) White Balance Image Adjustment Extra Functions LCD Brightness Auto Off Formatting Memory Cards LCD On/Off Restoring Default Settings Playback The Playback Menu Deleting Multiple Photographs from Memory Slideshow Protecting Photographs from Deletion Hiding Photographs...
-
Page 3: Trademark Information
The address of Nikon’s representative in your area is provided separately. • Nikon is not liable for damages resulting from the use of this product. Trademark Information Macintosh is a registered trademark of Apple Computer Inc. -
Page 4: Cautions
Nikon Corporation may void the user's authority to operate the equipment. Serial Cables Use the serial cables provided with your COOLPIX 900 (see page 12 of this manual). Using other interface cables may exceed the limits of Class B Part 15 of the FCC rules. -
Page 5: Safety Precautions
Safety Precautions Be sure to observe the following safety precautions when using and storing your COOLPIX 900. • Do not look directly at the sun through the viewfinder Viewing the sun or other strong light source through the viewfinder could cause permanent visual impairment. - Page 6 Observe the following precautions when using the AC adapter with your camera. • Use only the adapter and cable sold for the COOLPIX 900 in your region. Using any other adapter or cable could result in fire or electric shock.
-
Page 7: A Note On Memory Cards
• Do not put fingers or clothing into the camera hinge The COOLPIX 900 features a hinged body which allows the lens and viewfinder to rotate 270º. Be careful not to catch your fingers, hair, or clothing in the hinge. -
Page 8: Do Not Drop
LCD monitor, damage data stored on the flash memory card, or affect the camera’s internal circuitry. Keep dry The COOLPIX 900 is not waterproof, and may malfunction if immersed in water or exposed to high levels of humidity. Other Cautions... - Page 9 Notice concerning prohibition of copying or reproduction Note that simply being in possession of material which has been copied or reproduced by means of a digital camera may be punishable by law. • Items prohibited by law from being copied or reproduced...
-
Page 10: Overview
“Connections.” The final sections, “Caring for Your Camera” and “Troubleshooting,” describe how to take care of your COOLPIX 900 and what to do when things go wrong. Please read all instructions carefully to ensure that you get the most from your camera. - Page 11 Note: The illustrations in this manual are composites. Photo- graphs taken with the COOLPIX 900 may differ from those shown here. Note: The illustrations in this manual show the color LCD moni- tor used in the NTSC-compatible model of the COOLPIX 900.
-
Page 12: Parts And Accessories
Parts and Accessories This chapter identifies the parts of the COOLPIX 900 and lists the items packaged with your camera or available separately as options. What’s in this Package Purchasers of the COOLPIX 900 should find that the package contains all the items listed below. Should you notice that anything is missing or damaged, contact your retailer immedi- ately. -
Page 13: Optional Accessories
Optional Accessories At the time of writing, the following optional accessories were available for the COOLPIX 900. Contact your local Nikon EH-30 AC adapter representative or retailer for details. (shape of cable depends on country of purchase) • Fish-eye lens-adapter FC-E8 •... -
Page 14: Parts Of The Coolpix 900
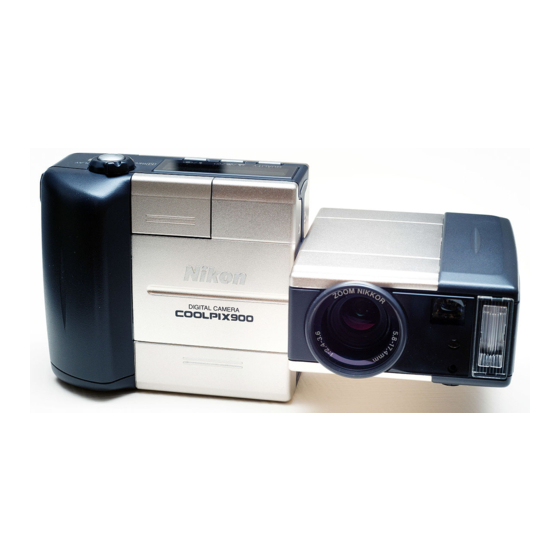
E900S CAMERA DIGITAL Nikon CARD [24] [23] [25] Parts and Accessories: Parts of the COOLPIX 900 [ 1] Speedlight (flash) [ 2] Red-eye reduction lamp [ 3] Photocell [ 4] Terminal for synchro-flash [7] [8] unit [ 5] Lens [ 6] Control panel... -
Page 15: The Control Panel And Color Lcd Monitor
The Control Panel and Color LCD Monitor The COOLPIX 900 is equipped with two displays, one a black- and-white control panel giving the current camera settings, and the other a color LCD monitor that in addition to displaying information on current settings also shows the view through the lens. -
Page 16: Through The Viewfinder
Through the Viewfinder The viewfinder contains two frames. The frame on the left is used when taking pictures at a range of 50 cm (twenty inches) or more, that on the right when composing photographs for macro close-up at ranges of 8 – 50 cm (3˝ – 20˝). The point marked by the indicator in the center of the viewfinder is used as the focus point for the autofocus operation. -
Page 17: First Steps
First Steps This chapter guides you through the steps you will take after removing the camera from the box, from inserting the batteries to making your first photographs and playing them back. Before you will be able to use your camera, you will need to: •... -
Page 18: Putting Batteries In Your Camera
Putting Batteries in Your Camera When putting new batteries in your camera, first rotate the selector dial to OFF (if you are using the AC adapter, you should also unplug the camera). If the camera is on a tripod, the camera must be removed from the tripod before the batteries can be replaced. -
Page 19: Using The Ac Adapter
Using the AC Adapter An AC adapter is available separately for the COOLPIX 900. When connecting the AC adapter, first make sure that the camera is off. Plug the power cable into the AC adapter. Then open the door which covers the DC IN and VIDEO OUT connectors and insert the power jack into the connector la- beled DC IN. -
Page 20: Inserting And Removing Memory Cards
Note: When buying memory cards for the COOLPIX 900, it is recommended that you purchase Nikon-made cards. Other cards may not perform to specifications. You will need to insert a memory card in your camera before you will be able to take photographs. -
Page 21: Checking The Battery Level
Checking the Battery Level Before using your camera, you should check the battery level to be sure that the batteries do not need to be replaced. To check the battery level, turn the selector dial to M-REC, A-REC, or PLAY. A battery indicator will appear in the control panel on top of the camera. -
Page 22: Choosing A Language For The Menus
Choosing a Language for the Menus For the display of messages and menu items in its LCD monitor, the COOLPIX 900 offers a choice of English, French, German, and Japanese. When you first turn your camera on, you may find that the menus are in a language other than English. To select a new language for the display, turn the selector dial to M-REC. -
Page 23: Setting The Time And Date
Setting the Time and Date The camera’s clock-calendar is not set at the factory. When you first turn on your camera, you will need to set the time and date. To do so, turn the selector dial to M-REC. Wait one or two seconds for the camera to complete start-up. The color LCD monitor should show the camera’s current settings superimposed on the view through the lens. - Page 24 The item currently selected for editing will flash. Edit the se- lected item by pressing the zoom-in switch (T/ ) to increase its value or the zoom-out switch (W/ ) to decrease its value. Pressing the zoom switch once changes the value of the se- lected item by one, while holding the switch down causes the value to change rapidly.
-
Page 25: Basic Photography (A-Rec)
Basic Photography (A-REC) The COOLPIX 900 offers a choice of two shooting modes, automatic (A-REC) and manual (M-REC). In automatic mode, the user can control flash settings, image quality, focus, and optical zoom. Exposure compensation, metering method, and white balance are all set automatically by the camera. Manual mode allows the user to adjust all the above settings and to experiment with a variety of digital effects. - Page 26 Step 3—Check the number of exposures remaining The control panel and color LCD monitor show the number of exposures remaining at the current image quality setting. When this number reaches zero, an “out of memory” message will be displayed in the color LCD monitor (see “Troubleshoot- ing,”...
-
Page 27: Step 5-Ready The Camera
Step 5—Ready the camera The COOLPIX 900’s color LCD monitor is joined to the lens by a rotating hinge, allowing the user to hold the camera at almost any angle while making photographs. When framing photographs in the monitor, the camera can be held as shown below. - Page 28 Step 6—Compose a photograph Frame your subject in the viewfinder or the color LCD monitor. Press the zoom-in switch (T/ ) to magnify the subject so that only a portion of it fills the frame, or use the zoom-out switch (W/ ) to expand the field-of-view so that more of the subject is visible.
-
Page 29: Step 7-Half-Press The Shutter-Release Button
Note: The field of view of the viewfinder is approximately 85% of that of the lens. The viewfinder will therefore show an area slightly smaller than that which will appear in the actual photo- graph. At distances of between 8 and 50 cm (3˝ – 20˝), objects centered in viewfinder will appear off-center in the actual photo- graph. -
Page 30: Step 8-Take A Photograph
Step 8—Take a photograph To take a photograph, press the shutter-release button all the way down. The autofocus lamp will flash rapidly and an hourglass icon ( ) will be displayed in the color LCD monitor while the photo- graph is being recorded to the compact flash memory card. Once the process of recording the photograph to memory is complete, the exposure count in the control panel and color LCD monitor will go down by one. -
Page 31: Step 10-Turn The Camera Off
Other photographs in memory, if any, can be reviewed by pressing the zoom-in switch (T/ ) to page through the photo- graphs one at a time in the order in which they were recorded, or the zoom-out (W/ ) switch to page through the photo- graphs in reverse order. -
Page 32: Basic Photography: Reference
This chapter describes the most frequently used techniques and camera settings: flash, focus, and image-quality settings. Using the Flash The COOLPIX 900 offers a choice of five flash modes: “Auto,” “Auto with Red-Eye Reduction,” “Slow Synchronized,” “Any- time Flash,” and “Flash Cancel.” An icon showing the current mode is displayed in the control panel. - Page 33 Using the flash close to your subject’s eyes could produce temporary visual impairment. Note: The COOLPIX 900’s built-in flash has a range of two meters at maximum zoom, three meters at minimum zoom (maximum angle). At a focus setting of “Infinity,” the flash will automatically be set to “Flash Cancel”...
-
Page 34: Using An External Flash
26, SB-25, SB-24, SB-22S, and SB-22. Caution: The use of non-Nikon flash units is not recom- mended with the COOLPIX 900. Using non-Nikon flash units may result in damage to the synchro-flash circuitry in the camera or the external flash. -
Page 35: Focus Settings
Focus Settings The COOLPIX 900 offers three focus settings: autofocus, infinity, and macro close-up. At settings of “Infinity” and “Macro Close-Up,” the current focus setting is shown in the control panel and, if set to display camera settings, the color LCD monitor. -
Page 36: Focus Lock
Focus Lock If the color LCD monitor is on when the camera is set to “Autofocus” or “Macro Close-Up,” focus will be continually adjusted according to the distance to the subject (if the LCD monitor is off, focus settings will be adjusted only when the shutter button is pressed half-way). -
Page 37: Using The Self-Timer
Using the Self-Timer The COOLPIX 900 is equipped with a ten-second automatic timer that allows photographers to appear in their own photo- graphs. To select this self-timer, first turn the selector dial to A- REC or M-REC and then press the timer indicator ( ) appears in the control panel. -
Page 38: Image Quality
JPEG-compressed, some details are lost. The more a photograph is compressed, the more noticeable this loss of detail will be. The COOLPIX 900 allows the user to control the trade-off between reduced memory requirements and loss of detail by choosing from among three image quality settings: “Fine,”... -
Page 39: Advanced Settings (M-Rec)
Advanced Settings (M-REC) This chapter explores the camera settings that can be accessed and used only when the selector dial is set to M-REC. These settings include exposure compensation, metering, digital mo- tor-drive, white-balance, and a variety of digital effects. In M- REC mode one can also set the date and time, choose a lan- guage for the camera’s menus and messages, format memory cards, and adjust the brightness of the color LCD monitor. - Page 40 OFF function is available for playback mode). See “Auto Off,” below. CARDFORMAT Choose CARDFORMAT to format compact flash- memory cards for use in the COOLPIX 900 as described in “Formatting Memory Cards,” below. LCD ON/OFF This setting controls whether the color LCD monitor comes on automatically or remains off to save battery power when the camera is turned on.
-
Page 41: Exposure Compensation
Exposure Compensation While the camera’s matrix metering system can adjust auto- exposure to suit most lighting conditions, in some cases it may be necessary to adjust exposure to bring out a back-lit subject or to darken an image that would be too bright. To adjust the camera’s autoexposure settings to increase or decrease expo- sure, highlight EXP. -
Page 42: Metering Method
Metering Method In determining autoexposure and shutter speed, the camera uses one of three light-metering methods: matrix, spot, or center-weighted. In matrix metering light is measured in sixty- four different areas of the frame and exposure adjusted to a level that in most conditions best captures both brightly-lit and shaded portions of the image. -
Page 43: Autoexposure Lock
Autoexposure Lock When spot metering is used, half-pressing the shutter button “locks” autoexposure to suit lighting conditions in the center of the frame. This can be used in combination with focus lock (see “Focus Settings,” above) to create unusual exposure effects, such as “washing out”... -
Page 44: Continuous (Digital Motor Drive)
The COOLPIX 900 offers a choice of three drive settings in M- REC mode: single frame, continuous, and VGA sequence. In single-frame mode, one photograph is taken each time the shutter-release button is fully pressed. -
Page 45: White Balance
White Balance The COOLPIX 900 automatically adjusts white balance to suit current lighting conditions when the shutter-release button is half-pressed. If desired, a white-balance program suited to specific light sources can be selected. The COOLPIX 900 offers separate programs for exterior (bright sunlight and over- cast) and interior (incandescent and fluorescent) lighting. -
Page 46: Image Adjustment
Image Adjustment In M-REC mode, it is possible to adjust digitally the brightness or contrast of photographs taken with the camera. Brightness can be increased to bring out poorly-lit portions of the compo- sition, or decreased to prevent bright portions of the composi- tion from being “washed out.”... -
Page 47: Extra Functions
Extra Functions The COOLPIX 900’s extra functions menu offers both digital effects and pre-programmed settings for the optional fish-eye and wide-angle lens adapters. The digital effects available are digital zoom, autoexposure lock, and VGA and/or grayscale recording. A menu of options can be viewed by highlighting EXTRA FUNC in the shooting menu and pressing the shut- ter button. - Page 48 DIGITAL TELE (Digital Telephoto) At this setting, an area in the center of the frame 640 pixels in size is digitally enlarged to a size of 1,280 pixels, filling the entire frame. As is the case with ordinary 2 digital zoom, activated by holding down the zoom-in switch when the camera is at maximum zoom, images recorded at this setting will be slightly “grainy.”...
- Page 49 AE LOCK (Autoexposure Lock) Autoexposure lock is used to make a series of photographs with consistent exposure and white balance, as for example when making a sequence of photographs that will later used in creating a 360-degree panorama. If autoexposure lock is used, the autoexposure (shutter speed and aperture) and white-balance settings for the first photograph in the series will be used for all subsequent photographs, allowing the...
-
Page 50: Lcd Brightness
The above settings can be used in combination. For example, it is possible to use VGA SHOT together with any combination of DIGITAL TELE and AE LOCK. Note however that digital zoom cannot be used in combination with either FISHEYE or WIDEADAPTER;... -
Page 51: Auto Off
Auto Off When the camera is operating on battery power, the monitor turns off automatically if no action is performed for thirty sec- onds (three minutes when menus are displayed). To change the time until the monitor turns off automatically in A-REC or M-REC modes, highlight AUTO OFF in the shooting menu and press the shutter button. -
Page 52: Formatting Memory Cards
Formatting Memory Cards Compact flash memory cards must be formatted before they can be used in the camera (unformatted cards can be formatted when inserted, as is described in “Troubleshooting,” below). You can also format cards to remove all data from the card. For- matting memory cards permanently deletes all photographs that may be stored on the card;... -
Page 53: Lcd On/Off
LCD On/Off By default, the color LCD monitor comes on when the camera is turned on and must be turned off by pressing the MONITOR switch. To save power, however, the monitor can be set to turn off when the selector dial is turned to M-REC mode, to be turned on as desired using the MONITOR switch. -
Page 54: Restoring Default Settings
Restoring Default Settings Exposure adjustment, metering, continuous, white-balance, brightness/contrast, monitor brightness, and extra functions settings can be restored to their factory default values by high- lighting RESTORE ALL in the shooting menu and pressing the shutter button. The following window will be displayed. B K R E S E T I NG L T V A L U E S ? - Page 55 Playback This chapter describes how to view photographs stored in the flash-memory card, how to create a slide show using these photos, and how to delete unwanted photographs from memory. These playback functions are available when the selector dial is turned to PLAY.
- Page 56 The numbers at the bottom right of each thumbnail give its position in memory; the currently selected photograph is marked by a yellow border. Select a photograph for viewing by pressing the zoom-in switch to move forward through the thumbnails or the zoom-out switch to go back.
- Page 57 Pressing the shutter button with YES highlighted causes the current photograph to be deleted. Once the photograph has been erased from memory, the following message will be displayed. DON E Note: Once deleted, photographs cannot be recovered; be sure to make copies of any photographs you wish to keep before deleting them from memory (see “Connections”...
-
Page 58: The Playback Menu
The Playback Menu In addition to the functions described above, playback mode offers a menu that allows the user to create slideshows, to delete several photographs simultaneously, to protect photo- graphs from deletion, and to hide photographs so that they will not be displayed in slideshows or ordinary playback mode. - Page 59 “Auto Off,” below. CARDFORMAT Choose CARDFORMAT to format compact flash- memory cards for use in the COOLPIX 900 as described in “Advanced Settings: Formatting Memory Cards,” above. DATE Choose DATE to set the camera’s clock-calendar as described in “First Steps: Setting the Time and Date.”...
-
Page 60: Deleting Multiple Photographs From Memory
Deleting Multiple Photographs from Memory While single photographs can be deleted in playback mode as described at the beginning of this chapter, it is also possible to select multiple images for simultaneous deletion or to delete all unprotected photographs currently selected for display. Note that once deleted, photographs cannot be recovered;... - Page 61 After highlighting the last of the images that are to be deleted, press the shutter button to select this and all images marked with a icon for deletion. A confirmation dialog will be dis- played. B K DE L E T E DE L E T E I MA G Y E S...
- Page 62 Slideshow The COOLPIX 900’s slideshow option allows unattended playback of all photographs currently selected for display. Once a slideshow has been started, photographs will be displayed one after the other in the order recorded, with a pause between each photograph.
- Page 63 To exit the slideshow and return to the playback menu, highlight BK and press the shutter button. Highlight RESTART and press the shutter button to resume the slideshow at the point it was interrupted. To adjust the length of time each photograph is displayed, highlight FRAME INTVL and press the shutter button.
-
Page 64: Protecting Photographs From Deletion
Protecting Photographs from Deletion To protect selected photographs from deletion, highlight PRO- TECT in the playback menu and press the shutter button. The following window will be displayed. P O T E C T S E T S H U T T E R MU L T I S E L . -
Page 65: Hiding Photographs
Hiding Photographs When creating a slideshow or playing back photographs for an audience, you may wish to hide some of the photographs in memory. This can be accomplished by highlighting HIDE IMAGE in the playback menu and pressing the shutter button. The following window will be displayed. -
Page 66: Auto Off
Auto Off When the camera is operating on battery power, the monitor turns off automatically if no action is performed for thirty sec- onds (if a slideshow is in progress, the monitor will remain on for thirty minutes). This limit can be extended for ordinary playback. -
Page 67: Connecting The Camera To A Television
Connecting the Camera to a Television The COOLPIX 900 can be connected to a television set, mak- ing it possible to play photographs back for an audience. To connect the camera to a television set, use the video cable supplied with the camera. -
Page 68: Reading Memory Cards With A Computer
JPEG files under the filenames used when the camera is in playback mode (see “Playback,” above) and may be handled as you would other files. If Nikon View 900 has been installed, the photographs on the card can be browsed in the same fashion as when the camera is connected directly to a computer. -
Page 69: Connecting The Camera To A Computer
Connecting the Camera to a Computer Serial cables are provided with your COOLPIX 900 for connec- tion to Macintosh and IBM-compatible computers. If Nikon View 900 is installed on your computer, a serial connection can be used to browse the photographs stored in the camera. To connect the camera to a computer, remove the rubber cap that covers the camera’s serial connector. - Page 70 Once the camera has been connected to your computer, you can use Nikon View 900 to browse the contents of the camera’s memory or to copy items from the camera to disk. Connections: Connecting the Camera to a Computer...
-
Page 71: Caring For Your Camera
Caring for Your Camera To ensure that you continue to get the most from your camera, you should observe the following precautions when cleaning and storing your camera. Cleaning The lens is covered by a clear plastic shield. You should avoid touching this shield with your fingers. -
Page 72: Troubleshooting
Troubleshooting If you should notice any problems with your COOLPIX 900, check the list below before consulting your retailer or Nikon representative. General Problems Nothing shows in the control panel Checklist: • Is the selector dial set to OFF? Turn the selector dial to A-REC, M-REC, or PLAY. - Page 73 Indication: The AF lamp is flickering • The camera is unable to focus. Release the shutter button and focus on a new subject at the same distance. Half-press the shutter button and check that the AF lamp glows steadily, then, with the shutter button held halfway down, frame the original subject in the monitor or viewfinder.
- Page 74 • Have the files been written or renamed by a computer? The COOLPIX 900 can only read files that have been re- corded by the camera and are named according to the conventions used by the camera.
-
Page 75: Error Messages
LCD monitor. Below is a list of error messages that may be dis- played by the COOLPIX 900 and the steps that should be taken to deal with them. The camera can not detect a flash- memory card. - Page 76 OFF to clear the message S Y T EM E R ROR from the display, wait a few seconds, and then turn the camera on once more. If the message persists, con- tact your retailer or Nikon represen- tative for servicing. - 76 -...
-
Page 77: Specifications
* The color LCD monitor may contain a few pixels that are always lit or that do not light. This is a characteristic common to all LCD displays and does not indicate a malfunction. The monitor also contains a fluorescent backlight. Should the display begin to dim or flicker, contact your Nikon service representative. adjustment approximately 85% 2˝... - Page 78 White balance: automatic TTL homing system with manual adjustment for sunny and overcast condi- tions and incandescent, fluorescent, and flash lighting Self-timer: fixed-duration timer (10 sec.) Built-in flash: guide number 9 (at IS0 100, m) Flash control: sensor flash system Range: –3m (9.8´) at maximum angle (W), –2m (6.6´) at maximum zoom (T)
- Page 79 Nikon Europe BV Address: Schipholweg 321, 1171 PL Badhoevedorp, The Netherlands declare that the product Product Name: Nikon Digital Camera E900S (PAL), AC Adapter EH-30 Manufacturer’s Name: Nikon Corporation Manufacturer’s Address: Fuji Bldg., 2-3, Marunouchi 3-chome, Chiyoda-ku, Tokyo 100-8331, Japan...
Need help?
Do you have a question about the CoolPix 900 and is the answer not in the manual?
Questions and answers