Table of Contents
Advertisement
Quick Links
The tools of innovation.
OPERATOR'S MANUAL
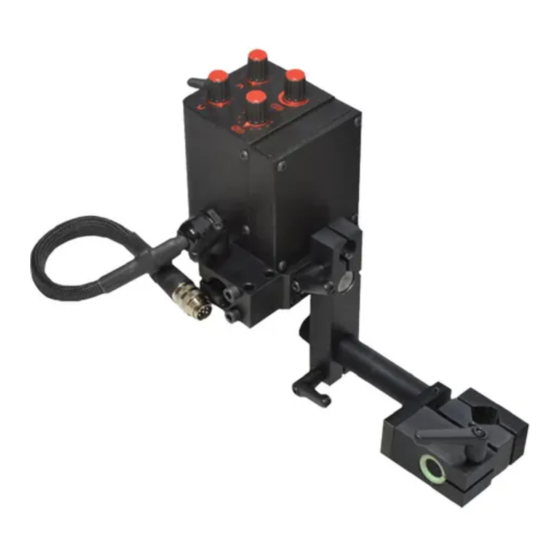
OSC-8 PENDULUM
O
S
C
8
O
S
C
8
WEAVE WELDER
PENDULUM OSCILLATOR
OPERATOR'S MANUAL
PART NO. WA-OSC8
Ver: 1.0
15335 E. Fremont Drive, Centennial, CO 80112
1– 87STEELMAX, FAX 303– 690– 9172
TO PREVENT SERIOUS INJURY OR DAMAGE TO YOUR PENDULUM WEAVE WELDER,
www.steelmax.com sales@steelmax.com
!
!
READ AND UNDERSTAND ALL WARNINGS AND INSTRUCTIONS BEFORE USE
www.itmtools.com.au
Advertisement
Table of Contents

Summary of Contents for Itm OSC-8
- Page 1 The tools of innovation. OPERATOR’S MANUAL OSC-8 PENDULUM WEAVE WELDER PENDULUM OSCILLATOR OPERATOR’S MANUAL PART NO. WA-OSC8 Ver: 1.0 15335 E. Fremont Drive, Centennial, CO 80112 1– 87STEELMAX, FAX 303– 690– 9172 TO PREVENT SERIOUS INJURY OR DAMAGE TO YOUR PENDULUM WEAVE WELDER, www.steelmax.com sales@steelmax.com...
-
Page 2: Table Of Contents
OSC-8 PENDULUM WEAVE WELDER OPERATOR’S MANUAL TABLE OF CONTENTS Contents 1. GENERAL INFORMATION ....................3 1.1. Application ......................... 3 1.2. Technical data......................3 1.3. Equipment included ....................4 1.4. Dimensions ........................ 5 2. SAFETY PRECAUTIONS....................6 3. STARTUP AND OPERATION ................... 7 3.1. -
Page 3: General Information
OSC-8 PENDULUM WEAVE WELDER OPERATOR’S MANUAL OSC 8 1. GENERAL INFORMATION 1.1. Application The OSC 8 pendulum oscillator is designed to oscillate MIG/MAG torches with the diameter of 16–22 mm (5/8–7/8″). The oscillator is installed onto a 22 mm (7/8″) diameter rod and powered from the welding equipment. -
Page 4: Equipment Included
OSC-8 PENDULUM WEAVE WELDER OPERATOR’S MANUAL OSC 8 1.3. Equipment included 1 Oscillator 1 unit 2 2 m (6.5 ft) power cord 1 unit 3 Low rod torch holder with clip 1 unit 4 Arm 1 unit 5 Clamping block... -
Page 5: Dimensions
OSC-8 PENDULUM WEAVE WELDER OPERATOR’S MANUAL OSC 8 1.4. Dimensions 343 mm (13-1/2″) www.itmtools.com.au... -
Page 6: Safety Precautions
OSC-8 PENDULUM WEAVE WELDER OPERATOR’S MANUAL OSC 8 2. SAFETY PRECAUTIONS 1. Before use, read this Operator’s Manual and complete a training in occupational safety and health. 2. Use only in applications specified in this Operator’s Manual. 3. Make sure that the oscillator has all parts and are genuine and not damaged. -
Page 7: Startup And Operation
OSC-8 PENDULUM WEAVE WELDER OPERATOR’S MANUAL OSC 8 3. STARTUP AND OPERATION 3.1. Assembling Use the 5 mm hex wrench to install the clamping block in the chosen position. Point the arm down, and then install the arm and the torch holder. -
Page 8: Connecting
OSC-8 PENDULUM WEAVE WELDER OPERATOR’S MANUAL OSC 8 3.2. Connecting 3.2.1. To the welding circuit Put the oscillator onto a 22 mm (7/8″) diameter rod (1) and set the switch to the middle position (2). Then, connect the power cord to the welding circuit (3). Next, connect the power cord to the oscillator (4). -
Page 9: To The Power Supply
OSC-8 PENDULUM WEAVE WELDER OPERATOR’S MANUAL OSC 8 3.2.1. To the power supply Put the oscillator onto a 22 mm (7/8″) diameter rod (1) or a freestanding support (2, option). Next, set the switch to the middle position (3). Then, connect the oscillator to the power supply (4, option). -
Page 10: To The Rail Runner 2 Welding Carriage
OSC-8 PENDULUM WEAVE WELDER OPERATOR’S MANUAL OSC 8 3.2.2. To the Rail Runner 2 welding carriage To use the oscillator without seam tracking, assembly the oscillator with a 203 mm (8″) rod and a clamping block (1, option). Then, use the 80 mm (3″) rod to put the oscillator onto the carriage (2). - Page 11 OSC-8 PENDULUM WEAVE WELDER OPERATOR’S MANUAL OSC 8 To use the oscillator with seam tracking, put the oscillator onto the carriage with the installed seam tracking attachment (1). Next, set the switch to the middle position (2) and connect the oscillator to the tracking sensor (3).
-
Page 12: Operating
OSC-8 PENDULUM WEAVE WELDER OPERATOR’S MANUAL OSC 8 3.3. Operating Use the knobs to set the required parameters from the table that follows. Then, set the switch to MANUAL control to start oscillations. To stop oscillations, set the switch to the middle position. - Page 13 OSC-8 PENDULUM WEAVE WELDER OPERATOR’S MANUAL OSC 8 To get the correct shape of oscillation, make sure that the axis of the torch crosses with the axis of the oscillator’s output shaft. www.itmtools.com.au...
-
Page 14: Accessories
OSC-8 PENDULUM WEAVE WELDER OPERATOR’S MANUAL OSC 8 4. ACCESSORIES 4.1. Freestanding support Allows welding with oscillation of pipes that rotate and plates that move. Part number: WA-OSC8STAND www.itmtools.com.au OSC 8 Operator’s Manual... -
Page 15: Power Supply
OSC-8 PENDULUM WEAVE WELDER OPERATOR’S MANUAL OSC 8 4.2. Power supply Allows you to connect the oscillator to a 230 V power source. Part number: WAP-RB9080 www.itmtools.com.au... -
Page 16: Exploded Views And Parts List
OSC-8 PENDULUM WEAVE WELDER OPERATOR’S MANUAL OSC 8 5. EXPLODED VIEWS AND PARTS LIST ITEM PART NUMBER DESCRIPTION Q-TY RKJ-000043 HANDLEVER M6-25 UCW-0497-13-00-00-0 CLAMP SRB-000124 HEX SOCKET HEAD CAP SCREW M6x40 KLC-000008 5 MM HEX WRENCH RAM-0477-01-10-00-0 OSCILLATOR ARM ASSY... - Page 17 OSC-8 PENDULUM WEAVE WELDER OPERATOR’S MANUAL OSC 8 www.itmtools.com.au...
- Page 18 OSC-8 PENDULUM WEAVE WELDER OPERATOR’S MANUAL OSC 8 ITEM PART NUMBER DESCRIPTION Q-TY OBD-0497-09-00-00-0 HOUSING ASSY ZLP-000020 PKT-000027 KNOB WSK-000008 KNOB INDICATOR WKR-000372 COUNTERSUNK HEAD SCREW M3x5 WZK-0497-09-02-00-0 TRAVEL DIRECTION SWITCH WIRE SET ASSY WKR-000313 HEX SOCKET BUTTON HEAD SCREW M3x8...
-
Page 19: Wiring Diagram
OSC-8 PENDULUM WEAVE WELDER OPERATOR’S MANUAL OSC 8 6. WIRING DIAGRAM www.itmtools.com.au OSC 8 Operator’s Manual... -
Page 20: Declaration Of Conformity
OSC-8 PENDULUM WEAVE WELDER OPERATOR’S MANUAL LIMITED WARRANTY Industrial Tool & Machinery Sales (hereinafter referred to as ITMS) will, within twelve (12) months from the original date of purchase, repair or replace any goods found to be defective in materials or workmanship.


Need help?
Do you have a question about the OSC-8 and is the answer not in the manual?
Questions and answers