Table of Contents
Advertisement
Quick Links
Advertisement
Chapters
Table of Contents

Related Manuals for H3 HUMMER 2007

Summary of Contents for H3 HUMMER 2007
- Page 2 The Navigation System Supplement Table of Contents Important Notes About this Manual ......Section 1 Overview ................. Section 2 System Setup ..............Section 3 Navigation Features and Controls ........ Section 4 Audio System ..............lndex ................AHENG73...
- Page 3 If you sell your vehicle, leave trademarks of General Motors the owner's manual supplement Corporation. and the owner's manual with the The name H3 is a trademark of vehicle. General Motors Corporation. This supplement includes the latest information available at the time it was printed.
-
Page 4: Table Of Contents
Section 1 Overview Navigation System Overview ......4 Basic System Information ........Getting Started Hard Keys . -
Page 5: Navigation System Overview
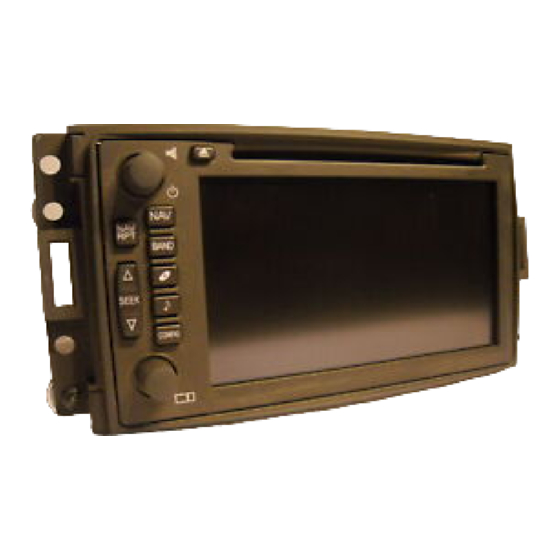
Overview • NAVIGATION SYSTEM OVERVIEW CD Loading Slot Open/Close Faceplate and � CD Player Eject Button Power/Volume Knob (navigation repeat) Hard (navigation) Hard Key 6. BAND Button .• SEEK. Switch CD Button Audio Button 10. CONFIG (configure) Button The following features are hidden See "Hard Keys"... - Page 6 Section 1 The following are touch-sensitive NAV§ 17. �Zoom In Button (navigation menu) buttons and symbols that may Button See "Map Scales" for more appear on the screen: information. See "Navigation Menu" for 14. North Up Symbol DEST more information. (set destination) Button See "Symbols"...
-
Page 7: Getting Started
Overview Before you begin to operate this Entering alpha-numeric text • GETTING STARTED system, please read this manual requires many steps, so you can is equipped Your vehicle vvith a thoroughly to become familiar only perform these operations Navigation System which has the with it and to understand how the while the vehicle is parked. - Page 8 Section 1 The navigation system is designed &CAUTION CAUTION to assist you while driving, but it is Giving extended attention to possible that the information in Looking at the moving map entertainment or navigation the system may not always be on the navigation screen tasks while driving will greatly complete.
-
Page 9: Installing The Map Dvd
Overview Installing the Map When getting started, you may set Insert the disc part-way into � the map DVD loading slot. the naviga ion sy � tem to your pref Ll ll Qll VI ule IVIIOVv'ing · n" •l--··· vU�·· ·-l r ol _____... -
Page 10: Cleaning The System
Section 1 Cleaning the System To close the screen, push up • BASIC SYSTEM slightly on the two outer top INFORMATION If the panel or the display is corners until the screen is in stained, wipe it with a soft cotton This section describes the basic position. -
Page 11: Hard Keys
Overview NAV (navigation) Hard Key Hard Keys If a route has been planned, • the first press of the Press this button to go to the The following hard keys are button will also display the navigation map screen. located on the outside of the following: Navigation System screen: If no route has been planned,... - Page 12 Section 1 BAND Button Open/Close Faceplate and • • � Audio Button • CD Player Eject Button BAND Press to select AM FM1 Press this button to access the or FM2. This hard key is used to open audio menu. the Navigation System's face...
-
Page 13: Alpha-Numeric Keypad
Overview Alpha-Numeric Keypad If you are unsuccessful when To enter a space between • characters or words, touch the inputting a name or word, it may An alpha-numeric keypad \vi!! need to be selected differently. space symbol ... on the automatically be available to you A-Z screen. -
Page 14: Touch-Sensitive Buttons
Section 1 Touch-Sensitive Buttons T ouch-sensitive buttons are located on the screen. 100m These buttons will be highlighted when a feature is available (active) and dim when they are unavailable (not active). When you touch a button on the screen, a beep may sound. See "Configure Menu"... - Page 15 Overview DEST (set destination) Button NAV OPTIONS (navigation �Zoom In Button • • • o � tions ) more information. See "Navigation Options the level of map detail on the Menu'' for more information. screen. Time Display • AM/FM Band Indicator See "Map Scales"...
- Page 16 Section 2- System Setup Configure Menu ..........Clock Menu ............ Display Settings ..........15 ...
- Page 17 System Setup hard key. Configure The Configure menu will be 11111111111111• • II Contrast displayed. This menu allows you to adjust various system settings: Brightness CONTRAST � Touch the plus(+) or minus(-) Screen Color to adjust the contrast of the screen.
- Page 18 Section 2 - DAY: BEEP (audible confirmation) This setting leaves the • NOTICE screen in day mode. The dis BEEP When the (beep) feature plays on the screen are usu If your vehicle's navigatio is turned on, a beep will sound ally brighter with a lighter system is removed or add1t1onal each time a touch-sensitive...
- Page 19 System Setup Clock Menu �access this menu, do the Adjust following: Clock Press the CONFIG (configure) hard key. 10:47 Manual Adjust The Configure menu will be displayed. 12Hr/24Hr Touch th e ClOCK button. Note: Auto GPS Update Touching the time display button briefly will display the Time Zone date.
- Page 20 Section 2 Display Settings AUTO GPS UPDATE TIME ZONE: Touch one of the • • (Automatic Global Positioning buttons located at the bottom This feature allows you to turn off of the screen to select a time System Update): Touch the navigation system display.
- Page 21 Section 3 Navigation Features and Controls Navigation Features and Controls Navigation Menu ..........53 ....Enter Destination Map Appearance ..........56 ... .
-
Page 22: Navigation Features And Controls
Navigation Features and Controls Once the vehicle is moving, • NAVIGATION The navigation system is designed to assist you while driving, but it is various functions will be disabled FEATURES AND possible that the information in to limit driver distraction. CONTROlS the system may not always be In order to use navigation... - Page 23 Section 3 Following are the main hard keys used to access navigation features: (navigation) Hard Key • Press this button to go to the navigation map screen. • On the map screen, the following touch-sensitive but ·� tons are available: - DEST (destination) Button See "Enter Destination"...
- Page 24 Navigation Features and Controls (navigation repeat) If no route has been planned, If a route has been planned, NAV RPT • tbe map_screen tbat app_ears Hard Ke_y will show the following infor button will also display the If the map screen is already following: mation: displayed, you may press this...
-
Page 25: Enter Destination
Section 3 • ENTER DESTINATION To access this menu, do the following: Press the NAV (navigation) 100m hard key to go to the navigation map screen. Touch the DEST (destination) button. The first page of the DESTINATION menu will be displayed. The Destination Entry screen allows you to plan a route using any of several destination entry... -
Page 26: Setting The Search Area
Navigation Features and Controls SETTING THE SEARCH AREA Search Area The current search area is the highlighted portion of the map image on the Destination Entry United Arab Emirates screen. Before selecting a destination entry method, review the map that image to make sure your destination is located in the... -
Page 27: Destination Entry Methods
Section 3 DESTINATION ENTRY METHODS Destination The Destination Entry screen allows you to plan a route using Search Area any of several destination entry methods. Before selecting a destination entry method, review the map image to make sure that your destination is located in the current search area. -
Page 28: Destination Entry Method: Address
Navigation Features and Controls These methods are explained in this section. Address Note that while the vehicle is moving, only the "Preset Destination" and "Home" � Input City Name destination entry methods are available for selection. The other Street **** destination entry methods are not avai!ab!e hi!e the vehicle is... - Page 29 Section 3 Note: Entering a City Name As information is entered, the system will automatically For the system to be able to To access the City screen, touch search for available names. properly search for an address, CITY button. While inputting a name, the standard street and city names Use one of the following methods LIST...
- Page 30 Navigation Features and Controls Method Two • The City screen allows you to Address view a list of the last five cities entered and the five cities nearest to your vehicle's House# current location. Touch the RECENT button to view a list of the last five cities ent"'red and th e t:ve cities nearest to your vehicle's current location.
- Page 31 Section 3 As information is entered, the 3. Touch the LIST button to view If you did not previously select system will automatically the list or continue to input the city name, the system may search for available names. information to further reduce prompt you to select the city While inputting a name, the the list of available items.
-
Page 32: Destination Entry Method: Point Of Interest
Navigation Features and Controls Destination Entry Method: Point of Interest This option allows you to choose a destination from the Point of Interest list. **** To use this destination entry .category method, do the following: BBBIIIIIIBII113 TA, 1rh tho A P()l fnAint Af 1'\..J U '-11 \.. - Page 33 Section 3 Touch the LIST button to view Touch the SET DESTINATION Selecting a Point of Interest by button. Name, Category or City the list or continue to input information to further reduce Touch the ROUTE button You may search for a point of the list of available items.
- Page 34 Navigation Features and Controls Touch the CITY button to enter If the list of available points of Note: • interest for the category a city for the desired Point of When a location name is too selected is too long, then you Interest.
-
Page 35: Destination Entry Method: Memory Point
Section 3 Destination Entry Method: Memory Point Memory Points This menu allows you to select a a � destination by choosing a memory point (a destination stored in 1427 6040 RD, KARRANA-BLOCK memory). To use this destination entry method, do the following: Touch the I-' MEMORY Date POINTS... -
Page 36: Destination Entry Method: Previous Destination
Navigation Features and Controls Destination Entry Method: Previous Destination Previous Destination This feature allows you to select a destination from a list of the destinations previously entered II> 1427 6040 RD, KARRANA-BLOC into the system. To use this destination entry II>... -
Page 37: Destination Entry Method: Emergency
Section 3 Destination Entry Method: Emergency Emergency A This feature allows you to select a destination from a list of emergency facilities. Note: N25. 13.38, ESS. 17.19 Current The available list will vary by Position LAT: N25°13"38' LONG: E55°17"19' area. To use this destination entry Police Station method, do the following:... -
Page 38: Destination Entry Method: Map Scroll
Navigation Features and Controls Destination Entry Method: Destination Entry Method: Touch the POLICE STATION Map Scroll Previous Start Point or HOSPITAL button. When either button is This allows you to select a This feature allows you to select touched, the system will the last starting point entered as a destination by scrolling on the provide a list of emergency... -
Page 39: Destination Entry Method: Phone Number
Section 3 Destination Entry Method: Phone Number Phone Number This option allows you to select a destination by inputting the phone number of a point of interest on the map DVD. Input Phone Number Cellular and internal company phone numbers are not available. To use this destination entry method, do the following: [I PHONE... -
Page 40: Destination Entry Method: Intersection
Navigation Features and Controls Destination Entry Method: Intersection Intersection This option allows you to select a destination by inputting the intersecting roads you wish to 1st Street Input 1st Street Name **** travel to. To enter an intersection, do the following: 2nd Street 111111&•113 ••••••••... - Page 41 Section 3 Enter the name of the first Enter the second street name See "Getting Started on Your street in the intersection using using the alphabet keypad. Route" for more information. the alphabet keypad. Select the street name from See "Alpha-Numeric Keypad" the list.
-
Page 42: Destination Entry Method
Navigation Features and Controls Destination Entry Method: Motorway Entrance/Exit Highway Ent/Exit You can select a motorway entrance or exit as a destination. Input H-way Name To use this destination entry method, do the following: Ent/Exit HIGHWAY Touch the·� ENTRANCE/EXIT button. •... -
Page 43: Destination Entry Method: Home Destination
Section 3 Destination Entry Method: Touch the liST button to view T he system will generate a list the list of available name of every motorway entrance or Home Destination choices or continue to spell exit ramp on the motorway This feature allows you to plan a the name to further reduce you entered. -
Page 44: Destination Entry Method: Preset Destination
Navigation Features and Controls Note that while the vehicle is map will appear with the moving, only the "Preset destination shown. Destination" and "Home" See "Getting Started On Your destination entry methods are Route" for more information. available for selection. The other Note that while the vehicle is destination entry methods are not moving, only the "Preset... -
Page 45: Getting Started On Your Route
Section 3 • GETTING STARTED ON YOUR ROUTE DESTINATION PREVIEW When you finish entering a location using one of the destination entry methods, a map Info will appear with the location shown. Route Preference On this screen, the following touch-sensitive buttons are available: SET DESTINATION •... - Page 46 Navigation Features and Controls CHANGE ADD WAYPOINT INFO • • • Touch this button if you would This-feature allows yo1::1 to add Touch the INFO button to view the selected Point of Interest like to change the allowed waypoints along the way to your final destination.
-
Page 47: Route Overview
Section 3 ROUTE OVERVIEW Once your route preferences are adjusted as desired and a final destination has been set, the system will begin route calculation. T ouch the ROUTE button located on the map screen to access the ROUTE OVERVIEW screen. -
Page 48: Three Routes
Navigation Features and Controls EDIT ROUTE • Once a destination has been set, you may use this menu to customize your route planning methods. See "Edit Route" under "Navigation Menu" for more information. Fastest Three Routes • Shortest If vou select the 3 ROUTES button •... - Page 49 Section 3 Note: The map will display each route in Touch FASTEST, SHORTEST or a different color. AlTERNATIVE to select the You can also access the desired route. ROUTES screen from the Touch the TIME & DISTANCE Navigation Menu. button to display the total distance map will appear with the and the estimated travel time for destination shown.
-
Page 50: Route Preview
Navigation Features and Controls ROUTE PREVIEW Once your route preferences are adjusted as desired and a final destination has been set, the system will begin route calculation. To begin route guidance, do one of the following: Touch the ROUTE button. •... - Page 51 Section 3 . � On this menu, the following . � touch-sensitive buttons are Touch this button to view the Touch this button to view the available: vehicle's current location on route traveling toward the INFO the current route. vehicle's current location. •...
-
Page 52: Edit Route Preview
Navigation Features and Controls Edit Route Preview Touch the BACK button twice � to go back to the EDIT T ouch EDIT on the route preview Touch this button to view the ROUTE PREVIEW screen. final destination of the current pop-up menu to access the EDIT Touch the NEXT POl (next screen. -
Page 53: Navigation Menu
Section 3 To return the system to the original setting, do the following: EDIT Touch on the Route Pre EDIT view screen to access the ROUTE PREVIEW screen. NEXT Touch the button. BACK Touch the button to ROUTE return to the PREVIEW screen. - Page 54 Navigation Features and Controls On this screen, the following touch-sensitive buttons are available: Nav Menu .;v SUSPEND GUIDANCE • � Select this item to temporarily Suspend Guidance Edit route pause guidance to all currently programmed destinations. You RoutePreview will no longer receive voice prompts for navigation.
- Page 55 Section 3 � ROUTE OVERVIEW >>)) VOICE VOLUME ROUTE PREVIEW • • • Select this item to display the Select VOICE VOLUME This feature allows you to street map with the route of adjust the navigation voice preview, scroll through and travel highlighted.
-
Page 56: Map Appearance
Navigation Features and Controls MAP APPEARANCE This menu allows you to set up Map Appearance one of the following options for the map appearance screen. Guidance MAP ORIENT) Map mode • Orient Mode GUIDANCE MODE [lj] (guidance • North Up Arrow mode) MAP MODE... - Page 57 Section 3 � GUIDANCE MODE MAP MODE HEADING UP • ll!l ARROW SINGLE Touch this button to put the • • system in Heading Up mode. Touch this button to have the Touch this button to display guidance screen display the one map screen.
-
Page 58: Voice Guidance Volume Settings
Navigation Features and Controls VOICE GUIDANCE VOLUME SETTINGS Voice Volume This screen allows you to adjust the volume level of all the voice prompts you receive from the system. 111111111111111111 Voice Volume Adaptive Voice Volume Control ltjolol I I To access this menu, do the >>)) Touch the VOICE... - Page 59 Section 3 The following menu items will Touch the ON button to turn ADAPTIVE VOICE VOLUME • this feature on. appear on the screen: CONTROL Touch OFF to turn this VOICE VOLUME When this feature is on, the • voice prompt volume will feature off.
-
Page 60: Edit Route
Navigation Features and Controls EDIT ROUTE Once a destination has been set, Edit Route you may use this menu to customize your route planning methods. Condition To access this menu, either touch Search EDIT ROUTE button when Condition it appears on the map screen or do the following: Reorder Modify... - Page 61 Section 3 The menu is divided into the CONDITION ROUTE PREFERENCE • following parts: On this part of the EDIT ROUTE Touch this button to select CONDITION screen, the following touch-sensi which types of roads you wish • tive buttons are available: to use or avoid on the current DESTINATION •...
- Page 62 Navigation Features and Controls DESTINATION Changing the Order of -FERRY Waypoints On this part of the EDIT ROUTE With this option, the system will include ferries when screen, the following touch-sensi To change the order of waypoints calculating a route. tive buttons are available: along the way to your final desti...
- Page 63 Section 3 Touch the waypoints in the 9. Next, touch the START SET PREFERRED ROAD order in which you would like button. On this part of the EDIT ROUTE them to fall along the route. Once you begin driving, you screen, the following touch-sensi...
- Page 64 Navigation Features and Controls DELETE Adding and Modifying Preferred Touch the MODIFY • Roads button under SET PREFERRED Touch this button to delete on the screen. ROAD road preference settings on the To add or modify road preference current route. settings, do the following: Touch the map and scroll to the road you wish to add or...
-
Page 65: Navigation Setup
Section 3 NAVIGATION SETUP This feature allows you to turn Nav Setup several route guidance information options on and off. Guidance Voice Voice Guide in All Mode Estimated Time Travel Enter Speed Change? To access this menu, do the � Touch the SETUP following:... - Page 66 Navigation Features and Controls The following menu items will VOICE GUIDE IN ALL MODE ESTIMATED TRAVEL TIME • • appear on the screen: This feature allows you to hear This feature allows you to turn GUIDANCE VOICE navigation voice guidance on or off the estimated time to •...
- Page 67 Section 3 ENTER SPEED CHANGE? AUTO REROUTE CURRENT STREET NAME • • • This feature allows you to When your destination is set When this feature is on, the adjust the estimated speeds for and you are off the planned display will show the name of Freeway, Main street, or route, the system will...
- Page 68 Navigation Features and Controls MAP COLOR (DAY) CAliBRATE SYSTEM? Touch to calibrate the sys • • tem. This feature allows you to This feature allows you to adjust the daytime map recalibrate the navigation Touch to retain the current system in the event that the settings.
- Page 69 Section 3 MAP COLOR (NIGHT) AUTO AUTO setting will change setting will change • the map appearance automati the map appearance automati This feature allows you to cally every three months. cally every three months. adjust the nighttime map The numbered settings vary appearance.
-
Page 70: Memory Points
Navigation Features and Controls MEMORY POINTS This menu allows you to store, edit Memory Points and delete memory points. To access this menu, do the Memory Points Preset Dest Areas to Avoid following: Free: 30 Free: 10 Free: 5 NAV� Touch the (navigation Register... - Page 71 Section 3 REGISTERING MEMORY POINTS 3. When you are finished, touch Note: To register a location as a memory You can also register a memory point, do the following: map will appear with the point using the NAV OPTIONS (navigation options) menu. destination represented by a Touch REGISTER under flag.
- Page 72 Navigation Features and Controls EDITING MEMORY POINTS 3. Touch CHANGE if you wish to The memory points can be sorted change one or more of the fol by date, name, and icon. With this feature, you are able to lowing features associated See the following for more edit the registered memory points with the stored memory...
-
Page 73: Preset Destinations
Section 3 Note that while the vehicle is DELETING MEMORY POINTS moving, only the "Preset This feature allows you to delete Destination" and "Home" stored points from the list. destination entry methods are To delete a memory point: available for selection. The other destination entry methods are not Touch DELETE under MEM... - Page 74 Navigation Features and Controls EDITING PRESET DESTINATIONS REGISTERING PRESET 4. Enter your destination and DESTINATIONS route settings. To edit a stored preset destination, To store a location as a preset See the following for more do the following: destination, do the following: information: Touch the NAV�...
-
Page 75: Home
Section 3 DELETING PRESET Select the preset destination Home DESTINATIONS you wish to edit. You can register one specific T he name, location, To delete a preset destination, do destination using the home information, and phone the following: feature. This feature should be number can be edited for each NAV�... -
Page 76: Avoid Area
Navigation Features and Controls Avoid Area Touch the REGISTER HOME Touch the REGISTER POINT button. button to store the location as This feature will let you register, the home destination. The REGISTER HOME screen edit and delete an area to avoid will appear. - Page 77 Section 3 EDITING AVOID AREAS REGISTERING AN AVOID AREA Select the avoid area using the Destination Entry screen. To register an avoid area, do the To edit an avoid area, do the following: See the following for more following: information: Touch the NAV§...
-
Page 78: Previous Destination
Navigation Features and Controls DELETING AVOID AREAS Select the avoid area you wish Previous Destination to edit. To delete an avoid area, do the T he feature allows you to view Make the desired change. following: and delete some or all previous destinations stored in the system. - Page 79 Section 3 Select the destination you To delete all destinations from the Touch DEL ALL (delete all) to delete all previous destina want to delete. list, do the following: tions. confirmation window will Touch the NAV� (navigation appear. confirmation window will menu) button located at the appear.
-
Page 80: Navigation Options Menu
Navigation Features and Controls • NAVIGATION OPTIONS MENU To access this menu, do the following: POl Icon Off NAV OPTIONS Touch the • (navigation options) button POl Selection located on the bottom of the map screen. Right Screen Suspend Guidance Cancel Route Nav Options POl ICON ON/OFF... - Page 81 Section 3 POl SElECTION (point of CANCEl ROUTE SUSPEND GUIDANCE • • • interest selection) Touch this button if you would Select this item to temporarily Touch this button to select like to cancel the current pause guidance to all currently which types of point of interest destination on a planned route.
- Page 82 Navigation Features and Controls CHANGE ROUTE REGISTER POINT RIGHT SCREEN • • • This feature allows you to This feature allows you to regis If a split screen is currently change the search condition ter a marked point or a mem displayed, touch this button to for the current route while the ory point.
- Page 83 Section 3 On this screen, the following touch-sensitive buttons are available: POl ICON ON/OFF • Touch this button to turn the point of interest icons displayed on the map screen on or off. SET DESTINATION • Touch this button to set the current map location as your final destination.
-
Page 84: Point Of Lnterestcustomization
Navigation Features and Controls Point of Interest Customization POl Selection This feature allows you to select which point of interest types will ••••• appear on the map screen while Delete All driving on a planned route. NAV OPTIONS Touch the Gas Station Park/Recreation (navigation options) button... - Page 85 Section 3 NOTE: If a selected icon category was Local POl List already displayed on the map, Sort then selecting the category will CITI remove the icons from the It> 1.0km PETROFIL GAS STA map. [jj] MORE Touch the button to view It>...
-
Page 86: Change Route
Navigation Features and Controls Change Route DETOUR FOR KILOMETERS? Touch the up or down arrow to • scroll up or down through the list. This feature allows you to This feature allows you to change The point of interest list can be detour 3 km (1.9 miles) around... -
Page 87: Maps
Section 3 CHANGE TO SHORTEST? Installing the Ma p .MAPS • This feature allows you to This section includes basic See "Getting Started" in Section recalculate the current route information that you need to using the shortest route know about the map database. method. -
Page 88: Ejecting The Map Dvd
Navigation Features and Controls Ejecting the Map Setting the Search Area 3. To close the screen, push up slightly on the two outer top See "Setting the Search Area'' . Press and hold the � (open/ corners until the screen is in under "Enter Destination"... -
Page 89: Symbols
Section 3 Symbols The following symbols are the most common that will appear on a map screen. Vehicle Symbol Destination Symbol After a route has been planned, Your vehicle is shown as this symbol. It indicates the current this symbol will appear on the map position and heading direction of to show your destination. - Page 90 Navigation Features and Controls Waypoint Symbol North Up and Vehicle Up This symbol indicates that the map Symbols view is vehicle up. When a waypoint has been selected; you will see this symbol This symbol indicates that the map The vehicle icon will always travel on the map.
- Page 91 Section 3 If you are not on the planned Once you enter the planned route, route, an arrow indicating the the actual calculated distance and ��@ estimated time of arrival at your general direction of your destination is shown. The distance final destination will be shown.
-
Page 92: Traveling Across Regions
Navigation Features and Controls Satellite Signal Unavailable • GLOBAL POSITIONING • TRAVEliNG ACROSS Symbol REGIONS SYSTEM (CPS) (global positioning system) If you plan to drive across regions, The Navigation System is displayed whenever the you may have to change the determines the position of your Navigation System is unable to region selected to represent the... - Page 93 Section 3 See the following, earlier in this This system may not be available NOTICE section, for more information: or interference may occur as a result of any of the following Do not apply after-market glass Maps • conditions: tinting to the vehicle's -Symbols windows.
-
Page 94: Vehicle Positioning
Navigation Features and Controls If you are experiencing a problem, • VEHICLE POSITIONING The vehicle is approaching a • see the following later in this tall building or a large vehicle. At times, the position of the section for more information: The surface streets run parallel vehicle on the map may be •... - Page 95 Section 3 The vehicle is entering and/or The first time the map • PROBLEMS WITH • • exiting a parking lot, garage or inserted. ROUTE GUIDANCE a lot with a roof. The battery is disconnected for • Inappropriate route guidance may several days.
-
Page 96: If The System Needs Service
Navigation Features and Controls When turning at an Some routes may not be • IF THE SYSTEM NEEDS • • intersection, there is no route searched. SERVICE guidance. If there are new roads, if roads • If you are still experiencing In some cases, plural names of have recently changed or if •... -
Page 97: Ordering Map Dvds
Section 3 • ORDERING MAP DVDS As map DVDs are updated, more • DATABASE COVERAGE detail may become available for EXPLANATIONS The map DVD in your vehicle areas which previously had limited contains the most up-to-date The maps are stored on one DVD. detail. - Page 98 Section 4 Audio System Audio System 1 00 Compact Disc Player ........1 09 ......
-
Page 99: Audio System
Audio System • AUDIO SYSTEM The audio system is operated NOTICE using menus located on the NOTICE If your vehicle's navigation navigation system screen. The system is removed or additional audio menus are explained in this Added sound equipment - such equipment is added, your section. -
Page 100: Power Control
Section 3 RADIO The basic controls consist of buttons (or "hard keys"), knobs and a touch-sensitive screen. POWER CONTROL Press lightly on the top knob to • .......-... · . · . · . · . · . · . · . ·.· . · . · . · . · . · . · . · . · . · . · . · . · . · . · . · . · . · _ ·:. · . · . · . · _ · .- .-.-.... -
Page 101: Finding A Station
Audio System Finding a Station BAND SELECTION To access the radio band screen, do either of the following: BAND Press the hard key. • AM/FM Touch the Band • Indicator on the map screen. See the following for more 97.1 information: - Navigation System Overview The station frequency will appear... -
Page 102: Tuning
Section 3 Time Display TUNING STATION SCANNING • See "Clock Menu" for more Turn the lower knob to choose To scan stations, press and hold information. radio stations. either SEEK arrow for two seconds until you hear a beep. The radio If available, touch the INFO STATION SEEKING •... -
Page 103: Setting Preset Stations
Audio System Preset Station Scanning SETTING PRESET STATIONS If desired, press the J> (audio) hard key to set the tone for To scan preset radio stations, press The six touch-sensitive buttons your preset. and hold either SEEK arrow for allow you to store your six favorite more than four seconds. -
Page 104: Audio Menu
Section 3 Audio Menu To view the AUDIO screen, press Audio the ) (audio) hard key. Bass Midrange Treble Use the up and down scroll arrows on the screen to scroll through the pages. • • • MANUAL TONE ADJUSTMENT •... -
Page 105: Equalization Settings
Audio System EQUALIZATION SETTINGS ADJUSTING THE SPEAKERS 3. Touch the L (left) button for more speaker sound on the To adjust the speaker balance or This feature allows y ou to choose left of the vehicle and the fade, do the following: one of several preset bass, R (right) button for more midrange and treble equalization... -
Page 106: Speed Compensated Volume (Scv)
Section 3 To store an equalization setting Press the BAND hard key to SPEED COMPENSATED VOlUME (SCV) for a preset station: return to the previous screen. Touch and hold one of the six Your sound system is equipped Turn the audio system on. preset buttons until you hear a with the speed-compensated Press the BAND hard key to... -
Page 107: Radio Data System (Rds)
Audio System RADIO DATA SYSTEM (RDS) 3. Adjust the volume to the Radio Data System (RDS) AVAILABILITY desired level by rotating the RDS features are only available for upper knob. In areas where the Radio Data use on stations which You may choose between System is not available, your broadcast RDS information. -
Page 108: Compact Disc Player
Section 3 COMPACT DISC PLAYER Normal size discs can be loaded NOTICE into the compact disc player. You can play a CD by sliding the However small, em discs can Do not apply paper labels to CD into the single CD player slot only be played with specially discs. -
Page 109: Playing A Compact Disc
Audio System Playing a Compact Disc The basic controls consist of buttons (or "hard keys"), knobs and a touch-sensitive screen. Use the volume, tone, and speaker controls just as you do for the radio. Other controls may have different functions when a disc is inserted. - Page 110 Section 3 �� REPEAT: Seeking Touch this button to (Forward): Press and hold • • listen to a selection again. The this button to fast forward To move ahead to the beginning current selection will continue quickly through a track SEEK_.
- Page 111 Audio System Scanning Source Selection Ejecting Discs BAND SEEK Press (located next to the Press and hold either arrow Press to stop playing the � for more than two seconds to disc and switch to the radio. compact disc slot) to eject the disc.
-
Page 112: Disc Error
Section 3 Disc Error Care of Your Compact Disc If the I hard key is pressed and a Player disc is not loaded in the CD player, If CD ERROR appears, it means the message NO DISC will appear there is an error. The cause may be The use of CD lens cleaners is not on the display. - Page 113 Index 1 09 CD Player ............1 06 Equalization Settings ADAPTIVE VOICE VOLUME CONTROL...
- Page 114 Index Controls 4, 11 Audio Button Cancel Route ..........
- Page 115 Index ..........45 (Continued) Destination Preview ..........89 Destination Symbol Destination ........
- Page 116 Index (Continued) Previous Destination Entry Method ....Previous Starting Point Eject ........
- Page 117 Index Hard Keys Language .........
- Page 118 Index Menu - Clock Menu (Continued) ..........Motorway Map Orientation Motorway Entrance/Exit ..........Map Scroll ...
- Page 119 Index 63, 64 Preferred Roads ......... . Preset Destination Entry Method Ordering Map DVDs .
- Page 120 Index (Continued) Region Setting the Search Area Power ........Regional Maps Power/Volume Knob .4, 10...
- Page 121 Index (Continued) 54, 81 Resume Guidance Scale of a Map ........
- Page 122 Index (Continued) Switch 4, 11 SEEK Switch Setup ..........Symbol, Destination .4, 11 CONFIG Button ..................Symbol, Vehicle 55, 65 Navigation Setup...
- Page 123 Index Waypoint Symbol User Settings ..........Configure Menu Waypoints .
Need help?
Do you have a question about the HUMMER 2007 and is the answer not in the manual?
Questions and answers