Table of Contents
Advertisement
Advertisement
Table of Contents

Summary of Contents for Fresca Smart Wash 3.2kg
- Page 1 User Manual...
-
Page 2: Table Of Contents
Contents Safety Precautions …………………………………………………… 2 Washing machine appearance ……………………………………… 4 Installing the Washing Machine ……………………………………… 5 Removing the shipping bolts ………………………………………… 5 Adjusting the leveling leg …………………………………………… 6 Fixing the cover bottom and guide-leg …………………………… 7 Connecting the hose-water(in) ………………………………… 8 Connecting the drain hose……………………………………………... -
Page 3: Safety Precautions
Safety Precautions Important Safety Symbols and Precautions. Please read this manual carefully before using this product. Please read the user manual carefully and perform all installations, maintenance and operation of this machine with caution and care. Proper operation, handling, usage and care for this product will help make the most of the functions of the product and extend the service life of the machine. - Page 4 Safety Precautions Risks associated to placement and location of product (continued...) ◆ This appliance is not intended for use by any children, persons with physical, sensory or mental disability and by any persons with inedequate knowledge of operating an appliance such as this washer product; unless been adequately supervised or guided by a responsible person and understand the potential hazards to ensure that they can use the appliance safely.
-
Page 5: Washing Machine Appearance
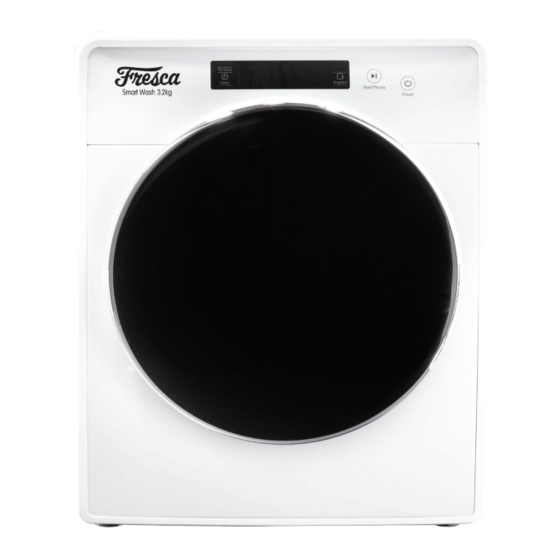
Parts of the Washing machine Common part names and positions of the mini drum washing machine. ASSY-COVER TOP FRAME-HANDLE CONTROL-PANEL HOUSING DRAWER PLUG DOOR-ASSEMBLY LEG-ASSEMBLY Accessories Complete accessories and personalized design BOLT-SPANNAR(1) HOSE-WATER(IN)(1) ASSY-HOSE DRAIN(1) HOSE-DRAIN LINK(1) GUIDE-LEG(4) COVER BOTTOM(1) CAP-FIXER(3) MANUAL-BOOK(1) -
Page 6: Installing The Washing Machine
Installing the Washing Machine Removing the shipping bolts Three shipping bolts on the back of the machine must be dismantled before using the washing machine. Loosen all bolts with the wrench. Take each bolt head and pull it out from the loose hole. -
Page 7: Adjusting The Leveling Leg
Installing the Washing Machine Adjusting the leveling leg ◆ If the floor is uneven, adjust the leveling leg of the washing machine (do not insert pieces of wood or any other objects under the leg) ◆ When tightening the leg bolt with the wrench during adjustments, avoid movement of the leg. -
Page 8: Fixing The Cover Bottom And Guide-Leg
Installing the Washing Machine Fixing the cover bottom and guide-leg Side lay the machine body and place the Align one side of the cover bottom and cover bottom to the bottom; insert it into the groove; Leveling feet Rubber guide-leg Clip four bayonets of the cover bottom into Tear off the internal adhesive paper of the groove, and press the whole bottom... -
Page 9: Connecting The Hose-Water(In)
Installing the Washing Machine Connecting the hose-water(in) Loosen the screw B,turn it to a position with Dismantle the existing hose-water(in); a distance of 5mm from A; Tighten the hose-water(in) and the water Turn part B in the direction as shown in the tap connector. -
Page 10: Connecting The Drain Hose
Installing the Washing Machine Connecting the drain hose existing drain hose Fix the existing drain hose to the larger Press the adapter ring and fit it on the hose connector of Y type drain pipe; drain of the washing machine; drain hole Fix the drain hose attached to the other water Fix one end of the drain hose to the... -
Page 11: Installation Requirements
Installation requirements All electrical circuit and grounding must be set as per the national electrical standard. Power supply ◆ To avoid the unnecessary risk of fire, electric shock or personal injury, all electrical circuit and grounding must be set as per the national electrical standard. It is the owner’s responsibility to provide proper maintenance on the electrical appliance. - Page 12 Installation requirements Grounding ◆ The instructions for appliances incorporating a functional earth, states that the appliance incorporates an earth connection for functional purposes only. ◆ The washing machine must be grounded. If the washing machine has a fault or cannot run normally, the current can be conducted to the ground, minimizing the risk of electric shock.
- Page 13 Installation requirements Ground location ◆ Avoid direct sunlight, with adequate ventilation. (The washing machine shall not be installed in a bathroom or a wet room.) ◆ Room temperature shall not fall below 0 ˚C. ◆ Away from sources of heat such as coal or gas stove. Make sure that the washing machine does not stand on its power cord.
-
Page 14: Control Panel And Program Description
Control panel and program description Control panel and program description facilitate easy operation of the drum washing machine. Start/Pause Power button Press this button start/pause Turn on/ off the washing machine using this operation of the machine; to change washing button. - Page 15 Control panel and program description Multiprogramming, washing state is absolutely clear Cotton Quick Wash suitable for washing cotton or linen cloth, such suitable for washing slightly soiled laundry that as bed sheet, table cloth, underwear, towels, is worn only once or needs washing a little, has shirts.
- Page 16 Control panel and program description Inspection before carrying out Hi-Temp (boiling) program A. Check the classified washing of clothing a.Carry out classification based on color and smudginess degree of clothing (for instance, more dirty clothing, unfaded clothing, white clothing, soft clothing etc.). b.Fasten all attached articles of the clothing and empty the pockets;...
- Page 17 Control panel and program description Delay Press the button repeatedly to cycle through the available preset delay options (from 3 hour to 19 hours in one hour increments). The washing cycle will be completed in the displayed hours. Setting method of the preset time: 1.
-
Page 18: Using Detergents And Additives
Using methods of detergents and additives Please ensure the cap-drawer is placed at the correct position, and it cannot be taken down during wash Cap-drawer Addition level of laundry liquid should not exceed MAX base line marked on the cap-drawer, Laundry power or laundry beads should be added into drum directly. -
Page 19: Cleaning The Washer Drum
Drum clean This is a drum auto clean program and can remove possibility of mold that may be present in the drum. Precautions for using drum cleaning function A. Turn on the water supply faucet. B.Press the Power button to start the washing machine. C.Press the Program button to select the Drum clean program. -
Page 20: Cleaning The Water Supply Valve Filter
Cleaning the water supply valve filter You should clean the supply valve filter at least 3 to 4 times per year, or when you see “SF”error message on the display: Cleaning the water supply valve filter Pull out the power plug and turn off the Unscrew the water supply hose from the water supply faucet of the washing back of the machine. -
Page 21: Cleaning The Washer Enclosure
Cleaning the water supply valve filter - Rust:Rusting may occur if water with rust or rusty article, such as hair pin, is put into the drum, or water has been remained in the drum for too long. - Rust cleaning: Squeeze out the rust removing paste on a soft cloth or sponge, and then wipe the rusty parts. -
Page 22: Storing The Washing Machine
Cleaning the enclosure Precautions for cleaning housing of the washing machine ◆ Wipe the washing machine enclosure, including the control panel, with a soft cloth and nonabrasive household detergents. ◆ Use a soft cloth to dry the enclosure. ◆ Do not pour water on the enclosure, as non water-resistant parts of the machine may get damage. -
Page 23: Troubleshooting
Troubleshooting Problems and solutions Phenomenon Solution Detergent remains in the ● Check if the water pressure is sufficient when washing. detergent drawer after the ● Check if the washing powder are damp and caking. washing is complete ● Check if the washing machine is set on an uneven surface. If the surface is uneven,adjust the leveling leg to level the appliance. - Page 24 Troubleshooting Error messages description Error Code Solution code description ● Check if the door is opened and make sure the door is closed firmly. ● Check if the wiring harness of the computer board was Abnormal door lock accidentally disconnected. ●...
- Page 25 Troubleshooting Error messages description Error Code Solution code description ● Check if the NTC plug wire is in poor contact. ● Test the resistance of temperature sensor in cold state with the multimeter Temperature sensor and check if it is above 1.5MΩ. abnormity ●...
-
Page 26: Product Specifications
Product Specifications FRESCA SMARTWASH 3.2KG - FRONT LOADING WASHING MACHINE Type Full automatic washing machine Rated voltage and frequency 220V-240V/50Hz Wash mode Drum-type Spin mode Centrifugal type Wash 3.2 kg Rated wash and Spin capacity Spin 3.2 kg Rated consumed power 1300W 0.05MPa-0.8MPa... -
Page 27: Program Control Board
• Manufacturer : Team Noble International LTD • Contact number : +86 755 85278182 • Website : www.teamnobleint.com • Importer : Faxtrans P/L Trading as Fresca • Imported on behalf of : Razor RV Accessories • Consumer support Number & Warranty : 03 83545500.
Need help?
Do you have a question about the Smart Wash 3.2kg and is the answer not in the manual?
Questions and answers
Our washing machine is continually coming up with the SF code regardless of what water the machine is connected to. Also it is using a massive amount of water. Continuously pumping water in and out.