Advertisement
Quick Links
Advertisement

Summary of Contents for Gudsen Moza Slypod
- Page 1 User Manual 用户手册 Slypod Remote Controller...
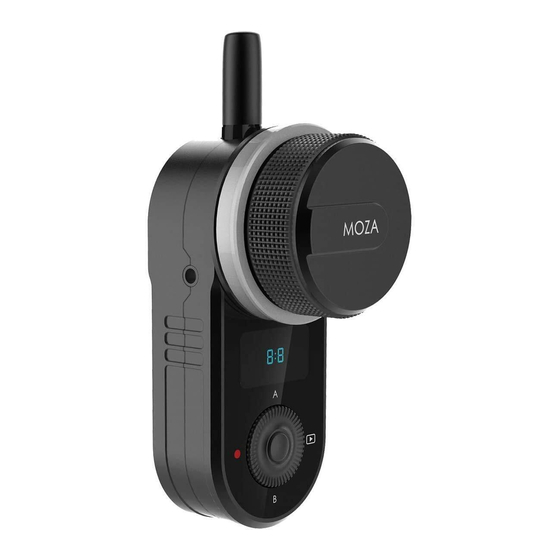
- Page 2 MOZA Slypod Remote Controller Remote Controller Antenna Down Button Rod Clip Wheel Dial Multi-CAN Port OLED Display Screen DEL / Shutter Button Mark Ring Up Button Power Button USB Port Mark / Follow Button Knob Screw...
-
Page 3: Getting Started
Getting Started Installation a.Loosen the knob screw on the rod clip. b. Revolve the support rod into the clip. c. Tighten the knob screw. Note: the diameter range of the support rod clamped by the rod clip should be 15mm to 32mm. Charging Connect the remote controller to the charger via a USB-C cable, then the charging and battery level icon will be displayed on the screen. - Page 4 Status Display Route Calibration Status Route Bar Wireless Connection Status Moving Position SlypodBattery Level Moving Speed Remote Controller Battery Level Modes Display Connecting to the Slypod Pairing a. Turn off the Slypod b. Turn on the remote controller, enter the menu interface, and select Wireless>Pair>Pairing c.
-
Page 5: Menu Introduction
TOP/BTM Mode Double click the up button to enter the TOP Mode, the Slypod extends continuously, turn the dial to adjust the extending speed. FOLLOW Mode Click the left button (Mark/Follow Button) to enter the FOLLOW Mode, set A-B endpoints as shown in the picture, the Slypod will move within the set range. Set A-B Endpoints a. -
Page 6: Firmware Upgrade
Function>Wheel Calibrate> The remote controller controls the Slypod movement through the wheel. Under normal circumstance, the value is the smallest when turning the wheel anticlockwise to the endpoint, and the value gets the largest when turning the wheel clockwise. If the wheel is abnormal, calibration is required. Click the right button to start calibration. - Page 7 “Upgrading” and “Upgrade success” will be displayed in sequence on the screen. f. Restart the remote controller. Note: Please download the MOZA Master (1.2.0 version or above) software from Gudsen MOZA official website to upgrade. SPECS Weight (battery excluded) 165g...
- Page 8 认识MOZA Slypod 遥控器 遥控器 天线 DOWN键 管夹 手轮 拔盘 Multi-CAN接口 OLED显示屏 DEL键/拍照键 标记环 UP键 开关键 USB-C接口 MAKE键/FOLLOW键 管夹锁紧螺丝...
- Page 9 入门 安装 a. 将管夹锁紧螺丝拧松; b. 将管夹套入安装遥控器的圆管上; c. 拧紧管夹锁紧螺丝。 注意: 遥控器的管夹能夹持在直径为15mm到32mm的圆管上。 充电 使用USB-C线将遥控器连接到充电器,遥控器的显示屏会显示充电图标和电量,电池充满 后,充电图标消失。 按键功能定义 界面 操作 上( 下( DOWN 左(FOLLOW) 右 ( 电源 单击 UpDn模式 UpDn模式 FOLLOW模式 拍照 进入菜单 双击 TOP模式 BTM模式 —— —— —— 主界面 长按3s 向上运动 向下运动 标记A,B点 删除A,B点...
- Page 10 状态显示 行程校准状态 行程显示条 无线连接状态 运动位置显示 伸缩杆电量 运动速度显示 遥控器电量 模式显示 连接Slypod 配对 a. 保证Slypod处于关闭状态; b. 打开遥控器,进入菜单,选择Wireless>Pair>Pairing; c. 按下Slypod开机键,Slypod上电(灯环闪烁)后,遥控器屏幕会显示“Pair OK!", 保持 Slypod开机键按住直至魔杖完成开机后,配对完成。 注意:配对成功后,需要先进行遥控器的行程校准,才能正常控制Slypod。参考第 11页 操作教程 手动模式 长按上键,进入UP模式,遥控器控制Slypod向上运动;松开按键,Slypod停止向上运动 。旋转拨盘调节运动速度。顺时针旋转拨轮,速度增加;逆时针 旋转拨轮,速度减小。 长按下键,进入DOWN模式,遥控器控制Slypod向下运动;松开按键,Slypod停止向下 运动。旋转拨盘实时调节运动速度。顺时针旋转拨轮,速度增加;逆时针 旋转拨轮,速度 减小。 注意:从其他模式切换到手动模式时,需要单击菜单上键/下键进入UpDn模式...
- Page 11 TOP/BTM模式 双击上键,进入TOP模式,遥控器控制Slypod持续向上运动,旋转拨盘调节运动速度。 顺时针旋转拨轮,速度增加;逆时针 旋转拨轮,速度减小。 双击下键,进入BTM模式,遥控器控制Slypod持续向下运动,旋转拨盘调节运动速度。 顺时针旋转拨轮,速度增加;逆时针 旋转拨轮,速度减小。 FOLLOW模式 单击左键进入FOLLOW模式,转动遥控器手轮,Slypod则跟随手轮转动的行程位置运动到 相对的行程位置。 顺时针旋转遥控器手轮,实时控制Slypod伸出;逆时针旋转遥控器手轮,实时控制Slypod 缩回。 MARK模式 在已经进入FOLLOW模式下,如图设置A-B点限位,Slypod则在遥控器标记限位的行程范围 内运动。 设置A-B限位 a. 用手轮控制遥控器标记点运动到限位A; b. 按住MARK键,当行程显示条出现A字样时,转动手轮控制遥控器标记点运动到限位B; c. 松开MARK键,A-B限位设置完成。 取消A-B限位 在屏幕上显示有白色A-B限位条的状态下,长按DEL键,可取消设置的A-B限位,恢复行程 校准的限位。 AUTO模式 单击电源键进入菜单,右键选择Motor>进入auto模式,即可自行设置遥控器控制 Slypod运动的方向与速度。 : Range Time Time 菜单介绍 Motor>:Auto模式设置 Dir:设置遥控器控制Slypod运动的方向,单击电源键切换运动方向。 Range:设置遥控器控制Slypod运动行程长度,旋转拨盘调节运动行程长度。(总行程 280mm)...
- Page 12 Time:设置遥控器控制Slypod行程运动的时间,旋转拨盘调节行程运动时间(最大设置时 间2000s,长按拨盘右键快速增加行程时间) Run:单击电源键切换开始行程运动/停止运动 Function>Wheel Calibrate>:手轮校准 遥控器使用手轮控制Slypod运动。正常情况下,手轮逆时针旋转到限位时数值最小,手轮 顺时针旋转到限位时数值最大。如手轮异常,则需要进行手轮校准。 点击右键开始操作 Wheel Calibrate > Brightness :050 a. 将手轮转动到起始位置(如图),点击拨盘右键确认; 1.Turn to the st arting position; Click [>] to con firm. b. 将手轮转动到结束位置(如图),点击拨盘右键确认; 2.Turn to the en d position;Click [>] to confirm. c. 点击拨盘左键退出校准,或者点击菜单键回到主界面。 Brightness>:屏幕显示亮度调节 选中Brightness后,转动拨盘,可以从0到100调节其数值,数值越大,屏幕亮度越高。...
- Page 13 e. 电脑在联网的情况下自动下载最新版本的固件。等待固件下载完成后, 点击”升级“按 钮。 f. 升级过程中,请勿操作遥控器 g. 重启遥控器即可 注意:请从MOZA官方网站下载MOZA Master (1.2.0或以上版本)软件进行升级。 MOZA Master 软件运行前需要安装相关驱动,具体操作请咨询魔爪售后或参考官网相关教 程文档。 规格参数 重量 208g 尺寸 38*92*48mm 工作电压 3.7V 电池容量 750mAh 升级/充电接口 USB-C 工作温度 0-50℃...
- Page 14 产品保修卡 用户资料 产品型号 MOZA Slypod 遥控器 购买日期 姓 名 电 话 地 址 产品保修条例 保修期 自购机日起,遥控器主体保修12个月;电机、电池保修3个月。设备外壳、说明书、线材、 包装等不在"一年免费保修服务"范围内,您可以选择有偿服务。 七日内免费退货 自购机日起7日内,根据国家最新三包规定,您可以选择退货(按票面金额一次性退清货款 )、换货(更换同型号同规格的产品)或修理。 八至十五日免费换货或修理 自购机日起第8日至第15日内,主机出现性能故障,并经特约维修中心检测,确认非人为损 坏的本身质量问题,您可以选择换货(更换同型号、同规格产品)或修理;但是更换的范围, 只限于产品主机,其他配件无质量问题,不能更换;购买者在以下条件下不享受免费保修 服务,您可以选择有偿服务。 1. 超过三包有效期的 2. 无三包凭证及有效发货票的,但能够证明该产品在三包有效期内的除外 3. 包修凭证上的型号与修理产品型号不符或者涂改的 4. 非本公司特约维修人员拆动造成损坏的 5. 因不可抗拒力造成损坏的 6. 未按产品使用说明书要求使用、维护、保养而造成损坏的...
- Page 15 Web: www.gudsen.com...
Need help?
Do you have a question about the Moza Slypod and is the answer not in the manual?
Questions and answers