Table of Contents
Advertisement
Advertisement
Table of Contents

Subscribe to Our Youtube Channel
Summary of Contents for Skytron STELLAR
- Page 1 Page 15 MAINTENANCE MANUAL SERIES SURGICAL LIGHTS 5/04...
-
Page 3: Table Of Contents
2-6. Horizontal Rotation Axis Adjustment ..................... 8 2-7. Radial Arm Horizontal Rotation Axis ....................9 2-8. Bulb Voltage Adjustment ......................10 5/04 Although current at the time of publication, SKYTRON'S policy of continuous development makes this manual subject to change without notice. -
Page 4: Equipment Labels And Specifications
Page 2 EQUIPMENT LABELS AND SPECIFICATIONS ATTENTION, CONSULT MANUAL FOR FURTHER INSTRUCTIONS. INDICATES SPECIAL USER ATTENTION. AC VOLTAGE FUSE TYPE 3 AMP, SLOW BLOW TYPE FUSE TYPE 5 AMP, SLOW BLOW TYPE CLASS I DEFIBRILLATION PROOF, TYPE B EQUIPMENT- IPX4 RATED. INTERNALLY POWERED EQUIPMENT TYPE B EQUIPMENT... -
Page 5: Section I Maintenance
To insure proper operation and extend the life of operation and lubrication. Lubricate the drive your SKYTRON surgical lighting fixture, the follow- gears with lithium grease and all pivot points with a ing preventive maintenance procedures are rec- lightweight oil as necessary. - Page 6 1/4 TURN SCREW NOTE To ensure proper operation of your Stel- lar Light, use ONLY Skytron replace- ment bulbs Part Number B1-010-28. c. Holding the replacement bulb by the base, plug it directly into the socket. Do not touch the Figure 1-1.
-
Page 7: Focus Adjustment
Page 5 1-5. Focus Adjustment As part of normal Preventive Maintenance, the lighthead focus adjustment should be checked. If an adjustment is necessary, use the following pro- c. Adjust the focus control to check that all bulb cedures: patterns will converge on a single spot anywhere from two to six feet from lighthead face. -
Page 8: General
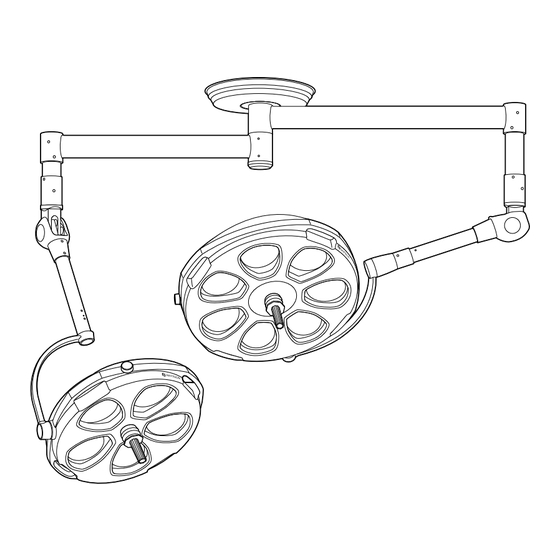
Page 6 SECTION II POSITIONING AXES ADJUSTMENT 2-1. General As a part of normal preventive maintenance, all fixture rotation axes adjustments should be checked and adjusted as necessary. Refer to figure 2-1 for location of desired check or adjustment procedure. C-Vertical Travel Tension paragraph 2-5 A-Lighthead Pitch Axis... -
Page 9: Lighthead Pitch Adjustment
Page 7 2-2. Lighthead Pitch Adjustment 2-3. Model 29 Lighthead Roll Adjustment a. Check the pitch axis tension of each lighthead a. Check the roll axis tension of the model 29 by moving it through its full range of motion. See lighthead by moving it through its full 360°... -
Page 10: Model 23 Lighthead Roll Adjustment
Page 8 2-4. Model 23 Lighthead Roll Adjustment d. Continue to rotate the yoke until a 5mm hole is visible through the hole. Insert a pin punch into a. Check the roll axis tension of the model 23 the hole in the adjustment nut. lighthead by moving it through its full 360°... -
Page 11: Horizontal Rotation Axis Adjustment
Page 9 COVER PLATE PUNCH b. The lighthead should maintain its position without drifting, yet move freely around the Bal- ance Mechanism. Normally this adjustment is correct from the factory and does not change. If the ADJUSTMENT SLOT lighthead drifts, the most likely cause is an unlevel mounting plate. -
Page 12: Radial Arm Horizontal Rotation Axis
Radial Arms are difficult to another reference line as shown in figure 2-12. move, the bearing preload must be adjusted. This requires the use of special tools. Contact your SKYTRON dealer for assistance. -
Page 13: Bulb Voltage Adjustment
SKYTRON Surgical Light. For factory service contact your nearest SKYTRON dealer or write: SKYTRON, 5000 - 36th St., S.E., Grand Rapids, MI 49512 / Phone (616) 957-0500. - Page 14 Page 12 WIRING DIAGRAM...
- Page 15 Page 13...
- Page 16 Page 14 5000 36th Street S.E. • Grand Rapids, MI 49512 1.800.SKYTRON • 1.616.957.0500 • FAX 1.616.957.5053...
Need help?
Do you have a question about the STELLAR and is the answer not in the manual?
Questions and answers