
Subscribe to Our Youtube Channel
Related Manuals for Vaisala INTERCAP HMDW80 Series


Summary of Contents for Vaisala INTERCAP HMDW80 Series
- Page 1 USER'S GUIDE Vaisala INTERCAP® Humidity and Temperature Transmitters HMDW80 Series M211510EN-E...
- Page 2 This manual does not create any legally binding obligations for Vaisala towards customers or end users. All legally binding obligations and agreements are included exclusively in the applicable supply contract or the General Conditions of Sale and General Conditions of Service of Vaisala.
-
Page 3: Table Of Contents
Configuration and Wiring ............. 24 Pole installation ..............25 Wall installation ..............26 Wiring ..................27 HMD82(D), HMW88(D), and HMS82 ........27 TMS82 ................. 28 TMD82 ................. 28 TMD83 ................. 28 HMW82 ................29 HMW82P100 ............... 29 TMW82 ................29 VAISALA _________________________________________________________________________ 1... - Page 4 User's Guide _______________________________________________________________________ HMW83 ................30 TMW83 ................30 DIP Switches ................31 CHAPTER 4 MAINTENANCE .................... 33 Cleaning ................... 33 Calibration ................33 ® Replacing the INTERCAP Humidity Sensor ....... 34 ® Replacing the INTERCAP Sensor on Models HMD82/83 and HMW88/89 ..............
- Page 5 Specifications for Models HMD82/83D, HMW88/89D, and TMW88 ................45 Table 12 Operating Environment (All Models) ........46 Table 13 Inputs and Outputs ..............46 Table 14 Mechanics ................46 Table 15 HMDW80 Series Spare Parts and Accessories ....... 47 VAISALA _________________________________________________________________________ 3...
- Page 6 User's Guide _______________________________________________________________________ 4 ____________________________________________________________________ M211510EN-E...
-
Page 7: Chapter 1 General Information
- Chapter 4, Maintenance, provides information that is needed in basic maintenance of HMDW80 series. - Chapter 5, Troubleshooting, describes possible problems, their probable causes and remedies, and provides contact information for technical support. - Chapter 6, Technical Data, provides the technical data of the HMDW80 series. VAISALA _________________________________________________________________________ 5... -
Page 8: Version Information
User's Guide _______________________________________________________________________ Version Information Table 1 Manual Revisions Manual Code Description M211510EN-E May 2016. This manual. Changes: Added transmitter models TMS82, TMW88, and HMW82P100. Updated the HMD82(D)/HMW88(D)/HMS82 wiring diagram for one power supply alternative. Updated the HMD82(D), HMW88(D), HMS82, and TMD82 power supply requirements information in wiring diagrams. -
Page 9: Documentation Conventions
ESD Protection Electrostatic Discharge (ESD) can cause immediate or latent damage to electronic circuits. Vaisala products are adequately protected against ESD for their intended use. It is possible to damage the product, however, by delivering electrostatic discharges when touching, removing, or inserting any objects inside the equipment housing. -
Page 10: Recycling
Vaisala Oyj. Software License This product contains software developed by Vaisala. Use of the software is governed by license terms and conditions included in the applicable supply contract or, in the absence of separate license terms and conditions, by the General License Conditions of Vaisala Group. -
Page 11: Warranty
Please observe that any such warranty may not be valid in case of damage due to normal wear and tear, exceptional operating conditions, negligent handling or installation, or unauthorized modifications. Please see the applicable supply contract or Conditions of Sale for details of the warranty for each product. VAISALA _________________________________________________________________________ 9... -
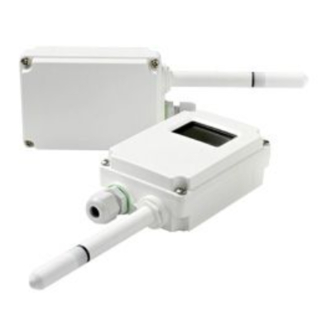
Page 12: Chapter 2 Product Overview
This chapter introduces the features and options of the HMDW80 series transmitters. Introduction to HMDW80 Series ® Vaisala INTERCAP Humidity and Temperature Transmitter Series HMDW80 measure relative humidity and temperature in various building automation applications. Transmitters combine easy installation and reliable operation with a low requirement for maintenance. -
Page 13: Hmdw80 Series Transmitter Models
(Tf) instead of dewpoint. Enthalpy kJ/kg Sum of the internal energy of a thermodynamic BTU/lb system. Wet bulb °C The minimum temperature that can be reached temperature °F by evaporative cooling in the current conditions. VAISALA ________________________________________________________________________ 11... -
Page 14: Transmitter Parts - Duct Models
User's Guide _______________________________________________________________________ Transmitter Parts – Duct Models 1302-018 Figure 1 Parts of Duct Mounted Models (HMD82/83 and TMD82/83) 1 = PTFE membrane filter (spare part item ASM210856SP). ® 2 = INTERCAP humidity sensor and temperature sensor. Not included in TMD82 and TMD83 models. 3 = Probe. -
Page 15: Transmitter Parts - Wall Models
7 = Probe. ® 8 = INTERCAP humidity sensor and temperature sensor. 9 = PTFE filter (spare part item DRW239993SP). 10 = Window for display (in HMW88D and HMW89D models) 11 = Transmitter cover with captive screws. VAISALA ________________________________________________________________________ 13... -
Page 16: Figure 3 Parts Of Wall Mounted Models (Hmw82/82P100/83 And Tmw82/83)
User's Guide _______________________________________________________________________ 1302-020 Figure 3 Parts of Wall Mounted Models (HMW82/82P100/83 and TMW82/83) 1 = Opening tab: push down to open the transmitter. 2 = Direction arrow. Must point up after mounting base has been installed on the wall. 3 = Wiring label. -
Page 17: Transmitter Parts - Outdoor Models
9 = Medium size crosshead screws (6 pcs) that hold the transmitter cover in place. 10 = Transmitter cover. 11 = Cable gland. Suitable for 4 ... 8 mm diameter cable. 12 = Configuration DIP switches. See section DIP Switches on page 31. VAISALA ________________________________________________________________________ 15... -
Page 18: Display
User's Guide _______________________________________________________________________ Display Display is present on the following models: - HMD82D and HMD83D - HMW88D and HMW89D When the transmitter is powered on, it displays a sequence of information screens about the transmitter and its analog outputs. The screens are shown for a few seconds each. Checking the screens on startup is a good way to verify that the transmitter’s configuration DIP switches are set correctly. -
Page 19: Analog Output Overrange Behavior
(if included in the transmitter model). The display always shows the currently measured readings if the measurement is operating without error. For more information on transmitter errors, see section Error Messages on the Display on page 41. VAISALA ________________________________________________________________________ 17... -
Page 20: Chapter 3 Installation
User's Guide _______________________________________________________________________ CHAPTER 3 INSTALLATION This chapter provides you with information that is intended to help you install HMDW80 series transmitters. Selecting Location When mounting duct model transmitters: - Avoid installing in a location where condensation may fall on the sensor inside the duct. -
Page 21: Installing Duct Models Hmd82/83 And Tmd82/83
Refer to section Wiring on page 27. Check that the DIP switches (if present in your transmitter model) are set as desired. See section DIP Switches on page 31. Tighten the cable gland and close the transmitter cover. VAISALA ________________________________________________________________________ 19... -
Page 22: Figure 8 Duct Model Installation
User's Guide _______________________________________________________________________ 1302-026 Figure 8 Duct Model Installation 1302-027 Figure 9 Position the Sensor to Center of Duct 290.8 40.6 250.2 244.5 Ø12 Ø3.5 Ø12 Ø4...8 1302-028 Figure 10 Duct Model Dimensions (HMD82/83 and TMD82/83) 20 ___________________________________________________________________ M211510EN-E... -
Page 23: Installing Wall Models Hmw88, Hmw89 And Tmw88
Refer to section Wiring on page 27. Close the transmitter cover and remove the yellow transport protection cap from the probe. 40.6 Ø10 Ø3.5 Ø3.5 Ø10 Ø12 Ø4...8 1302-029 Figure 11 Wall Model Dimensions (HMW88/89, TMW88) VAISALA ________________________________________________________________________ 21... -
Page 24: Installing Wall Models Hmw82/82P100/83 And Tmw82/83
User's Guide _______________________________________________________________________ Installing Wall Models HMW82/82P100/83 and TMW82/83 Small flat head screwdriver for opening the transmitter and for REQUIRED screw terminals. TOOLS Two screws, max Ø 4 mm. Depending on the wall material and screw type, you may need a drill and a suitable drill bit to make installation holes for screws. -
Page 25: Installing Outdoor Models Hms82/83, Tms82
Additional tools for wall installation: Drill and bits. Screws (2 pcs, Ø < 5.5 mm) and wall plugs Cable clips for securing the cable to the wall. Ø5.5 Ø4...8 121.5 264.2 1304-053 Figure 13 Outdoor Model Dimensions (HMS82/83, TMS82) VAISALA ________________________________________________________________________ 23... -
Page 26: Configuration And Wiring
User's Guide _______________________________________________________________________ Configuration and Wiring To minimize working at height at the installation location, prepare the transmitter configuration and wiring before climbing up. Open the six screws that hold the transmitter cover. Check that the DIP switches are set as desired. See section DIP Switches on page 31. -
Page 27: Pole Installation
Secure the cable to the pole using a zip tie. Allow some cable to hang down from the cable gland to prevent water from entering the transmitter along the cable. 1304-056 Figure 16 Securing the Cable on a Pole VAISALA ________________________________________________________________________ 25... -
Page 28: Wall Installation
User's Guide _______________________________________________________________________ Wall installation Drill two holes for wall plugs 100 mm apart. Place the wall plugs in the holes. Mount the transmitter using two screws of sufficient length. 100 mm Ø 5.5 mm 1304-055 Figure 17 HMS82/83 Wall Installation Plug in the screw terminal block, close the cover, and tighten the screws. -
Page 29: Wiring
-40 ... +60 °C (-40 ... +140 °F). You must connect the HUM channel even if you only want to measure temperature. Connecting the T channel is optional. Alternate wiring with one power supply. VAISALA ________________________________________________________________________ 27... -
Page 30: Tms82
User's Guide _______________________________________________________________________ TMS82 4 ... 20 mA output, scaling -40 ... +60 °C (-40 ... +140 °F). Leave terminals 3 and 4 unconnected. TMD82 4 ... 20 mA output, scaling -40 ... +60 °C (-40 ... +140 °F). Leave terminals 3 and 4 unconnected. -
Page 31: Hmw82
(-5 ... +55ºC) TMW82 One 4 ... 20 mA output, -T +T scaling -5 ... +55 °C (+23 ... +131 °F). 28 VDC Leave the two terminals on the left unconnected. 600 Ω R L = 0 VAISALA ________________________________________________________________________ 29... -
Page 32: Hmw83
User's Guide _______________________________________________________________________ HMW83 Two 0 ... 10 V outputs, temperature output -RH +RH scaling -5 ... +55 °C 35 VDC (+23 ... +131 °F). or 24 VAC This is the recommended wiring R L = min. 10 kΩ for long cables. -RH +RH 3-wire connection with - VS as common ground. -
Page 33: Dip Switches
Figure 19 below shows the default position of the DIP switches. The default settings are: - Metric units shown on display. - Relative humidity (RH) selected as humidity output parameter. Non-metric Metric 1302-053 Figure 19 DIP Switches on Component Board VAISALA ________________________________________________________________________ 31... -
Page 34: Table 5 Dip Switch Positions For Metric Output
User's Guide _______________________________________________________________________ Table 5 DIP Switch Positions for Metric Output DIP Position Analog Output Parameters and Units Parameter and Scaling on Display Relative humidity (RH) RH (%) 0 ... 100 % Temperature (T) T (°C) -40 ... +60 °C Dewpoint (Td) Td (°C) -40 ... -
Page 35: Chapter 4 Maintenance
Do not attempt to clean contaminated INTERCAP sensors or filters. Instead, replace them with new parts. Filters and sensors can be purchased from Vaisala. For order codes, see section Spare Parts and Accessories on page 47. Calibration You can verify the performance of your HMDW80 series transmitter by... -
Page 36: Replacing The Intercap Humidity Sensor
Verify that the transmitter now provides a valid humidity reading. 1305-024 Figure 20 Sensors on HMD82/83 and HMW88/89 Models 1 = Vaisala INTERCAP® sensor. Handle by the plastic frame. 2 = Temperature sensor. Do not touch or attempt to remove. 3 = Sensor socket. 4 = Transmitter probe. -
Page 37: Replacing The Intercap Sensor On Wall Models Hmw82/82P100/83
Remove the old sensor, and insert the new one. See Figure 21 below. Reconnect the cover to the mounting base. Verify that the transmitter now provides a valid humidity reading. 1305-018 ® Figure 21 INTERCAP Sensor on HMW82/83 Models VAISALA ________________________________________________________________________ 35... -
Page 38: Replacing The Intercap Sensor On Outdoor Models Hms82/83
User's Guide _______________________________________________________________________ ® Replacing the INTERCAP Sensor on Outdoor Models HMS82/83 ® New INTERCAP humidity sensor. REQUIRED New filter (always recommended when replacing the sensor). TOOLS Medium size crosshead screwdriver (Pozidriv) Flat head screwdriver 3 mm hex key (Allen key) for opening the radiation shield screws. If transmitter mounted on pole: 2.5 mm hex key for opening and tightening the set screw. -
Page 39: Figure 23 Opening The Radiation Shield Screws
Chapter 4 _______________________________________________________________ Maintenance Open the two long screws that hold the radiation shield, and pull them out. 1305-020 Figure 23 Opening the Radiation Shield Screws 1305-021 Figure 24 Removing the Radiation Shield Screws VAISALA ________________________________________________________________________ 37... -
Page 40: Figure 25 Location Of Locking Tab
User's Guide _______________________________________________________________________ Use a flat head screwdriver to push on the visible plastic tab below the radiation shield. 1305-022 Figure 25 Location of Locking Tab Tilt the radiation shield away from the opened tab. This opens the second tab on the other side, allowing you to remove the radiation shield. -
Page 41: Figure 27 Filter Removed
1305-024 Figure 28 Sensors on HMS82/83 Models 1 = Vaisala INTERCAP® humidity sensor. Handle by the plastic frame. 2 = Temperature sensor. Do not touch or attempt to remove. 3 = Sensor socket. 4 = Transmitter probe. -
Page 42: Chapter 5 Troubleshooting
User's Guide _______________________________________________________________________ CHAPTER 5 TROUBLESHOOTING This chapter describes possible problems, their probable causes and remedies, and provides contact information for technical support. Problem Situations Table 7 Possible Problem Situations and Their Remedies Problem Probable Cause and Remedy Transmitter outputs an 1. -
Page 43: Analog Output Error State
Possible Cause and Solution INTERNAL 1 Internal problem with the transmitter. Restart the INTERNAL 2 transmitter to see if the problem remains. Contact Vaisala INTERNAL 3 technical support if unable to remove the problem. ERROR HUM Humidity measurement failed. Check if the humidity sensor is damaged or missing. -
Page 44: Technical Support
User's Guide _______________________________________________________________________ Technical Support For technical questions, contact the Vaisala technical support by e-mail at helpdesk@vaisala.com. Provide at least the following supporting information: - Name and model of the product in question - Serial number of the product - Name and location of the installation site - Name and contact information of a technically competent person who can provide further information on the problem. -
Page 45: Chapter 6 Technical Data
+10 … +30 °C (+50 °F … +86 °F) ±0.5 °C (±0.9 °F) -5 … +10 °C, +30 … +55 °C (+23 ... +50 °F, +86 ... +131°F) ±1.0 °C (±1.8 °F) Temperature sensor Digital temperature sensor HMW82P100: Pt100 Class F 0.1 IEC 60751 VAISALA ________________________________________________________________________ 43... -
Page 46: Table 10 Specifications For Models Hmd82/83, Tmd82/83, Hmw88/89, Hms82/83, And Tms82
0 … 100 %RH ±7 %RH Stability in typical HVAC applications ±2 %RH over 2 years ® Humidity sensor Vaisala INTERCAP Temperature Measurement range -40 ...+60 °C (-40 ... +140 °F) Accuracy At +20 °C (+68 °F) ±0.3 °C (±0.54 °F) Temperature dependence ±0.01 °C/°C... -
Page 47: Table 11 Specifications For Models Hmd82/83D, Hmw88/89D, And Tmw88
Accuracy at +20 °C (+68 °F) and 80 %RH: Dewpoint ±0.9 °C (1.6 °F) Wet bulb temperature ±0.7 °C (1.3 °F) Enthalpy ±2kJ/kg (0.9 BTU/lb) VAISALA ________________________________________________________________________ 45... -
Page 48: Table 12 Operating Environment (All Models)
User's Guide _______________________________________________________________________ Table 12 Operating Environment (All Models) Property Description / Value Operating environment See model specifications Maximum wind/flow speed 30 m/s Storage temperature -40 ... +60 °C (-40 ... +140 °F) Electromagnetic compliance EN61326-1, industrial environment Table 13 Inputs and Outputs Property Description / Value... -
Page 49: Spare Parts And Accessories
Conduit fitting + O-ring (M16x1.5 / NPT1/2 Inch) ● ● ● ● ● ● 210674SP Conduit fitting + O-ring (M16x1.5 / PG9, RE-MS) ● ● ● ● ● ● 236620SP Terminal block, blue ● = Part is compatible VAISALA ________________________________________________________________________ 47... - Page 50 *M211510EN*...
Need help?
Do you have a question about the INTERCAP HMDW80 Series and is the answer not in the manual?
Questions and answers