Table of Contents
Advertisement
Quick Links
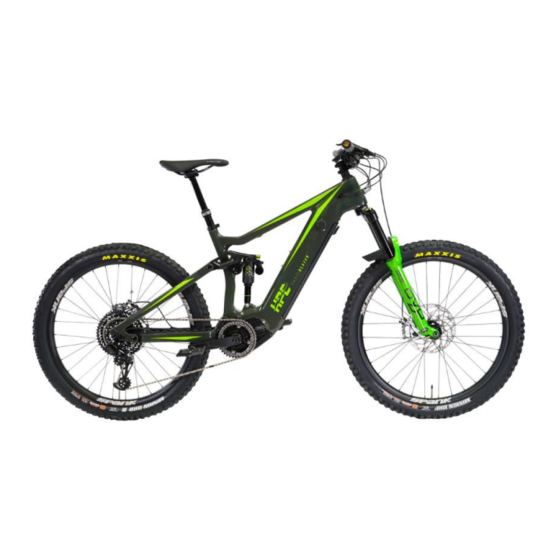
Congratulations! The Trailblazer is our newest state of the art electric mountain bike that is meticulously hand assembled the right
here in our Los Angeles warehouse. Your choice puts you among the elite group that demands the most advanced technology and the
highest quality craftsmanship available for electric bikes.
Hi Power Cycles has put together high-performing electric bikes that are designed and assembled here in our USA factory to be
economical, non-polluting, quiet, and efficient. This allows you to be a part of the electric vehicle generation and to be environmentally
conscientious, while at the same time providing you with a FUN new way to get around and exercise!
With your new Trailblazer, you are at the forefront of electric propulsion technology. You now own one of the industry's most capable
and most powerful electric bikes!
Below you will find the instructions on how to quickly and easily get started with your brand new HPC Trailblazer electric mountain
bike. Note that Trailblazers come standard limited to 20 MPH, with no throttle and ship as a Class 1 ebike. If you choose to add a
throttle, it will no longer be a Class 1 ebike and will be considered Class 2. Please consult your local regulations to clarify e-bike rules
which can vary from location to location.
Trailblazer Owner's Manual
Advertisement
Table of Contents

Summary of Contents for HPC Trailblazer
- Page 1 FUN new way to get around and exercise! With your new Trailblazer, you are at the forefront of electric propulsion technology. You now own one of the industry’s most capable...
- Page 2 (Mandated by federal law due to the 750W/20 MPH limit in the US. Please check with your local government to ensure you follow all local laws and ordinances). HPC is not liable for those who chose not to follow their local laws.
- Page 3 Glossary 1. Assembly..……………………………………. 4-7 2. Battery Safety...…………………...…………… 8-10 3. How To Charger Your Trailblazer..………… 11-12 4. Battery Removal…………………..………… 13 5. Before You Ride…………………..………… 14 6. Riding Tips and Maintenance…...…………..15-19 7. Battery Level Indicator….………………………..20 8. Troubleshooting………………………………..21 9. Warranty ………………………………….…..22-26 HPC Warranty Card……….…..…………..….27...
- Page 4 IMMEDIATELY. Open your HPC accessory box. In this box you will find your “L” goes on the left side and “R” goes on the right side. MAKE...
- Page 5 1.4 (Optional) Install supplied fender. Using a 3mm allen key (ball end recommended), carefully thread in the 2 snap-in bolts into the lower holes on the rear of the arch and torque to 3Nm. Once these have been installed these bolts do not have to be removed.
- Page 6 1.8 Both Trailblazer and Trailblazer PRO feature an adjustable 1.10 Make sure brake cutoffs are properly plugged in. dropper seatpost already installed. The seatpost should be CAREFULLY make sure you plug in the connectors and follow the inserted all the way in. Make sure it is tightened with a 5mm white mark as your guide.
- Page 7 1.13 Make sure the display is plugged into the main wiring harness. The green triangular connector on the 750W/1200W will be by the handlebar and plugs directly into the back of the display. The display connector for the 1600W can be found on the right side of the headtube as shown.
-
Page 8: Battery Safety (Brief Overview)
2. Battery Safety (Brief Overview) If you ever suspect a battery problem, please contact us immediately by email or phone so we can go through the appropriate steps/procedures to make sure everything is okay with battery system. At Hi Power Cycles, safety is our number one concern. We want our customers to enjoy a great product that will give those customers’ years of trouble free operation. -
Page 9: Safety Precautions
battery system or bike outside immediately, away from all 2.1 Safety Precautions: structures and people, preferably on concrete (like a We recommend keeping the following immediately accessible driveway). Observe the battery pack from a safe distance to where you charge your battery: see if it is a pertinent problem that needs to be addressed Class D Fire Extinguisher: can be used in the event of a immediately. - Page 10 The intent of this section is to provide a general knowledge of abusive condition or misuse that raises the cell how to handle cells and batteries that have been subject to these temperature above its critical point. adverse conditions. This document will focus on the following: In the event of a lithium battery explosion, a room Hot cells can quickly fill with a dense white smoke that can...
- Page 11 European owners 4. Plug in the charger plug into the built in charge port on the drive side of the Trailblazer frame as shown in the photo. make sure to select 230v mode.
- Page 12 In order to maximize storage life and performance, you will Cycle Satiator Electronic Charger want to charge the battery using the 50% profile and disconnect If you purchased the Cycle Satiator electronic charger, your it when it is finished. charger has already been programmed for your bike! The three profiles are written on top of the charger so you know which Every 2 months, we recommend using the 50% charge profile profile to choose.
-
Page 13: Installing/Removing Battery
4. Installing/Removing Battery Trailblazer features a quick change battery that take less than 10 seconds to change! Your battery will arrive plugged in, inside the downtube of the carbon frame. To remove the battery, 1. Insert the key on the left side of the battery tube 2. -
Page 14: Before You Ride
During shipping, shifters, brakes and other mechanical parts may come out of ENJOY your new HPC e-bike! A lot of time and hard alignment. If you are capable, you are welcome to do it yourself work is spent on getting these bikes just right, so enjoy it! if you are confident in your abilities. -
Page 15: Battery Care
6.1 Riding and Maintenance Tips can’t hold your finger on either the BMS, battery, charger for more than 5 seconds), immediately stop charging and check for 1. If you do not wish have pedal assist active, start with the electric system in level “0”. connection problems. -
Page 16: Prolonging The Life Of Your Battery
It will not last very long and put excessive wear and tear on your drive train. Do not abuse your system, and it will last Your HPC bicycle features a state of the art Lithium based you a long time! battery system built right here in the USA. - Page 17 25.2 miles maximum range (48v pressure will cause sidewalls to collapse, and that is how x 10.5ah = 504wh. 504wh watt-hours divided by 20 watt- most blowouts occur. HPC IS NOT RESPONSIBLE FOR hours/mile = 25.2 miles range). Our range estimates are FLAT TIRES! slightly more conservative although many of our customers 8.
- Page 18 Tire PSI and weather also can affect your range. 6.8 Using your E-Bike Computer The HPC Trailblazer comes with an intelligent LCD display which gives an abundance of information including: speed relative battery level, trip, odometer, pedal assist level, and current time.
- Page 19 Off Road Riding Tips On Road Riding Tips 1. Always wear a helmet and protective gear while riding your 1. Always wear a helmet and protective gear while riding your mountain bike. This includes a helmet, gloves, and knee and electric bike.
-
Page 20: Battery Level Indicator
1600W The 1600W Trailblazer come with an advanced DPC 18 color display. This display features a battery indicator which is simply based off the voltage and shows the current battery voltage. Because the bike is running a higher voltage 52V battery, you do not want to pay attention to the battery indicator but focus on the voltage readout since that is the most accurate metric. -
Page 21: Troubleshooting
Troubleshooting Problem: Why won’t my bike turn on? This is the most common problem we encounter and the solution is typically very simple. Solution: 1. Check that the battery is fully charged. Use a voltmeter and test the output on the charging terminals (take the battery off and you will see the terminals on the bottom). - Page 22 If you are not getting the range, there are many factors at play. If you are a heavier rider, it will adversely affect your range. If you do a lot of starting/stopping on your ride, your range numbers will plummet since accelerating takes the most juice out of the battery. If you are riding on hills or rough terrain, you will decrease your range number as the system will draw much more battery juice under these circumstances.
-
Page 23: Warranty Information
7.1 Basic Warranty- The HPC warranty is comprehensive, no questions asked for the first year. After the first year (year 1-3) any replacement components needed to fix a customer’s bike will be discounted 50% off the normal retail price, provided we receive the broken component in return. - Page 24 The original owner shall pay all labor charges (after the first 30 days of ownership) associated with the repair or replacement of all parts. Under no circumstances (after the first 30 days of ownership) does this limited warranty include the cost of shipment or transportation to or from Hi-Power Cycles.
- Page 25 Any product returned for repair or replacement must be accompanied by a contact name, email address, shipping address and daytime phone number. If this information is not provided, HPC will be unable to return your product to you and reserves the right to dispose of your product two months after the receipt of the warranty item.
- Page 26 Months 13-36: After the first year of ownership is over, HPC will repair defective products if possible. The first hour of labor will be at no cost to the customer and will be a free service. Any consecutive hour(s) of labor will be charged at a discounted rate of 25% off the normal shop rate of $120/hr.
-
Page 27: Hpc Warranty Card
7. HPC Warranty Card Detailed Description of the Problem: In order to warrant your product, please have this card ______________________________________________________ COMPLETELY filled out ALONG WITH PROOF OF PURCHASE (printed invoice or receipt), and send to the ________________________________________________________ following address: ________________________________________________________...
Need help?
Do you have a question about the Trailblazer and is the answer not in the manual?
Questions and answers