Table of Contents
Advertisement
Quick Links
Advertisement
Table of Contents

Summary of Contents for MonkMakes 00063
- Page 1 Instructions: LECTRONICS TARTER OR MICRO Rev 4a.
-
Page 2: Table Of Contents
Getting Started......................7 Project 1. Movement Alarm..................10 Project 2. Lighthouse....................12 Project 3. Shout-o-meter..................14 Project 4. Thermometer...................17 Project 5. Fan Speed Controller................20 Project 6. Automatic Fan..................24 Project 7. Magic Music....................26 The JavaScript Blocks Editor..................28 Using MicroPython....................30 Troubleshooting.......................31 What Next?......................32 Notes........................33 MonkMakes......................36 Page 2... -
Page 3: Parts
MonkMakes Switch for micro:bit (switch things on and off or control the brightness of a light or the speed of a motor) MonkMakes Sensor Board for micro:bit (sense sound, temperature and light) Set of alligator clip leads (10 leads) to connect... -
Page 4: Making The Projects
All the programs for this kit are listed on a web page for this kit's software at: https://monkmakes.com/mb_2a shown below. Clicking on one of the programs will open it in your browser so that you can then install it on your micro:bit. - Page 5 The projects in this kit are assembled by connecting your micro:bit to one or more of the MonkMakes boards using alligator clips. You have to be a bit careful how you connect the clips at the micro:bit end. The correct way is to connect the clips vertically as shown below.
- Page 6 Building a Project The micro:bit and the MonkMakes boards are pretty robust when it comes to connecting things up the wrong way around, but it's a good idea to unplug your micro:bit from your computer while you are wiring things up. Then check it over carefully before connecting your micro:bit to your computer.
-
Page 7: Getting Started
To get you started with your kit, please follow the steps below. This does not use any of the MonkMakes add-on boards, so for now you don't need the alligator clips. If you have already used your micro:bit for other things, you can probably skip this section. - Page 8 Click on the project called welcome. This is what you should see when you click on Step 3. Install the Program Next, you are going to send the welcome program to the micro:bit. Click on the “Download” link at the bottom of the page. This will download a file for the program ending in .hex.
- Page 9 drag the hex file from your Downloads folder onto the micro:bit icon in the file explorer just as if the micro:bit were a USB flash drive. If you are using a Mac, Linux or Raspberry Pi computer the process is the same, but the file explorer tool will be different.
-
Page 10: Project 1. Movement Alarm
OVEMENT LARM You will need: • micro:bit • MonkMakes Speaker for micro:bit • Program: P1 Alarm Flash the program P1 Alarm onto your micro:bit (see page 8 for instructions on flashing programs onto your micro:bit). Then connect the Speaker as shown to the right. - Page 11 Try tweaking the number 50, to alter how sensitive the alarm is. You can also pick different tunes to play in the start melody block. MicroPython Code If you want to use the MicroPython versions of the programs rather than the Block Editor code, then please see the section near the end of this booklet called Using MicroPython for instructions on downloading and using the code.
-
Page 12: Project 2. Lighthouse
2. L ROJECT IGHTHOUSE You will need: • micro:bit • MonkMakes Switch for micro:bit • MonkMakes 1V Bulb • Single AA battery holder and battery • Program: P2 Light House Flash the program P2 Light House onto your micro:bit (see page 8) and then wire up the Switch, battery and light-bulb as shown to the right. - Page 13 MicroPython Code If you want to use the MicroPython versions of the programs rather than the Block Editor code, then please see the section near the end of this booklet called Using MicroPython for instructions on downloading and using the code. Here is the MicroPython code for this project.
-
Page 14: Project 3. Shout-O-Meter
(see page 8) and then connect up the Sensor board as show to the right. Make a noise near the microphone section of the MonkMakes Sensor Board and you should see the LEDs on the micro:bit light to show the volume. The louder the noise, the more LEDs will be lit. - Page 15 Here is the code for the project: The function analog read pin gives a number between 0 and 1023 depending on the voltage at pin0. Since pin0 is connected to the microphone, the signal will vary between 0 and 1023 as the sound wave oscillates. 511 is subtracted from the reading to get the midpoint of the signal.
- Page 16 MicroPython Code If you want to use the MicroPython versions of the programs rather than the Block Editor code, then please see the section near the end of this booklet called Using MicroPython for instructions on downloading and using the code. Here is the MicroPython code for this project.
-
Page 17: Project 4. Thermometer
C) or P4 Thermometer F (for Fahrenheit) onto it (see page 8). Then connect the Sensor board as shown. Your micro:bit will display the temperature of the MonkMakes Sensor Board's temperature sensor (shown by the thermometer symbol). Try putting your finger on the sensor and you should see the temperature start to rise. - Page 18 multiplied by a number (A) the result is then divided by another number (B) and then a positive or negative final number C is added to the result. To make your thermometer more accurate you can use the program P4 Calibrate to find the analog reading for two known temperatures (using a second thermometer) and then calculate new values of A, B and C.
- Page 19 while True: reading = pin1.read_analog() temp_c = reading * 0.157 - 54 display.scroll(str(temp_c)) Page 19...
-
Page 20: Project 5. Fan Speed Controller
A to decrease the speed. How it Works This project uses the MonkMakes Switch to provide pulses of power of varying length to the motor. The code is the most complicated so far. It uses quite a few variables that are defined in the on start block. - Page 21 The forever loop is used to continuously set the power level to match the speed. The case of the speed being 0 is treated as a special case, to set the power to 0, otherwise the motor may buzz without actually turning when the speed is 0. The on button pressed blocks are very similar to each other.
- Page 22 pulse is high, the more power is delivered to the motor and the faster it will turn. MicroPython Code If you want to use the MicroPython versions of the programs rather than the Block Editor code, then please see the section near the end of this booklet called Using MicroPython for instructions on downloading and using the code.
- Page 23 pin0.write_analog(speed * power_step + min_power) set_power(speed) while True: if button_a.was_pressed(): speed -= 1 if speed < 0: speed = 0 set_power(speed) elif button_b.was_pressed(): speed += 1 if speed > 9: speed = 9 set_power(speed) sleep(100) Page 23...
-
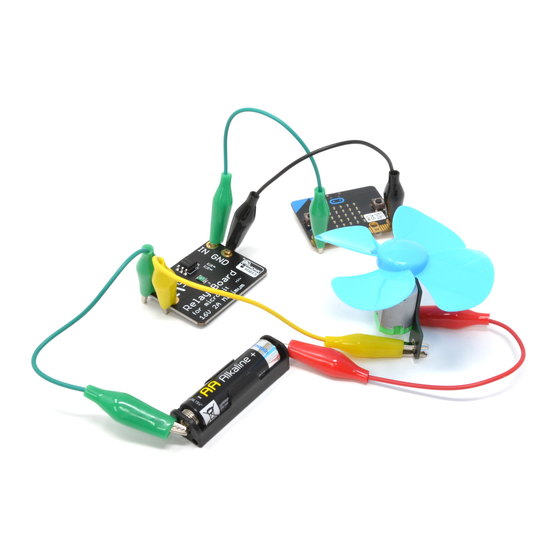
Page 24: Project 6. Automatic Fan
To test the project out, set the set-temperature to a few of degrees above the current temperature and then put your finger on the temperature sensor area of the MonkMakes Sensor board to simulate the room temperature rising. When the temperature rises above the set temperature, the fan will start. Take your finger away and after a few seconds, the sensor's temperature will fall back below the set temperature and the motor will turn off again. - Page 25 MicroPython Code If you want to use the MicroPython versions of the programs rather than the Block Editor code, then please see the section near the end of this booklet called Using MicroPython for instructions on downloading and using the code. Here is the MicroPython code for this project.
-
Page 26: Project 7. Magic Music
7. M ROJECT AGIC USIC You will need: • micro:bit • MonkMakes Sensor Board for micro:bit • MonkMakes Speaker for micro:bit • Program: P7 Magic Music Flash the program P7 Magic Music onto your micro:bit (see page 8). Then connect up the wiring as shown to the right. - Page 27 The variable multiplier is initially set to 20. This is used to increase the value of the calculated light level to an audible frequency. So, if when you wave your hand in front of the light sensor, all you hear are clicks, then try increasing this value. On the other hand, if, as you move your hand closer to the light sensor, the pitch of the sound rises too high to be audible, try decreasing the value of multiplier to 10.
-
Page 28: The Javascript Blocks Editor
CRIPT LOCKS DITOR If you want to modify one of the Block programs for the kit, you can do so by clicking on the either of the two Edit buttons. Clicking on the Edit button will then open the project in the Blocks Editor. Page 28... - Page 29 One really nice feature of the Blocks editor is that the image of a micro:bit on the left of the screen is a virtual micro:bit that you can run your programs on before flashing them onto the micro:bit. You can press its buttons with your mouse, it will display things and if you used the GPIO pins as digital outputs, it will even highlight them when you write to them.
-
Page 30: Using Micropython
Python versions of the programs rather than the Block code, then you can download all the programs from Github here: https://github.com/monkmakes/micro_bit_kit Click on the green Code button and select the option Download ZIP. Extract the ZIP archive and you will find a directory containing the python programs for all the projects. -
Page 31: Troubleshooting
Try and think about which lead might be faulty. For example if the LED in the MonkMakes logo for the Sensor or Speaker are not lit, then try swapping out the power leads (3V and GND) from the micro:bit. -
Page 32: What Next
micro:bit Programming If you want to learn more about programming the micro:bit in Python, then you should consider buying Simon Monk's book 'Programming micro:bit: Getting Started with MicroPython', which is available from all major book sellers. For a micro:bit project book, take a look at micro:bit for Mad Scientists.Both books are available from Amazon and all good book stores. -
Page 33: Notes
OTES Page 33... - Page 34 Page 34...
- Page 35 Page 35...
-
Page 36: Monkmakes
For more information on this kit, the product's home page is here: https://monkmakes.com/mb_kit As well as this kit, MonkMakes makes all sorts of kits and gadgets to help with your micro:bit and Raspberry Pi projects. Find out more, as well as where to buy here: https://monkmakes.com...
Need help?
Do you have a question about the 00063 and is the answer not in the manual?
Questions and answers