Table of Contents
Advertisement
Advertisement
Table of Contents

Summary of Contents for Cameo CFP-200
- Page 2 Cameo Proclain Furnace Operator's Manual Model: CFP-200 Ideal diagnosis and treatment experience Cameo Porcelain Furnace...
-
Page 3: Table Of Contents
2.3Installation and use 2.4 Cleaning 2.5 Precautions for vacuum pump installation: 2.6 Active cooling fan 2.7 Automatic temperature regulation Chapter 3 Furnace Introduction 3.1 Cameo CFP-200 Proclain Furnace 3.2 Features 3.3 Software 3.4 Technical parameters 3.5 Packing List Chapter 4 Operation Guidance 4.1 Main interface... - Page 4 4.6 Curve Program Choose Screen 4.7 Curve parameters setting screen 4.8 Abnormal reminder of parameters setting 4.9 Function setting screen 4.10 Vacuum test 4.11 Vacuum test interface 4.12 Temperature calibration function 4.13 Standby temperature setting 4.14 Sleep mode interface 4.15 Furnace cleaning 4.16 System setting 4.17 Furnace self-check 4.18 Language setting...
- Page 5 Disclaimer >>>>>>>>>>>>>>>>>>>>>>>>>>>>>>>>>>>>>>>>>>>>>>>>>>>>>>>>>>>>>>>>>>>>>>>>>>>>>>>>>>>>>>>>>>>>>>>>>>>>>>>>>>>>>>>>>>>>>>>>>>>>>>>>>>>>> Disclaimer The information contained in this manual belongs to Aidite(Qinhuangdao)Technology Co., Ltd. and is only intended for users. Without our written permission, any part of this manual are not allowed to be duplicated, stored or disseminated in an electronic, mechanical, photocopying or recording way. Because this manual has been prepared with great care, the publisher declares that it is not liable for errors and omissions in this manual and losses caused by the use of the information contained therein.
- Page 6 Foreword >>>>>>>>>>>>>>>>>>>>>>>>>>>>>>>>>>>>>>>>>>>>>>>>>>>>>>>>>>>>>>>>>>>>>>>>>>>>>>>>>>>>>>>>>>>>>>>>>>>>>>>>>>>>>>>>>>>>>>>>>>>>>>>>>>>>> Storage, handling, transportation, debugging, operation and maintenance of this furnace shall comply with requirements of this manual. Before use of this furnace, relevant personnel shall read through this manual. This manual shall be deemed as part of this furnace for proper storage until the furnace is dismantled.
-
Page 7: Chapter 1 Safety Information
Chapter 1 | Safety Information >>>>>>>>>>>>>>>>>>>>>>>>>>>>>>>>>>>>>>>>>>>>>>>>>>>>>>>>>>>>>>>>>>>>>>>>>>>>>>>>>>>>>>>>>>>>>>>>>>>>>>>>>>>>>>>>>>>>>>>>>>>>>>>>>>>>> Chapter 1 Safety Information 1.1 Key Contents 1.1.1 The design and construction of the furnace comply with relevant safety standards, which guarantees that the furnace is safe under correct operation. The safety of operators are our top priority when designing the furnace. - Page 8 Chapter 1 | Safety Information >>>>>>>>>>>>>>>>>>>>>>>>>>>>>>>>>>>>>>>>>>>>>>>>>>>>>>>>>>>>>>>>>>>>>>>>>>>>>>>>>>>>>>>>>>>>>>>>>>>>>>>>>>>>>>>>>>>>>>>>>>>>>>>>>>>>> 1.1.5 Non-professional personnel shall not approach the furnace, and all visitors must keep a safe distance from the furnace. 1.1.6 It is very important to ensure that the carrying capacity of the lifting device is sufficient to bear the weight of the furnace when unloading and installing.
- Page 9 Chapter 1 | Safety Information >>>>>>>>>>>>>>>>>>>>>>>>>>>>>>>>>>>>>>>>>>>>>>>>>>>>>>>>>>>>>>>>>>>>>>>>>>>>>>>>>>>>>>>>>>>>>>>>>>>>>>>>>>>>>>>>>>>>>>>>>>>>>>>>>>>>> 1.1.14 Use the furnace in a clean, well-ventilated and flat indoor area. Protect it from lightning strikes, and do not use it in a damp or rainy place. 1.1.15 The operating speed of the furnace must meet design requirements. Do not force the furnace or auxiliary facilities to work.
- Page 10 Chapter 1 | Safety Information >>>>>>>>>>>>>>>>>>>>>>>>>>>>>>>>>>>>>>>>>>>>>>>>>>>>>>>>>>>>>>>>>>>>>>>>>>>>>>>>>>>>>>>>>>>>>>>>>>>>>>>>>>>>>>>>>>>>>>>>>>>>>>>>>>>>> 1.1.23 Do not put anything on the power cord and control cord. Place the furnace where the power cord will not be trampled or tripped. 1.1.24 Do not plug anything into the furnace from the casing gap, otherwise it will cause fire or electric shock. 1.1.25 The operator shall not leave his post without authorization when the furnace is working.
-
Page 11: How To Use And Keep This Manual
Chapter 1 | Safety Information >>>>>>>>>>>>>>>>>>>>>>>>>>>>>>>>>>>>>>>>>>>>>>>>>>>>>>>>>>>>>>>>>>>>>>>>>>>>>>>>>>>>>>>>>>>>>>>>>>>>>>>>>>>>>>>>>>>>>>>>>>>>>>>>>>>>> 1.1.32 After original installation, update the corresponding information in this manual if the user changes some place on the furnace. 1.2 How to use and keep this manual? 1.2.1 This manual is used by operators for operation and technical services to ensure that the furnace is in a good working condition. -
Page 12: Chapter 2 Safety Maintenance And Precautions
Chapter 2 | Safety Maintenance and Precautions >>>>>>>>>>>>>>>>>>>>>>>>>>>>>>>>>>>>>>>>>>>>>>>>>>>>>>>>>>>>>>>>>>>>>>>>>>>>>>>>>>>>>>>>>>>>>>>>>>>>>>>>>>>>>>>>>>>>>>>>>>>>>>>>>>>>> Chapter 2 Safety Maintenance and Precautions 2.1 Installation location The furnace shall be installed in a dry room, and not less than 30cm distant from the wall. The distance between the two furnaces shall be more than 50cm to ensure safety and heat dissipation. -
Page 13: Cleaning
Chapter 2 | Safety Maintenance and Precautions >>>>>>>>>>>>>>>>>>>>>>>>>>>>>>>>>>>>>>>>>>>>>>>>>>>>>>>>>>>>>>>>>>>>>>>>>>>>>>>>>>>>>>>>>>>>>>>>>>>>>>>>>>>>>>>>>>>>>>>>>>>>>>>>>>>>> The furnace shall burn without load for three times before officially burning teeth models. As the porcelain furnace works for the first time, it is recommended to run for 3 hours in standby mode (the tray is lowered to the lowest position) to remove the moisture in the furnace. -
Page 14: Precautions For Vacuum Pump Installation
Chapter 2 | Safety Maintenance and Precautions >>>>>>>>>>>>>>>>>>>>>>>>>>>>>>>>>>>>>>>>>>>>>>>>>>>>>>>>>>>>>>>>>>>>>>>>>>>>>>>>>>>>>>>>>>>>>>>>>>>>>>>>>>>>>>>>>>>>>>>>>>>>>>>>>>>>> 2.5 Precautions for vacuum pump installation: 1. Take out the vacuum pump and pipeline assembly from the accessories box, and connect one end of the pipeline assembly to the air inlet of the vacuum pump (note that the arrow indicates the air flow direction). -
Page 15: Chapter 3 Furnace Introduction
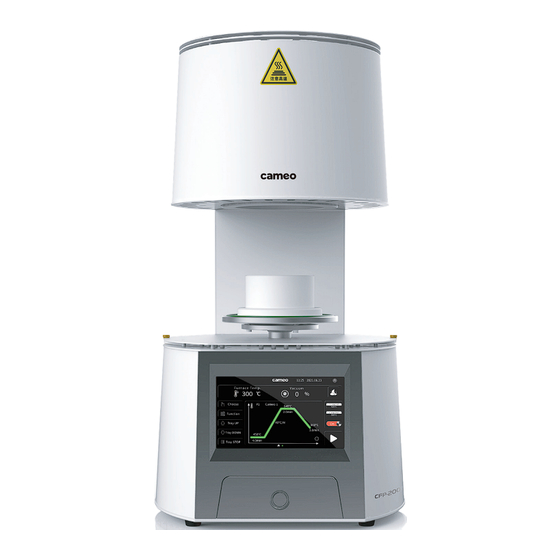
Chapter 3 | Furnace Introduction >>>>>>>>>>>>>>>>>>>>>>>>>>>>>>>>>>>>>>>>>>>>>>>>>>>>>>>>>>>>>>>>>>>>>>>>>>>>>>>>>>>>>>>>>>>>>>>>>>>>>>>>>>>>>>>>>>>>>>>>>>>>>>>>>>>>> Chapter 3 Furnace Introduction 3.1 Cameo CFP-200 Proclain Furnace 3.2 Features Touch screen: 7 -inch capacitive touch screen. Thermal insulation refractory materials: new, ultra-light, low energy consumption. Temperature control meter: high precision, automatic temperature regulation, temperature accuracy of ± 1 ℃... -
Page 16: Technical Parameters
Chapter 3 | Furnace Introduction >>>>>>>>>>>>>>>>>>>>>>>>>>>>>>>>>>>>>>>>>>>>>>>>>>>>>>>>>>>>>>>>>>>>>>>>>>>>>>>>>>>>>>>>>>>>>>>>>>>>>>>>>>>>>>>>>>>>>>>>>>>>>>>>>>>>> Second-order firing curve function. Remaining time: displaying the remaining time of roasting curve Standby function: to ensure the furnace is dry. One-click sleep function: low power standby. Temperature calibration: to ensure temperature control accuracy of the furnace. ... -
Page 17: Packing List
Silencer Working temperature 7-40℃ Weight 10KG Noise <60dB 3.5 Packing List Name Amount Cameo porcelain furnace 1 set Furnace power cord (16A) 1 piece Baking forceps (hemostatic forceps) 1 piece Honeycomb-type baking tray 2 pieces Porcelain nails 1 bag Firing platform... -
Page 18: Chapter 4 Operation Guidance
Chapter 4 | Operation Guidance >>>>>>>>>>>>>>>>>>>>>>>>>>>>>>>>>>>>>>>>>>>>>>>>>>>>>>>>>>>>>>>>>>>>>>>>>>>>>>>>>>>>>>>>>>>>>>>>>>>>>>>>>>>>>>>>>>>>>>>>>>>>>>>>>>>>> Chapter 4 Operation Guidance 4.1 Main interface Turn on the power switch on the back to display the interface after power on. The main interface displays the current furnace temperature, vacuum degree, vacuum configuration and current curve information in real time.(The status indicator is flashing green). - Page 19 Chapter 4 | Operation Guidance >>>>>>>>>>>>>>>>>>>>>>>>>>>>>>>>>>>>>>>>>>>>>>>>>>>>>>>>>>>>>>>>>>>>>>>>>>>>>>>>>>>>>>>>>>>>>>>>>>>>>>>>>>>>>>>>>>>>>>>>>>>>>>>>>>>>> Control tray up Control tray down Control tray stop Set the vacuum stop temperature of the current curve program (effective when the vacuum mode is on) Set the vacuum start temperature of the current curve program (effective when the vacuum mode is on) Whether the vacuum mode of the current curve program is on or not.
-
Page 20: Quick Curve Selection Interface
Chapter 4 | Operation Guidance >>>>>>>>>>>>>>>>>>>>>>>>>>>>>>>>>>>>>>>>>>>>>>>>>>>>>>>>>>>>>>>>>>>>>>>>>>>>>>>>>>>>>>>>>>>>>>>>>>>>>>>>>>>>>>>>>>>>>>>>>>>>>>>>>>>>> 4.2 Quick curve selection interface The quick curve selection interface displays the current furnace temperature, current curve, vacuum and current curve information in real time. “Cameo1”“Cameo2”“Biomi c1”“Biomic2”“Biomic3”“Bi omic4”“Biomic5”“Biomic6” are curve parameters and names configured by factory default, which can be modified at will. -
Page 21: Two-Stage Firing Interface
Chapter 4 | Operation Guidance >>>>>>>>>>>>>>>>>>>>>>>>>>>>>>>>>>>>>>>>>>>>>>>>>>>>>>>>>>>>>>>>>>>>>>>>>>>>>>>>>>>>>>>>>>>>>>>>>>>>>>>>>>>>>>>>>>>>>>>>>>>>>>>>>>>>> 4.4 Two-stage firing interface Display current furnace temperature, vacuum and name of the executed program as well as the remaining time 4.5 Confirm the firing interface and exit it Click √ to start the current firing procedure. Click X to return the main interface. Click √... -
Page 22: Curve Program Choose Screen
Chapter 4 | Operation Guidance >>>>>>>>>>>>>>>>>>>>>>>>>>>>>>>>>>>>>>>>>>>>>>>>>>>>>>>>>>>>>>>>>>>>>>>>>>>>>>>>>>>>>>>>>>>>>>>>>>>>>>>>>>>>>>>>>>>>>>>>>>>>>>>>>>>>> 4.6 Curve Program Choose Screen It includes Program Editing, Start Firing, Curve Program List and Curve Preview Enter parameters editing screen of selected Curve Program. Start Firing Current Curve Program List 120 Curve Programs. You can page up/down and click to select one curve to edit or directly start firing. -
Page 23: Abnormal Reminder Of Parameters Setting
Chapter 4 | Operation Guidance >>>>>>>>>>>>>>>>>>>>>>>>>>>>>>>>>>>>>>>>>>>>>>>>>>>>>>>>>>>>>>>>>>>>>>>>>>>>>>>>>>>>>>>>>>>>>>>>>>>>>>>>>>>>>>>>>>>>>>>>>>>>>>>>>>>>> On indicates that the vacuum pumping mode is on. Off indicates that the vacuum pumping is Vacuum Mode off. On indicates the second-stage firing mode is on. Off indicates the second-stage firing mode is Second-stage heating off. -
Page 24: Function Setting Screen
Chapter 4 | Operation Guidance >>>>>>>>>>>>>>>>>>>>>>>>>>>>>>>>>>>>>>>>>>>>>>>>>>>>>>>>>>>>>>>>>>>>>>>>>>>>>>>>>>>>>>>>>>>>>>>>>>>>>>>>>>>>>>>>>>>>>>>>>>>>>>>>>>>>> Error 1 1st-stage maximum temperature is lower than 2nd –stage one. Opening temperature is not higher than the maximum temperature during the firing procedure. Error 2 Error 3 The vacuum starting temperature is 10℃ lower than the vacuum stop temperature. Error 4 The starting temperature is lower than 1st-stage maximum temperature. -
Page 25: Vacuum Test Interface
Chapter 4 | Operation Guidance >>>>>>>>>>>>>>>>>>>>>>>>>>>>>>>>>>>>>>>>>>>>>>>>>>>>>>>>>>>>>>>>>>>>>>>>>>>>>>>>>>>>>>>>>>>>>>>>>>>>>>>>>>>>>>>>>>>>>>>>>>>>>>>>>>>>> 4.11 Vacuum test interface Click √ to enter the vacuum test. Click X to return the vacuum test interface. When the vacuum reaches 90% within 120 seconds, the vacuum is judged acceptable, and prompt the vacuum detection normal. When the vacuum does not reach 90% within 120 seconds, pop up vacuum detection abnormal dialogue... -
Page 26: Temperature Calibration Function
Chapter 4 | Operation Guidance >>>>>>>>>>>>>>>>>>>>>>>>>>>>>>>>>>>>>>>>>>>>>>>>>>>>>>>>>>>>>>>>>>>>>>>>>>>>>>>>>>>>>>>>>>>>>>>>>>>>>>>>>>>>>>>>>>>>>>>>>>>>>>>>>>>>> 4.12 Temperature calibration function Click Temperature Calibration on the function setting screen to enter the temperature calibration interface. If the furnace temperature deviates from the set temperature, use the temperature calibration function to ensure the temperature accuracy. According to Step 1, click Temperature Test, the tray will drop to the lowest end. -
Page 27: Standby Temperature Setting
Chapter 4 | Operation Guidance >>>>>>>>>>>>>>>>>>>>>>>>>>>>>>>>>>>>>>>>>>>>>>>>>>>>>>>>>>>>>>>>>>>>>>>>>>>>>>>>>>>>>>>>>>>>>>>>>>>>>>>>>>>>>>>>>>>>>>>>>>>>>>>>>>>>> Enter the actual temperature to the red number under Step 2 on the temperature calibration screen, and Click Set up and display , that is, the temperature calibration is completed. To adapt to the usage habits of old customers, click the temperature control compensation value in the lower left corner, or directly set the... -
Page 28: Sleep Mode Interface
Chapter 4 | Operation Guidance >>>>>>>>>>>>>>>>>>>>>>>>>>>>>>>>>>>>>>>>>>>>>>>>>>>>>>>>>>>>>>>>>>>>>>>>>>>>>>>>>>>>>>>>>>>>>>>>>>>>>>>>>>>>>>>>>>>>>>>>>>>>>>>>>>>>> 4.14 Sleep mode interface The user can manually or automatically enable the furnace to enter the sleep state. The platform rises to close the furnace. Keep the temperature constant at 100° C. Click anywhere on the screen to exit sleep mode. -
Page 29: System Setting
Chapter 4 | Operation Guidance >>>>>>>>>>>>>>>>>>>>>>>>>>>>>>>>>>>>>>>>>>>>>>>>>>>>>>>>>>>>>>>>>>>>>>>>>>>>>>>>>>>>>>>>>>>>>>>>>>>>>>>>>>>>>>>>>>>>>>>>>>>>>>>>>>>>> At 200 ℃ for 30 minutes, the tray drops to the lowest end, take out the crucible and activated carbon bag, and then complete cleaning. Complete Clean interface 4.16 System setting Click System Setting on the function design interface to enter the system setting interface. -
Page 30: Furnace Self-Check
Chapter 4 | Operation Guidance >>>>>>>>>>>>>>>>>>>>>>>>>>>>>>>>>>>>>>>>>>>>>>>>>>>>>>>>>>>>>>>>>>>>>>>>>>>>>>>>>>>>>>>>>>>>>>>>>>>>>>>>>>>>>>>>>>>>>>>>>>>>>>>>>>>>> After Self test is on, power off the furnace manually and restart and automatically carry out furnace self-check. Porcelain furnace status light switch Reset curve can restore all the currently set firing curve parameters to the factory state (including user-defined) Enter the language setting interface to select 9 languages. -
Page 31: Language Setting
Chapter 4 | Operation Guidance >>>>>>>>>>>>>>>>>>>>>>>>>>>>>>>>>>>>>>>>>>>>>>>>>>>>>>>>>>>>>>>>>>>>>>>>>>>>>>>>>>>>>>>>>>>>>>>>>>>>>>>>>>>>>>>>>>>>>>>>>>>>>>>>>>>>> After all self-checks are completed, and all normal, click Confirm to enter the main interface. 4.18 Language setting Click "System Settings" -> "Language Settings" on the function setting interface to enter the language setting interface. This version supports 9 languages: Simplified Chinese, English, French, Italian, German, Spanish, Portuguese, Japanese, Korean. -
Page 32: Abnormal Alarm
Chapter 4 | Operation Guidance >>>>>>>>>>>>>>>>>>>>>>>>>>>>>>>>>>>>>>>>>>>>>>>>>>>>>>>>>>>>>>>>>>>>>>>>>>>>>>>>>>>>>>>>>>>>>>>>>>>>>>>>>>>>>>>>>>>>>>>>>>>>>>>>>>>>> 4.20 Abnormal alarm Temperature control error Contact customer service for inspection and maintenance. Tray up/down error Contact customer service for inspection and maintenance. Communication error Contact customer service for inspection and maintenance. Aidite | 28... - Page 33 Chapter 4 | Operation Guidance >>>>>>>>>>>>>>>>>>>>>>>>>>>>>>>>>>>>>>>>>>>>>>>>>>>>>>>>>>>>>>>>>>>>>>>>>>>>>>>>>>>>>>>>>>>>>>>>>>>>>>>>>>>>>>>>>>>>>>>>>>>>>>>>>>>>> Vacuum error Please check whether the air seal is damaged or contact customer service for inspection and maintenance. | Aidite...
-
Page 34: Chapter 5 Warranty Terms
>>>>>>>>>>>>>>>>>>>>>>>>>>>>>>>>>>>>>>>>>>>>>>>>>>>>>>>>>>>>>>>>>>>>>>>>>>>>>>>>>>>>>>>>>>>>>>>>>>>>>>>>>>>>>>>>>>>>>>>>>>>>>>>>>>>>> Chapter 5 Warranty terms Aidite guarantees Buyer that the technology and materials of CFP-100 and CFP-200 are free from defects under the professional normal installation, use and service procedures, and the warranty period is 1 year or 2000 hours of high-temperature operation, whichever occurs first. - Page 35 ℃ ℃ /min ℃ ℃ Cameo1 cameo2 Cameo 1 : Cameo glass ceramic-veneer inlay curve Cameo 2 : Cameo glass ceramic-crown, bridge curve Starting Temperature Maximum Holding time Drying time Opening Slow cooling temperature rise rate temperature min.
- Page 36 Chapter 5 | Warranty terms >>>>>>>>>>>>>>>>>>>>>>>>>>>>>>>>>>>>>>>>>>>>>>>>>>>>>>>>>>>>>>>>>>>>>>>>>>>>>>>>>>>>>>>>>>>>>>>>>>>>>>>>>>>>>>>>>>>>>>>>>>>>>>>>>>>>> 1st-stage 2nd -stage Starting 1st -stage 1st –stage holding Drying time temperature rise temperature rise temperature temperature time rate rate min. ℃ ℃ ℃ /min. ℃ /min Biomic7 2nd -stage Opening 1st –stage holding Slow cooling Vacuum start Vacuum end temperature...
Need help?
Do you have a question about the CFP-200 and is the answer not in the manual?
Questions and answers
What to do if the programs have been deleted and all of the curve numbers are the same hence, can only make 1 program?
To restore deleted programs on the Cameo CFP-200 when all curve numbers are the same, reset the furnace to the default factory settings. This restores the default factory-configured curve parameters and names.
This answer is automatically generated
@Mr. Anderson @Mr. Anderson How do you reset to default factory settings? I tried to click reset curve but it's still showing 'default curve number 120'
Would you please send me the Calibration Program for the CFP200 ? Thank you in advance