
Summary of Contents for Enapter DRY2.1
- Page 1 Owner’s Manual Dryer 2.1 Please study this manual carefully before unpacking, installing, and operating the device. Rev. 03 – January 2023...
-
Page 2: Change History
VE RS I ON D O CU MEN T TI TLE RELEAS E DAT E DR2.1 – Owner’s Manual 2023-01-13 CHANGE HISTORY A black triangle on the left side of the page indicates changes since the last revision. The number inside the triangle indicates the revision which includes the changes the first time. -
Page 3: Preface
Thank you for choosing Enapter. Please study this manual carefully before unpacking, installing, and operating the device. If you have any further questions, please contact the Enapter customer support team. Quote the device serial number and hardware number on the back of the device to help identifying your product quickly. -
Page 4: Terms
To simplify reading, this document only refers to the operator to distinguish from Enapter but may also include the user, customer, client, owner, installer, instructor, system integrator or persons who are responsible for a safe operation of the device. -
Page 5: Table Of Contents
DR2.1 – Owner’s Manual 2023-01-13 TABLE OF CONTENTS Change history ........................I Preface ..........................II Enapter Srl ............................. II Scope of the document ........................II Approved use ..........................II Terms ............................III Table of Contents ......................... IV Overview of the Dryer ..................... 6 Specifications ........................ - Page 6 Switching ......................... 29 Pressurizing ........................29 Finalizing .......................... 29 Dryer Control Network ..................... 29 Troubleshooting ....................... 29 Enapter Monitoring Tools ..................... 30 Mobile Application ......................30 Maintenance of the Dryer ..................... 31 Updates ........................... 31 Routine Maintenance ....................... 31 Cleaning ........................... 32 Disposal ...........................
-
Page 7: Overview Of The Dryer
2023-01-13 1. OVERVIEW OF THE DRYER Enapter's hydrogen dryer is a standardised, stackable, and flexible device to dry hydrogen. The modular, easily maintainable design – paired with advanced software integration – allows set up in minutes and remote control and management. -
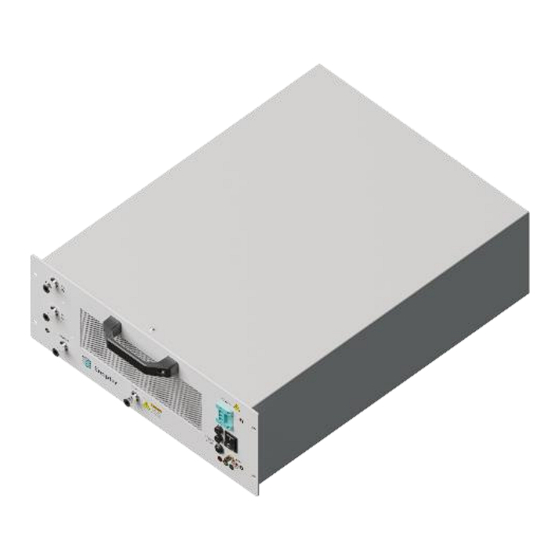
Page 8: Front Panel
VE RS I ON D O CU MEN T TI TLE RELEAS E DAT E DR2.1 – Owner’s Manual 2023-01-13 IEC 61010-1 ASME B31:12 Noise level at 1 m < 60 dB Indoor: Ventilation depends on room size. Hydrogen detection system with a safety circuit is recommended Ventilation and Safety Recommendation... -
Page 9: Back Panel
The device can be connected to the local network via Bluetooth and Wi-Fi, enabling real-time updates and monitoring for the operator via the Enapter App and cloud. A miniature antenna can be attached to this port to increase the amplification. -
Page 10: Safety Instructions
VE RS I ON D O CU MEN T TI TLE RELEAS E DAT E DR2.1 – Owner’s Manual 2023-01-13 2. SAFETY INSTRUCTIONS 2.1 WARNINGS AND HAZARDS The following terms and symbols are used in this manual to indicate important text passages which must be given particular attention: Warns of fatal/serious injuries or death Warns of injury... -
Page 11: General Safety
Caused by improper installation Regarding design and installation, the operator must follow Enapter’s installation rules, and ensure full compliance with all relevant local safety guidelines, rules, directives and regulations. The operator must check the device for hydrogen, water and KOH leakages regularly and ensure that all interfaces are connected correctly. -
Page 12: Additional Safety For The Dryer
Do not attach filled tanks or other equipment with pressures higher than the device’s maximum outlet pressure to the H outlet of the device. Do not attach hydrogen sources other than the electrolysers specified by Enapter. Make sure that the H purge line is never obstructed. -
Page 13: Hazards
VE RS I ON D O CU MEN T TI TLE RELEAS E DAT E DR2.1 – Owner’s Manual 2023-01-13 3. HAZARDS The operator who operates, services, maintains, or installs this device must be aware of the potential dangers associated with its use and set up, the required materials, as well as the inputs and outputs, to implement sufficient countermeasures and processes to prevent accidents and act correctly in case of emergencies. -
Page 14: Mechanical Hazards
VE RS I ON D O CU MEN T TI TLE RELEAS E DAT E DR2.1 – Owner’s Manual 2023-01-13 3.2 MECHANICAL HAZARDS It is always necessary to wear appropriate personal protective equipment (PPE) and to use suitable tools when handling the device and packaging material. A general training with regards to lifting heavy loads and general safety briefings are required to perform the tasks safely described in this manual. - Page 15 Always turn off the power supply when the device is being cleaned, maintained, or transported. Any servicing, other than cleaning and routine user maintenance, must be performed by trained, Enapter-endorsed technicians. DR2.1 – Owner’s Manual – Rev.03 – January 2023...
-
Page 16: Chemical Hazards
VE RS I ON D O CU MEN T TI TLE RELEAS E DAT E DR2.1 – Owner’s Manual 2023-01-13 3.4 CHEMICAL HAZARDS Potassium Hydroxyde is used in the electrolyser as the main process liquid (electrolyte). The electrolyte usually comes pre-mixed with the electrolyser but it can also be purchased as a powder to be diluted in purified water. -
Page 17: Thermal Hazards
(80 dBA). However, a sudden vent (either caused by device shut down or unforeseen error) can be louder than 85 dB, depending on the vent line installation. Due to this, Enapter recommends wearing PPE (earplugs) while working around the device. -
Page 18: Installation Of The Dryer
Please do not dispose the original shipping materials. Enapter will not accept devices if they are returned without the original shipping boxes or equivalents for a safe transport. If the shipping boxes cannot be kept, please recycle responsibly. -
Page 19: Implementing System Safety
VE RS I ON D O CU MEN T TI TLE RELEAS E DAT E DR2.1 – Owner’s Manual 2023-01-13 4.2.2 MATERIAL Stainless steel AISI 136- ASTM A269 ¼” outside diameter X 0,89 mm w.t. 4.2.3 ACCESSORIES (INCLUDED IN THE BOX) ... -
Page 20: Piping And Instrumentation Diagram (P&Id)
The following diagram shows internal components of the device as well as how it interacts with the Enapter Electrolyser and the Enapter Water Tank. It is also available here. Please note that the diagram is slightly simplified to be better understandable and to protect Enapter’s intellectual property. -
Page 21: Instructions For Connecting Stainless Steel Tubes
VE RS I ON D O CU MEN T TI TLE RELEAS E DAT E DR2.1 – Owner’s Manual 2023-01-13 P&ID of the DR2.1 4.5 INSTRUCTIONS FOR CONNECTING STAINLESS STEEL TUBES All pressurised hydrogen gas connections are Swagelok tube fittings for ¼” outside diameter (OD) tubes. The inlets/outlets to be connected according to these instructions are labelled “H In”, “H Out”... - Page 22 After operation, this pipe might stay under pressure. First release the pressure carefully before opening the connection. Enapter is not responsible for any damage caused by improperly installed equipment. EL H OUT connected to DR H...
- Page 23 Out port and the storage or other downstream equipment to protect the devices from overpressure. Enapter is not responsible for any damage caused by improperly installed equipment. Please be aware that when larger hydrogen systems are created by putting together several modules, the piping downstream may have to be sized accordingly.
- Page 24 VE RS I ON D O CU MEN T TI TLE RELEAS E DAT E DR2.1 – Owner’s Manual 2023-01-13 DR H OUT connected 4.5.3 PURGE CONNECTION GUIDE (PURGE) Connect the H purge port, located at the bottom left of the front panel, to the hydrogen purge outlet.
- Page 25 4.5.4 INSTRUCTIONS FOR THE DEPRESSURISATION LINE (DEPR) Do not open the cap of the depressurisation line unless instructed by Enapter. This line is to release pressure in case of an emergency or error. It is not relevant for normal usage.
-
Page 26: Electrical Connection Guide
VE RS I ON D O CU MEN T TI TLE RELEAS E DAT E DR2.1 – Owner’s Manual 2023-01-13 Danger! Risk of explosion! If this cap is not completely closed or even removed during operation, hydrogen will be released to the surrounding and create an explosive atmosphere. Therefore, it is important to keep the depressurisation line closed. - Page 27 DR Power Connector DR Power Connector Enapter recommends installing a protective device against overload and short circuits on the power supply line; this must be selected in relation to the devices maximum power consumption and in compliance with all local and national safety requirements. To further increase electrical safety of the...
-
Page 28: Initial Operation Of The Dryer
To create an account, click on the create account button of the first screen. After logging in on the Enapter app, create a site – a virtual environment which will show all the telemetries collected from the devices connected to the cloud via UCMs (Universal Communication Modules). -
Page 29: Operation Of The Dryer
5.2 REMOTE START/STOP The device can be started/stopped remotely using the Enapter app or cloud as well as remotely via the Modbus interface. For more information on this, please refer to the online Enapter handbook. The device can be controlled automatically by setting up a rule-based engine. If this is in place, it will start automatically from standby once it detects incoming pressure in the hydrogen inlet pipe. -
Page 30: Cooling
The device can be continuously monitored and controlled remotely. This allows a quick and easy detection of warnings and errors. The device will automatically stop the operation in case of a fatal error. For troubleshooting please visit handbook.enapter.com. DR2.1 – Owner’s Manual – Rev.03 – January 2023... -
Page 31: Enapter Monitoring Tools
The device comes with a preinstalled UCM (Universal Communication Module), to monitor and manage the device. Various sensor data from the devices is stored in the Enapter Cloud in a time-series database and provides real-time or on-demand visualisation of collected data on customisable dashboards. To support the latest protocols and security fixes, the UCM can be updated over-the-air. -
Page 32: Maintenance Of The Dryer
In some cases, interfaces or compatibility with other devices might change due to an update. To make sure, that an update is not negatively affecting the overall setup, please read the release notes beforehand and inform the Enapter customer support team in case of doubts. -
Page 33: Cleaning
Enapter is fully committed to recycling the devices and its components. Please return the device to Enapter at the end of life, where it will be fully recycled. By ensuring this product is correctly recycled, you will help to further reduce your impact on the environment and aid us in making the world cleaner and greener. - Page 34 Notice! Use original shipping material only! Enapter may not accept the device if returned without the original shipping boxes or equivalent for safe transport. If damage occurs during the return of a device under warranty, Enapter will not cover the costs of repair.
-
Page 35: Appendix
VE RS I ON D O CU MEN T TI TLE RELEAS E DAT E DR2.1 – Owner’s Manual 2023-01-13 8. APPENDIX Appendix I. Hydrogen Leak Testing As part of a hydrogen device, it is of vital importance to check every connection made for leaks. For more information on this matter, please refer to the appendix of ASME B31.12. -
Page 36: Appendix Ii. Led States
VE RS I ON D O CU MEN T TI TLE RELEAS E DAT E DR2.1 – Owner’s Manual 2023-01-13 Can verify several connections at the same time Appendix II. LED States EL4.0 AC version LEDs EL4.0 DC version LEDs The three LEDs located next to the right handle on the front panel and help to indicate the device status and operating condition. - Page 37 VE RS I ON D O CU MEN T TI TLE RELEAS E DAT E DR2.1 – Owner’s Manual 2023-01-13 DR2.1 – Owner’s Manual – Rev.03 – January 2023...
Need help?
Do you have a question about the DRY2.1 and is the answer not in the manual?
Questions and answers