
Summary of Contents for Motoalliance Dock 8x4
- Page 1 Aluminum Marine Dock Frame Dock_8x4 I N S T A L L A T I O N I N S T R U C T I O N S www.motoalliance.com motoinfo@motoalliance.com 866.527.7637 Rogers, MN...
-
Page 2: Included In This Kit
Fasteners should be used to secure the decking to the dock frame. These should be stainless steel or coated fasteners to prevent corrosion. We recommend 1¾" wood screws. You will need 70 to complete the recommended fastening. www.motoalliance.com motoinfo@motoalliance.com 866.527.7637... -
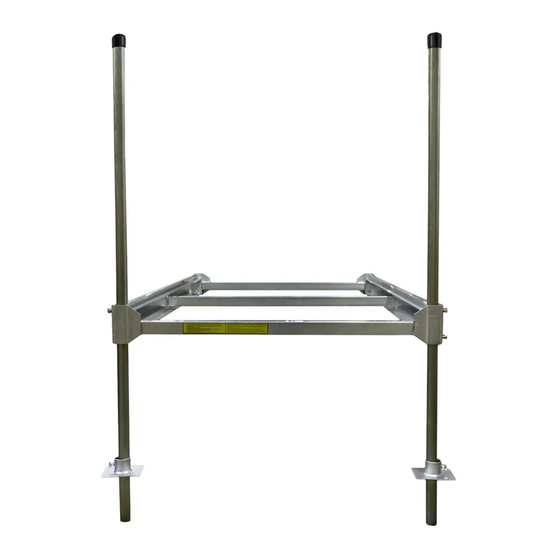
Page 3: Frame Assembly
Place the 2 sides of the dock on a flat surface. Verify the orientation of the frame matches FIGURE 1 Slot in the center brace. Verify the orientation of the brace matches FIGURE 2 Secure using the ¼"x5/8" bolts and finger tighten. www.motoalliance.com motoinfo@motoalliance.com 866.527.7637 Rogers, MN... - Page 4 Insert an end piece on each side of the dock. Verify the orientation of the pieces match FIGURE 3 Secure with ¼"x1¼" bolts and finger tighten. Check the dock frame for squareness and tighten hardware. DO NOT USE IMPACT DRIVERS OR OTHER Beware of overtightening the fasteners. POWERTOOLS TO TIGHTEN. www.motoalliance.com motoinfo@motoalliance.com 866.527.7637 Rogers, MN...
-
Page 5: Deck Assembly
Slide decking into the frame. 10. Slide in the two remaining 8' sections perpendicular to the decking. Space them 1' from either side of the dock. FIGURE 4 11. Space the decking evenly along the frame. www.motoalliance.com motoinfo@motoalliance.com 866.527.7637 Rogers, MN... - Page 6 12. Drill pilot holes through your bracing and decking. Secure each deck plank to both cross braces. FIGURE 5 13. Flip the dock section over. 14. Drill 6 pilot holes through decking and frame. One in each corner and one in each long side near the center brace. FIGURE 6 www.motoalliance.com motoinfo@motoalliance.com 866.527.7637 Rogers, MN...
-
Page 7: Installation
17. Place the first dock section with one side on land. Drive the galvanized posts into the lakebed. 18. Level the dock and set height with the provided ½"x1" hardware. Tighten both bolts to secure. FIGURE 7 www.motoalliance.com motoinfo@motoalliance.com 866.527.7637... - Page 8 19. Loosely install galvanized posts in the deep end of the dock. Attach triangular joining plates to the shoreside of the dock as shown. FIGURE 8 20. Place dock section after the previous dock section, attach the joining plate to the standing dock section, then adjust the galvanized posts. FIGURE 8 www.motoalliance.com motoinfo@motoalliance.com 866.527.7637 Rogers, MN...
- Page 9 22. Place the next dock section on the L brackets and adjust the height of the galvanized posts to level the dock. Then, unscrew the bolts from the corners without galvanized posts to provide counter pressure and lock the dock section into place. FIGURE 9 www.motoalliance.com motoinfo@motoalliance.com 866.527.7637 Rogers, MN...
- Page 10 24. Secure the outside corner with the provided right-angle adapter using the provided ½" hardware as shown. FIGURE 10 25. Using the newly drilled holes in the dock side. Secure the inside corner with the provided right-angle adapter using the provided ½" hardware as shown. FIGURE 10 www.motoalliance.com motoinfo@motoalliance.com 866.527.7637 Rogers, MN...
-
Page 11: Warranty
The obligation under this warranty, statutory or otherwise, is limited to the replacement of such part as shall appear to MotoAlliance, upon inspection of such part, to have been defective in material or workmanship. If MotoAlliance elects to replace the defective product or part, MotoAlliance reserves the right to provide another product or part of the same model or a model of at least comparable quality and features in MotoAlliance’s sole determination.
Need help?
Do you have a question about the Dock 8x4 and is the answer not in the manual?
Questions and answers