Advertisement
Available languages
Available languages
Quick Links
Advertisement

Summary of Contents for Matheo MRC 141 WS
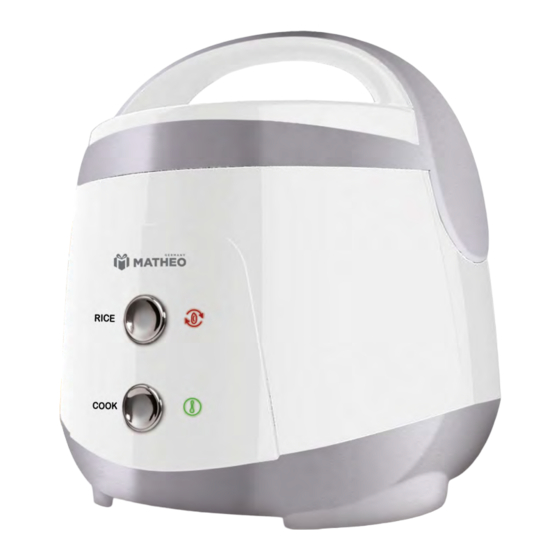
- Page 2 MRC 141 مشتری گرامی ضمن تشکر از حسن سلیقه و اعتماد شما به برند متئو امیدواریم از کار با این .دستگاه لذت ببرید اجزای دستگاه درپوش داخلی جداشدنی درپوش بیرونی قاشق گیره باالبرنده ظرف بخارپز منفذ خروج بخار قابلمه داخلی بدنه...
- Page 3 مراحل کار با پلوپز 1. با اســتفاده از پیمانه اندازه گیری که همراه با این دستگاه ارائه شده است، مقدار برنج مورد نیاز برای پخت را بردارید. چند بار برنج را بشــویید تا آب درون قابلمه شــفاف .شود .• وزن یک پیمانه برنج 061 گرم است ،•...
- Page 4 .• اگر درپوش را به درستی نبندید، بر کیفیت پخت تأثیر گذاشته می شود .• قبل از تکان دادن پلوپز، مطمئن شوید که درپوش به درستی بسته شده است 5. وقتی برنج آماده پخت است، سیم برق را ابتدا به پلوپز وصل کنید سپس دوشاخه را .به...
- Page 5 8. برای بخارپز شــدن غذا، مقداری مشخص آب در قابلمه بریزید. این مقدار بر اساس )نوع غذا و مقدارش متفاوت است (بیش از ارتفاع سبد بخارپز آب در قابلمه نریزید .• سبد بخارپز را روی قابلمه گذاشته و غذا را درون سبد قرار دهید .•...
- Page 6 روش تمیز کاری 1. اجزای سوپاپ بخار باید به طور منظم شسته شوند و پوشش و درزهای سوپاپ بخار .باید به طور جداگانه شسته شوند .2. پوشش، تکیه گاه و درون سوپاپ بخار را با دستمال خشک و تمیز کنید 3.
- Page 7 نکات احتیاط آمیز 1. اگر شــیئی خارجی در سوپاپ بخار قرار می گیرد، باید آن را در فواصل زمانی تمیز .نمود تا از بروز سرریز شدن آب و تحت تأثیر قرار گرفتن پخت برنج جلوگیری شود 2. هنـگام شستشـوی سـوپاپ بخـار، لطفـا حلقـه درزگیـر سـوپاپ بخار را نکشـید یا .فشـار...
- Page 8 نکات ایمنی 1. این دستگاه برای افرادی که از لحاظ جسمانی ضعیف هستند یا افرادی که کم ذهن هســتند یا اختالالت فکری دارند(از جمله کودکان) در نظر گرفته نشــده اســت. مگر .توسط افراد مسئول به طوری ایمن مورد نظارت و راهنمایی قرار بگیرند 2.
- Page 9 عیب یابی راه حل دلیل اختالل ،مطمئن شوید که کلید، دوشاخه پریز، فیوز و سیم اتصال در جریان برق پلوپز به پریز برق المنت داغ نیست وضعیت مناسبی در اتصال قرار وصل نیست دارند و محکم هستند چراغ خاموش است 1.
- Page 10 Dear customer! Thanks for your worthful choice and confidence to Feller brand. We really hope that you enjoy operating this product. B rief introduction of products Detachable Inner lid Outer Lid Spoon Steamer Mounting Pin Steam Vent Hole Inner Pot Water Level Indicator Main Body Cord...
- Page 11 Rice cooking procedure Measure the desired amount of rice with measuring cup supplied with this rice cooker. Rinse the rice several times until the water in the bowl shows relatively clear. - one cup of rice weight (About 160gr). - DO NOT rinse rice in the cooking pot, if the pot is using for washing rice, the fluorine-resin coating may be damaged or the bottom may be deformed which will result in poor conduction because it contacts with heating plate improperly.
- Page 12 When ready to cook, connect the power supply cord to the cooker first, then plug into cord in until cooking is ready. Press the “cooking” switch. The rice is starting to cook. “Cook” Light will light up after inserting the plug into socket, you must push down the “Cook”...
-
Page 13: Cleaning Method
- When food steaming is finished, you must turn off the switch button manually (push up). The cooker will automatically keep the food warm until serving. Unplug the cord before serving. Only use the spoon supplied with this cooker, Do not use a metal scoop so as to avoid scratching non-stick coated. - Page 14 P recautions If there is foreign matter in steam valve, it should be removed timely in order to keep the effect of preventing spill over and cooking rice. When washing the steam, please do not pull and push the seal ring of steam valve at discretion. The inside pot cannot be heated on any other furnace, otherwise it can be deformed easily.
- Page 15 The body and cover of electric rice cooker cannot be washed with water or in water, otherwise the insulator will be damaged and become dangerous. If the power cord damaged, it must be changed with new power cord produced by the manufacturer. Do not let a child operate the product alone.
-
Page 16: Troubleshooting
T roubleshooting No Malfunction Causal Solution Circuit of electric Heating plate cooker is not is not hot connected with Inspect weather the switch, plug power supply and socket connector, fuse and light is leading wire of power supply are in 1.
Need help?
Do you have a question about the MRC 141 WS and is the answer not in the manual?
Questions and answers