Advertisement
Quick Links
Installation Procedure
allation Procedure
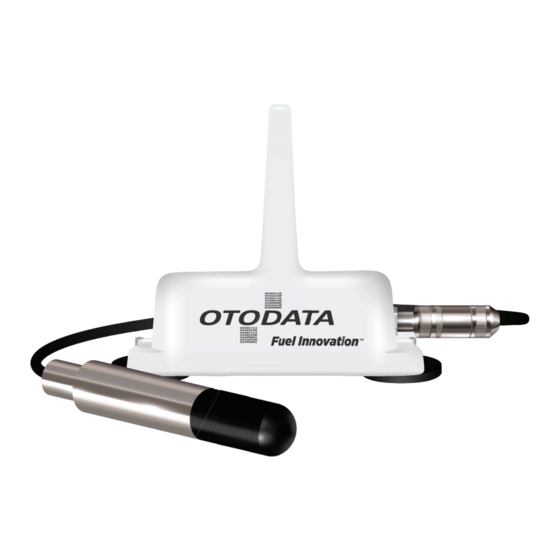
TM7530HP
M7530HP
Tank Monitor
ank Monitor
and Hydrostatic
nd Hydrostatic
Pressure Sensor
ressure Sensor
IMPORTANT
It is critical in all
installations to ensure monitors' antenna
is positioned vertically. This will achieve
optimal signal strength, ensuring that
you receive data in a timely manner and
prolong the battery life of the monitor.
WARNING Substitution of components may impair intrinsic safety.
For outdoor use only. Explosion Hazard - Batteries must only be
changed in an area free of ignitable concentrations. Do not open when
an explosive atmosphere is present. Potential electrostatic charging
hazard - wipe only with a damp cloth.
Do not
pressure wash
PLEASE TAKE A MOMENT TO CAREFULLY READ
THE INSTALLATION INSTRUCTIONS INCLUDED
WITH YOUR MONITORS, AND ENSURE YOU
UNDERSTAND AND RESPECT LOCAL
REGULATIONS.
BATTERY REPLACEMENT Battery replacement must only be performed
by OTODATA Wireless Network Inc. factory to maintain intrinsic safety
protection of the TM7530HP. Cover shall not be opened when an explosive
atmosphere is present.
Advertisement

Summary of Contents for Otodata TM7530HP
- Page 1 OTODATA Wireless Network Inc. factory to maintain intrinsic safety changed in an area free of ignitable concentrations. Do not open when protection of the TM7530HP. Cover shall not be opened when an explosive an explosive atmosphere is present. Potential electrostatic charging atmosphere is present.
- Page 3 We’re changing that. Otodata has been a key player in the tank monitoring industry for over ten years. Our goal has always been to produce a monitor with very low cost of ownership - making large-scale implementation affordable for all fuel resellers.
- Page 4 SUPPORT 1-514-673-0244 | 1-844-763-3344 (Toll-free) support@otodatatankmonitors.com EMERGENCY SUPPORT 1-833-529-9499 Available 24 hours, 7 days a week.
-
Page 5: Specifications
Technologies 4G, LTE CAT1, CATM, NB IOT, 3G PUR cable lengths Dual SIM Bluetooth Order Otodata Monitor with Hydrostatic Pressure Sensor Environmental Specifications (Range 0-1.5ft) TM7530HP-001 Otodata Monitor with Hydrostatic Pressure Sensor Operating & storage -40˚C to 60˚C -40˚F to 140˚F (Range 0-4.5ft) TM7530HP-002... - Page 6 Device Anatomy Polypropylene Connector Elbow 1” NPT SS304 Nylon 6/6 with TPE Sealing Cord Grip Communicator Polypropylene Reducer 2” NPT PUR Jacketed Cable Sensor/Transducer SS304 Black Nylon Cover Tip Ideal position Choose the most convenient port on your tank, but not the one that is normally used for filling.
- Page 7 Maximizing Monitor Performance Not Optimal. Optimal Position. Installing a monitor in position 1, 2 or 3 can cause Installing a monitor is position 4, 5 or 6 will ensure impediments to signal transmission which can result maximum signal strength which will conserve battery in inaccurate readings and premature drainage of a life and provide accurate readings.
-
Page 8: Installation Instructions
Consult with certified personnel to ensure your installation is compliant. Mounting fittings, such as elbow fitting, are not part of the certification for model TM7530HP. Final installation shall be subjected to acceptance by the Local Authority Having Juristiction. Installation Instructions Step 1 Unplug your monitor d. - Page 9 Preparation DO NOT apply Teflon tape on the front nut of the cord grip. DO apply Teflon tape on the NPT connections. Step 2 Adjust your cable length Step 3 Secure lead in place g. Thread fittings into bung hole of tank and tighten with j.
-
Page 10: Device Maintenance
Device Maintenance When required, clean the sensor in order to remove any accumulated dirt, sludge, gunk or debris. Step 1 Remove sensor from tank a. Disconnect the cable from the communicator and carefully remove the sensor from the tank. b. Avoid disconnecting or loosening any of the parts which secure the cable in place. - Page 11 Members can watch step-by-step installation videos and shop online Sign up free today otodatatankmonitors.com/membership Members can purchase monitors and accessories like gauges, leads, mounting equipment and more via our online store.
Need help?
Do you have a question about the TM7530HP and is the answer not in the manual?
Questions and answers