
Summary of Contents for Elah CHASER 1000
-
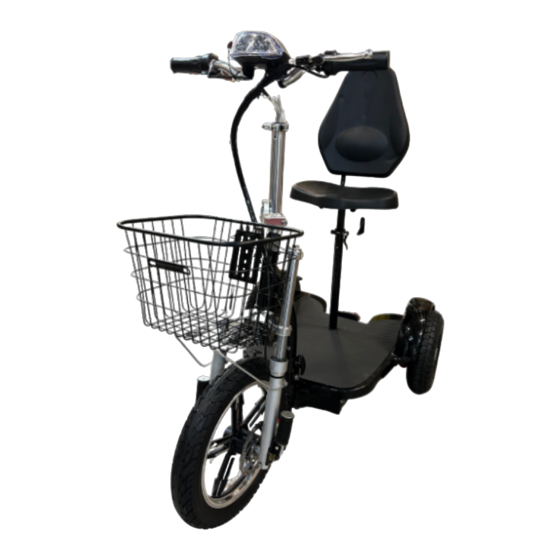
Page 1: Front Cover
Owner’s Manual EL–C1000 All rights reserved, photos and content property of ÓElah International LLC... -
Page 2: Table Of Contents
Seat Adjustment----------------------------- 11 Installing the Handlebar------------------- 12 Handlebar Adjustment--------------------- 13 Folding the Handlebar -------------------- 13 Charging the Batteries ------------------- 14 Chaser 1000 Operation ------------------- 15 Adjusting the Brakes --------------------- 16 Maintenance --------------------------------- 17 Battery Replacement ------------------- Troubleshooting -------------------------- Warranty --------------------------------... -
Page 3: Technical Information
Technical Information Type of Motor 48V Hub Brushless DC Motor Motor Power 1000W Battery Type Sealed Lead Acid Battery x4 (48V12Ah) Charger 100-240VAC50-60HZ,1.8A-2.0A amps Charging Time 6-8 hours Rated Speed 33km/h ---38km/h (23.6 mph) Single Charge distance Up to 35KM (21.75 miles) Maximum Capacity 158kg (350lbs) Unit Net Weight... -
Page 4: Warning Statement
If you are using your Chaser 1000 outdoors, please be aware of all state and local laws governing the use of such vehicles. State and local ordinances may vary, and you must make sure you comply with all applicable laws. -
Page 5: Safety Information
Before riding your Chaser 1000, please read and be sure you understand this manual completely. The Chaser 1000 is not a toy and should always be operated safely. Elah International LLC will not be liable for any damages or injuries to any person. -
Page 6: Chaser 1000 Parts List
Chaser 1000 Parts List 1. Front Wheel 11. Green Button for Horn 2. Disc Brake 12. Handlebar height adjustment 3. Electric motor 13. Power Indicator (pod) 4. Headlight (pod) 14. Seat Post 5. Front fork 15. Seat Height Adjustment 6. Basket 16. -
Page 7: Tool Kit & Assembly
Tool Kit Tool Kit Charger Assembling the Chaser 1000 1.) Unpack the Chaser 1000 and inspect all the parts to ensure all are included. Page 7... - Page 8 2.) Place your Chaser 1000 on a flat, clean surface. Place a block 3.5” under the front, by the battery. This will make it easier for the next step. 3.) Remove the Battery Cover at the base of the scooter. Unscrew the two bolts at the end of the base.
- Page 9 4.) Once the cover is removed, locate the Red Inline Fuse Folder. Insert the Green 30 AMP blade fuse into the Red Inline Fuse Folder. Tuck the wires without pinching and reinstall. 5.) After reinstalling, the battery pack put the base cover back on and re- screw the bolts to the appropriate holes.
-
Page 10: Seat Installation
8.) Tighten the bolts and nuts using the wrenches in the tool kit. Also, tighten the small bolts on the outside of the tube clamp securely. Seat Installation 9.) To assemble the seat, make sure that the parts needed are in your possession (backrest, seat, seat post, and backrest railing.) Next, unscrew the bolts in the backrest cushion and seat cushion. -
Page 11: Seat Adjustment
10.) After the seat is installed, make sure to lock it in place with the pin under the base of the scooter. Seat Adjustment To adjust the seat, undo the quick release, push the brass button, and adjust as required. To remove the seat pole, undo the two bolts and then lift the seat pole. -
Page 12: Installing The Handlebar
Installing the Handlebar 11.) Insert the handlebars fully into the tube. Insert the spline into the slot located in the center of the forks. Make sure the front tire and handlebars are both facing forward and straight. Release the quick connect latch from the bottom of the handlebar. Press the silver button located on the right side of the quick-connect latch to fold the handlebars over. -
Page 13: Handlebar Adjustment
Handlebar Adjustment To adjust the handlebar, flip the lever on the neck of the handlebar and slide the pole up and down to the desired height. Folding the Handlebar To fold the handlebar, flip the silver clasp at the base of the neck of the handlebar out of its slot then press the silver button in and gently fold the handlebar down. -
Page 14: Charging The Batteries
Charging the Batteries Before riding your Chaser 1000 for the first time, the unit should be fully charged. Ride your Chaser 1000 until the battery is fully discharged before recharging it. Doing this 3-5 times will ensure maximum battery efficiency and scooter performance. -
Page 15: Chaser 1000 Operation
3 being the highest speed. The left-side green switch is the horn. To stop your Chaser 1000, disengage C.) the Throttle and engage D.) the hand break. Be aware the brake is very sensitive. When the brake is applied this kills the power to the throttle. -
Page 16: Adjusting The Brakes
First, loosen the nut and then push the wire back toward the brake to lessen sensitivity or pull the wire to increase sensitivity. Elah does not recommend the end user WARNING: adjusting the brakes. Brakes should be serviced by a professional. -
Page 17: Maintenance
Battery Replacement (Service Professional Only) Battery replacement should be done by a Chaser 1000 authorized service dealer. The batteries are in the battery compartment on the footboard. To access the batteries, remove the screws that hold down the battery cover and carefully disconnect the wires from the battery terminal, marking each wire to ensure that it will be reconnected to the correct connector. -
Page 18: Troubleshooting
Chaser 1000 dealer. Check connector is correctly inserted into the Chaser 1000 will not recharge within 10 hours. side of your Chaser 1000. Check power to outlet. Battery may be malfunctioning. Contact your Chaser 1000 dealer. Page 18... -
Page 19: Warranty
Warranty claims. For questions concerning your Chaser 1000, Please contact your dealer. Operate your Chaser 1000 Scooter in accordance with the operation and always use the instructions in this manual. Any unauthorized repair, alteration, willful abuse, accident, or misuse of the product shall nullify this warranty. - Page 20 NEED MORE HELP? ELAHINTERNATIONAL.COM SALES@ELAHINTERNATIONAL.COM 1.800.867.2151 Page 20...
Need help?
Do you have a question about the CHASER 1000 and is the answer not in the manual?
Questions and answers