
Summary of Contents for EENOUR GC-1078
- Page 1 GC-1078 Metal Detector Owner’s Manual Please read the manual before using the detector.
-
Page 3: Table Of Contents
CONTENT INTRODUCTION …………………………………………………………………… 01 ………………………………………………………………………… FEATURES EASY ASSEMBLY …………………………………………………………… 02-03 INSTALLING THE BATTERIES …………………………………………….…… 04 USING HEADPHONES ………………………………………………………… LAYOUT OF THE CONTROL PANEL …………………………………………… 05 CONTROL BUTTONS …………………………………………………………… SEARCH MODES ……………………………………………………………… 06-08 A-M(ALL METAL) MODE DISC (DISCRIMINATION) MODE NOTCH MODE PP (PINPOINT) MODE OPERATION ………………………………………………………………………... -
Page 4: Introduction
INTRODUCTION Thanks for choosing our GC-1078 metal detector. With this metal detector, you can hunt for coins, relics, jewelry, gold, and silver just about anywhere. The detector comes with high sensitivity and strong ability of discrimination. search coil middle stem... -
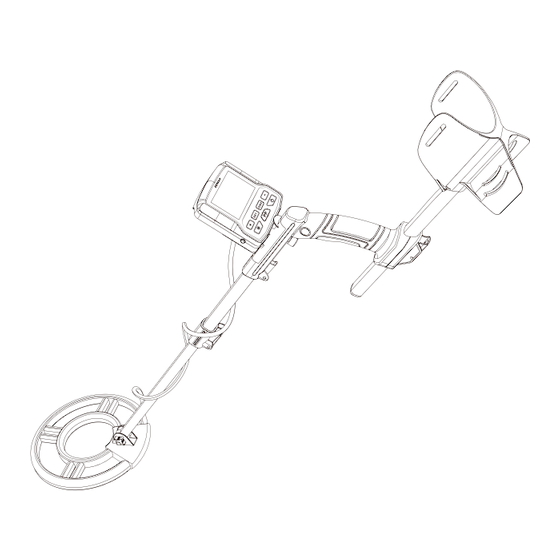
Page 5: Easy Assembly
EASY ASSEMBLY Assembling your detector is easy and requires no special tools. JUST FOLLOW THESE STEPS: lower stem middle stem search coil handle fixing screw knob top stem cam lock connector control box fixing knob cam lock STEP 1 Release the cam lock on the handle and insert Release Tighten the middle stem into the top stem. - Page 6 STEP 6 Insert the stem and align the holes on the search coil bracket and the stem. STEP 7 Push the connector through the holes and tight- en the knob. STEP 8 Wind the search coil cable around the stem. Insert the search coil’s cable plug into the five-pin jack at the back of the control box and tighten the nut properly.
-
Page 7: Installing The Batteries
INSTALLING THE BATTERIES 1. Turn off the power before installing the batteries. 2. Take the battery cover off. 3. Place two 9V alkaline batteries into the battery compartment matching the po- larity symbols ("+ "and "-") marked inside. Note: The detector will maintain full performance until the batteries need to be replaced. -
Page 8: Layout Of The Control Panel
LAYOUT OF THE CONTROL PANEL LOW BATT VOLUME Indicator Indicator TARGET ID DISC/NOTCH INDICATOR COIN DEPTH INDICATOR SENSITIVITY Indicator DISC/NOTCH CONTROL BUTTON Control button DECREASE INCREASE Control button Control button POWER BACKLIGHT Control button Control button PINPOINT Control button LCD DISPLAY LOW BATT VOLUME Indicator... -
Page 9: Control Buttons
CONTROL BUTTONS POWER: Press the button to power on the detector. Press it again to power off the detector. SET: Press the button to set the level of sensitivity or volume. DISC: Press the button to set the discrimination range working with "+" or "-". DISC BACKLIGHT: Press it to turn on the backlight. -
Page 10: Disc (Discrimination) Mode
02 DISC (DISCRIMINATION) MODE The DISC mode can eliminate the unwanted metal targets in sequence and works with “+” or “-”. You can eliminate the unwanted target(s) in sequence from left to right. Press DISC, the blank frame below the target icon flashes. Then press “+”. Press DISC again to confirm the elimination. -
Page 11: Pp (Pinpoint) Mode
04 PP (PINPOINT) MODE After you find a metal object, you can use PP to find the exact location of the target. Press and hold the PP button, PINPOINT icon on the LCD flashes. When LCD displays steady PINPOINT, you can start to move the search coil slowly above the sound area. -
Page 12: Operation
OPERATION Hold the search coil level to the ground about 1~2 inches above the surface, and slowly move the search coil over the area where you placed the sample, sweeping the search coil in a side-to-side motion. Never sweep the search coil as if it were a pendulum. Raising the search coil while sweeping or at the end of a sweep will cause false readings. -
Page 13: Test Procedure
TEST PROCEDURE Turning on the detector Setting DISC Adjusting sensitivity Find a ground without metal Place the test metal Start testing TARGET INDICATIONS 25-cent 50-cent 5-cent S-caps 1cent/zinc 10-cent Target Iron Silver Silver Pull tab S-caps Copper Jewelry coin coin Tone Medium Medium Medium... -
Page 14: Troubleshooting Guide
TROUBLESHOOTING GUIDE Problems Reasons Suggestions 1.The detector may receive interference The detector and a false signal from 1.Change searching displays and the broadcast antenna place. sounds and other electronic lines. 2.Wait for some time to without 2.The humidity of the check again. -
Page 15: Warranty
CONTACT US If you experience any problems, please feel free to contact us at support@EE- NOUR.com. EENOUR offer a lifetime friendly consumer service. Any issues can get response within 24 hours. www.eenour.com E-mail:Support@eenour.com...
Need help?
Do you have a question about the GC-1078 and is the answer not in the manual?
Questions and answers