Table of Contents

Summary of Contents for Rima RM7
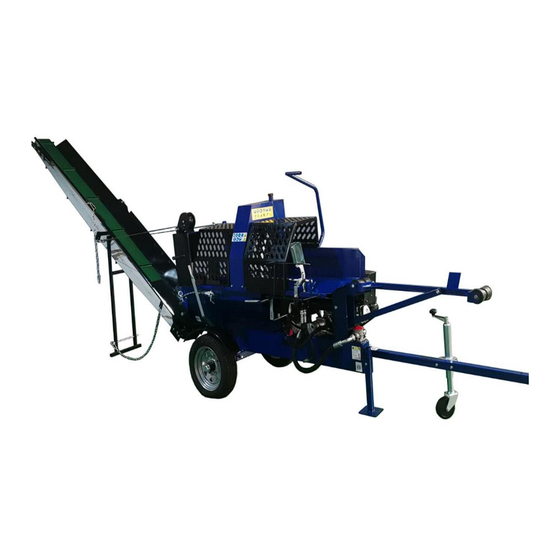
- Page 1 Automatic Wood Processor with Conveyor OWNER 'S MANUAL WARNING: Read carefully and understand all INSTRUCTIONS before operating. Failure to follow the safety rules and other basic safety precautions may result in serious personal injury.
-
Page 2: Table Of Contents
1 Machine Description..........5 2 Safety regulations............6 3 Specifications of machines........8 4 Transportation of machines........10 5 Installation of machines...........13 6 Operation..............23 7 Maintenance..............23 8 Wear parts..............24 9 Hydraulic drawings and components list………….25 10 Attaching information..........25 11 Note................26... -
Page 3: Machine Description
1 Machine Description A very efficient and user friendly log splitter that cuts and splits the log in one operation. Splits logs up to 530/550mm long and 300/380mm in diameter. Pull the handle of the chain saw lightly and push the log holding handle, the chain saw starts to cut the log. After finishing cutting, release the handles, then the handle is automatically reset. -
Page 4: Safety Regulations
2 Safety regulations The machine may only be used in the manner prescribed in this manual. Deviations may lead to that the health and safety requirements are not met. The user is responsible to read through the instructions and follow them properly. - Page 5 Operation safety The machine shall only be used by one person at a time. No other than the user may stay in the risk area around the machine. The risk area covers 230mm around the machine. Personal safety Protective equipment must be used while operating the machine. Machine safety The machine is intended for use in outdoor environment and for log cutting and splitting only.
-
Page 6: Specifications Of Machines
3 Specifications of machines 3.1 Exploded views and spare parts... - Page 7 3.2 Identification Data Every machine we produce is fitted with a name plate with its serial number. The number is also punched on the machine. An exact description of the machine model and serial number will facilitate rapid and effective replies from our after-sales service. All the models are identical machine except the model name, the following name plate is one example:...
-
Page 8: Transportation Of Machines
4Transportation of machines Transportation and store The measures of anti-rust and shockproof should be taken during packing. The machine endures transportation and store in -25~55° C ambient temperature. Be care of not making machine exposed to rain or damaging the packing during transportation and store. - Page 9 4.3 Confirmation after unpacking When open the packing box, please pay attention to the following stems. If you have any questions, please contact directly with us. 1) the machine is damaged in transportation or not 2) other accessories and documents is complete or not 3) the product is consistent with the contract or not 4) the specifications on machine label is consistent with the contract or 4.4 With a crane...
- Page 10 When transporting this machine from a long distance, it cannot be pulled on the road. It needs to be placed on the truck and transported after being tied in the place marked with binding points.
-
Page 11: Installation Of Machines
5 Installation of machines 5.1 Remove processor and all parts from the steel shipping crate. 5.2 Insert axle through the processor ensuring it is centered and tighten the bolts to hold it securely in place. Note, it is important to ensure the two holes are facing up as they are used to hold the wheel fenders in place. - Page 12 5.4. Install the fenders and attach to the axle using the two bolts as shown below. 5.5. Match hydraulic line “A” up with fitting “A” on the control valve and tighten with a wrench. 5.6. Match hydraulic line “B” up with fitting “B” on the control valve and tighten with a wrench.
- Page 13 5.7. Install the hydraulic line to the chainsaw bar as per the images below and tighten with wrench. 5.8. Fix the buffer spring. This spring is used to aid in returning the chainsaw bar handle. 5.9. Install the chainsaw bar guard and tighten the 3 bolts in the areas shown below.
- Page 14 5.10. Remove the adhesive backing from the chainsaw bar guard and position the bar oil tank in place. Tighten nut to securely hold it in place. Attach the oil line to the spout on the chainsaw bar as shown in below right image.
- Page 15 5.12. Install the large cage guard and wedge plate as shown below so that when the large cage guard is opened, the plate will depress the valve plunger. A smooth transition motion is recommended. There are slots in both directions allowing positional adjust ability to achieve proper actuation of valve.
- Page 16 5.14Install the notched plate on the processor with the two nuts and bolts provided. This plate is used to lock the handle in place which holds the 2/4 way splitter at the desired height. Turn the handle to left side with symbol arrow downward, the wedge height will move lower, turn the handle to right side with arrow upward, the wedge height will move upper.
- Page 17 5.16. The chain can now be adjusted to ensure the tension is set correctly. Proper chain tension is achieved when the chain can be pulled away from the bar by hand 6.4mm-- 12.7mm. To tighten or loosen the chain, the two bolts can be loosened using a 13mm wrench. Next, the hexagon socket bolt can be turned clockwise to tighten or counter-- clockwise to loosen the chain.
- Page 18 5.18. The top half of the conveyor can now be installed to the bottom half by bolting it at the seam using the hardware shown below. Be sure to install one of the washers in between the top and bottom conveyor. The nut should be left loose so that the bolts act as a hinge and allow the conveyor system to fold in half.
- Page 19 5.20. The conveyor belt can now be tightened by turning the “T” handle clockwise until the belt is taunt. 5.21. Insert the square blue tongue into the processor and tighten the two bolts to lock it in place. There is also a hole in the end of the tongue for a bolt to go through as a secondary security measure.
- Page 20 5.22. Attach tongue jack as pictured below. There are two bolts that hold it securely to the tongue. The leg stand can be used when the processor is in operation.
-
Page 21: Operation
6 Operation 6.1 Preparations Place the machine on a flat and stable surface. Check all oil levels and fill up if necessary. Check that the machine does not have any defects. Remember to use proper protective equipment. 6.2 Operating Adjusting the log length The log length stop is adjusted with two screws. -
Page 22: Wear Parts
7.3 Adjusting the chain Release the two bolts on the saw bar (see page 19) and adjust the tension screw. Tighten the screw to tighten the chain and vice versa. Then tighten the two bolts on the saw bar. You should be able to lift the chain about 6.4mm to 13mm from the saw bar. -
Page 23: Hydraulic Drawings And Components List
9 Hydraulic drawings and components list... - Page 24 Hydraulic components list Name and specification Quantity Engine 3600r/min 6.7kw Oil filter 100μm 100ml/min Duplex pump 17ml/r Motor 200ml/r Reversing valve CGDG Reversing valve CGDG2 Reversing valve CGDG Motor 8ml/r Reversing valve CEBE13.7MPa Oil cylinder -inside diameter 80mm Hydraulic pipe ∮25*500mm Hydraulic pipe ∮13*2000mm Hydraulic pipe ∮13*1000mm Hydraulic pipe ∮13*700mm...
-
Page 25: Attaching Information
10 Attaching information 10.1 Free service The warranty period for structural parts of this machine is two years, and for hydraulic accessories is one year. 10.2 Charge service -Damage resulted from improper installing, operating, maintaining and forbidden items in the instructions. -Damage caused by repair or modification by yourself without permission of this company. -
Page 26: Note
11 NOTE --------------------------------------------------------------------------------------------------------- --------------------------------------------------------------------------------------------------------- --------------------------------------------------------------------------------------------------------- --------------------------------------------------------------------------------------------------------- --------------------------------------------------------------------------------------------------------- --------------------------------------------------------------------------------------------------------- --------------------------------------------------------------------------------------------------------- --------------------------------------------------------------------------------------------------------- --------------------------------------------------------------------------------------------------------- --------------------------------------------------------------------------------------------------------- --------------------------------------------------------------------------------------------------------- --------------------------------------------------------------------------------------------------------- --------------------------------------------------------------------------------------------------------- --------------------------------------------------------------------------------------------------------- --------------------------------------------------------------------------------------------------------- --------------------------------------------------------------------------------------------------------- --------------------------------------------------------------------------------------------------------- --------------------------------------------------------------------------------------------------------- --------------------------------------------------------------------------------------------------------- --------------------------------------------------------------------------------------------------------- --------------------------------------------------------------------------------------------------------- ---------------------------------------------------------------------------------------------------------...
Need help?
Do you have a question about the RM7 and is the answer not in the manual?
Questions and answers
HI Folks, my 7 ton processor has worked well many years, but now it is not getting full power to split the timber as earlier years. It starts to complaining and is not able to split small timbers, which was easy for it earlier. I have checked oil level, valves, filter, tubes. Is there some pressure valve to prevent overpressure. The pressure meter in not showing anything. I have some tips to improve the device in other functions. You can contact me about them later. I purchased this device from Monica.
Possible causes for the Rima RM7 processor losing power and struggling to split timber include:
1. Incorrect chain tension – If the chain is too tight or too loose, it can reduce efficiency. Proper tension is when the chain can be pulled away from the bar by hand 6.4mm–12.7mm.
2. Defective or worn components – Worn saw chain, saw bar, or other wear parts like the coupling or hydraulic components may reduce performance.
3. Hydraulic issues – Problems with the hydraulic system (e.g., oil pump, motor, reversing valve, or oil cylinder) can cause power loss. Check for leaks or malfunctioning parts.
4. Improper log size – Logs shorter than 300mm are not recommended and may affect splitting performance.
5. Safety features malfunctioning – If the auto splitter does not stop when the protective cage is opened, the machine should not be used, which may also relate to performance issues.
6. General machine defects – Using a defective machine can lead to reduced power or failure during operation.
This answer is automatically generated