
Related Manuals for PSA LIFESAVER LIF6000THL

Summary of Contents for PSA LIFESAVER LIF6000THL
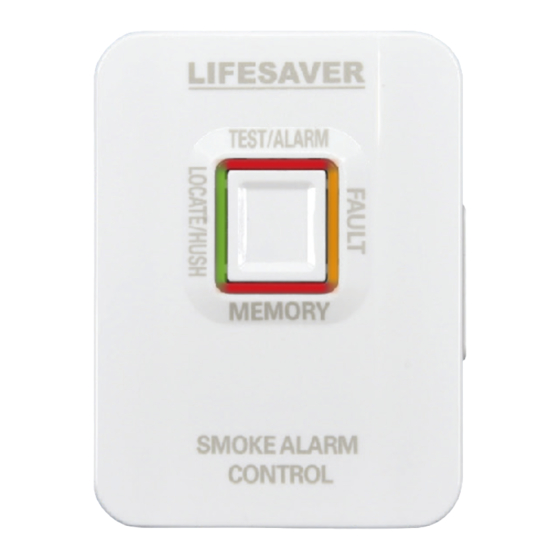
- Page 1 Smoke Alarm Remote Control User Guide MODEL 6000THL TEST/ALARM MEMORY SMOKE ALARM CONTROL Tested & Complies to Australian Standards AS3786:2014...
-
Page 2: Table Of Contents
Contents 1. Introduction ............4 2. Technical Specification ........6 3. Installation ............7 4. Programming the Network........9 5. Operation............11 6. Remote Status and Visual Indicators Table ........13 7. Troubleshooting Table ........15 8. Service and Warranty ........16 9. Warranty Registration........18 Quick Setup for New Wireless Network ................ - Page 3 Thank you for purchasing this PSA Lifesaver Smoke Alarm Remote Control NOTE: Please thoroughly read this User Guide and save the document for future reference and to pass on to any subsequent owner. Important: Please read this user guide before...
-
Page 4: Introduction
1. Introduction: The Smoke Alarm Remote Control model 6000THL allows compatible Lifesaver Smoke Alarms to be conveniently tested, hushed and located. It has a memory feature and status indication. This controller is wireless and will provide home owners with a more convenient method to identify which smoke alarm has activated, easily silence alarms and also promote regular testing of smoke alarms. - Page 5 The wireless signal uses radio frequency to create an interlinked network of smoke alarms. When one smoke alarm activates, it will trigger other smoke alarms within the same wireless network. The Smoke Alarm Remote Control will test, hush and locate smoke alarms within the same wireless network.
-
Page 6: Technical Specification
2. Technical Specification Power: Lithium 10 year battery Radio Frequency: 918 MHz Wireless Range: 100 meters open air. 30m indoors. Operation: Up to 23 units Temperature: 0°C– 40°C Humidity: 0 – 93% (non-condensing) Service Life: 10 years from installation Approval: AS/NZS 4268:2017 AS/NZS 3786:2014 (Selected Clause) AS/NZS CISPR 32:2015 AS/NZS 62368.1:2018... -
Page 7: Installation
3. Installation The Remote Control can be mounted either on a wall bracket, or directly on the wall. a. To mount the Remote Control directly on the wall. 1. Remove the back cover of the remote using a small flat blade screwdriver at the bottom of the Remote Control. - Page 8 b. Mounting Bracket. The Remote Control can be mounted onto a wall bracket. Mount the remote bracket on the wall, then slide the Smoke Alarm Remote Control into the bracket. Slide down Side Wall...
-
Page 9: Programming The Network
4. Programming the Network Before using the Remote Control, the unit needs to be programmed to an existing wireless network of smoke alarms. 4.1 Definitions: OOB: Out Of Box. Factory Default status. When first turned ON, an OOB device will auto-search and join an existing wireless network. - Page 10 by mode. The network will also timeout after 15 min- utes and automatically close. But if it didn’t connect to any network after 15 minutes, the Smoke Alarm Remote Control will go into Stand Alone mode and the Green LED will flash twice every 30 seconds. NOTE: It is recommended to first create the wireless smoke alarm network.
-
Page 11: Operation
5. Operation Test Function Press and release the Button, the Red LED will start flashing. All the interconnected smoke alarms in the wireless network will sound. Allow up to 20 seconds for the interconnected smoke alarms to respond to this Test function. Low Battery HUSH If a smoke alarm is in low battery condition, the low battery beeping can be hushed for 8-24 hours. - Page 12 Locate and Hush Function While the smoke alarms are sounding, the Locate function will identify the initiating smoke alarm. Press and release the Button to silence all interconnected smoke alarms for 2 minutes. However, the initiating smoke alarm will continue to sound. The green LED on the Remote Control will flash once every two seconds.
-
Page 13: Visual Indicators Table
6. Remote Control Status and Visual Indicators Visual Description Status Indicators or Action: Network Red LED (top) Remote Control Search flashes 1 sec On & 1 searching for an opened sec Off wireless network to join. Stand-alone Green LED flashes Not connected to any twice every network. - Page 14 Visual Description Status Indicators or Action: View the Top red LED flash the Press & release button number of number of network while network is open network devices devices Test Red LED flashes 6 In Standby mode, press & times repeatedly (in release Button to initiate Test two groups of three mode.
-
Page 15: Troubleshooting Table
7. Troubleshooting Table Status Visual Indicators Description or Action Not Joined Green LED flashes Standalone mode. twice every 30 sec Press the button twice to open the network to join the Remote Control. Low Battery Amber LED flashes Battery Voltage is low. every 30 sec Please dispose of the remote control... -
Page 16: Service And Warranty
Return it for servicing to: PSA Products Pty Ltd of 17 Millicent Street, Burwood Victoria 3125 (See Warranty for in-warranty returns). 1. PSA Products Pty Ltd (ABN: 99 076 468 703) of 17 Millicent Street, Burwood 3125 Victoria, Australia warrants this product for a period of two (2) years from the date of purchase, as reflected on the Authorized Reseller’s or Distributorʼs invoice /... - Page 17 Any other warranty, express or implied, loss or damage caused by failure to abide by the instructions supplied in the leaflets. 4. To the extent permitted by law, PSA Products Pty Ltd., makes no warranty, expressed or implied, written or oral, including that of merchantability or fitness for any particular purpose, with respect to the consumer replaceable battery if any.
-
Page 18: Warranty Registration
Consumer Product Safety Act. Registration will also help us improve our product design to meet your needs. Another Quality Product By: PSA Products Pty Ltd 17 Millicent Street, Burwood, Victoria 3125, Australia Ph: (03) 9888 9889 Email:enquiry@psaproducts.com.au... -
Page 19: Quick Setup For New Wireless Network
Quick Setup for New Wireless Network Step 1. Refer to the smoke alarm wireless setup. Quick Start Guide Quick Start Guide 6000WB Interlink 6000DCW Interlink Network Setup Network Setup Please Read All Instructions First! Please Read All Instructions First! Please read through 6000WB, 6000DCW for Interlink Network Setup. - Page 20 Quick Setup for New Wireless Network Quick Setup for New Wireless Network Step 2. Open wireless network on the smoke alarms. Step 2. Open wireless network on the smoke alarms. Refer to smoke alarm user guide. Refer to smoke alarm user guide. Refer to 6000DCW and 6000WB user guide to Refer to 6000DCW and 6000WB user guide to open the wireless network.
- Page 21 Quick Setup for New Wireless Network Step 3. Slide power switch to ON position at the back of remote. Back Switch (OFF/ ON) Slide power switch to ON position The remote will search network automatically with red LED flash 1 second ON and 1 second OFF.
- Page 22 TEST/ALARM MEMORY TEST/ALARM SMOKE ALARM MEMORY CONTROL SMOKE ALARM CONTROL The Remote Control has joined successfully When the Remote Control has successfully joined the network, its LEDs will flash in a circular pattern (RED → Green → Red → Amber → Blue).
- Page 23 Quick Setup for New Wireless Network Close the wireless network by pressing the Remote Control button twice CEILING TEST/ALARM WALL MEMORY SMOKE ALARM CONTROL Close the wireless network. P/N: 1208-7206-02...