Table of Contents
Advertisement
Quick Links
Advertisement
Table of Contents

Subscribe to Our Youtube Channel
Summary of Contents for heimgard Smart Thermostat
- Page 1 Smart Thermostat...
-
Page 2: What Is In The Box
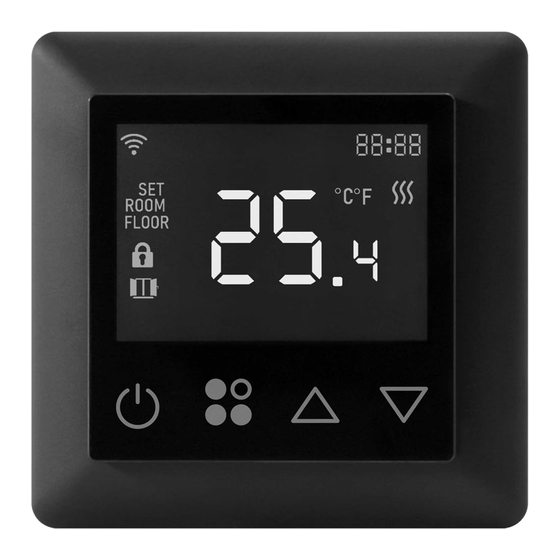
What is in Device overview the box Smart Thermostat Floor probe (NTC 10K) Frame D. Power button (On/Off, Back, Cancel) E. Menu button (Toggle modes, Select, Confirm) F. Up button (Scroll up) G. Down button (Scroll down) -
Page 3: Installation And Wiring
Connection/wiring Installation and wiring diagram overview Electronical properties • Load (A) 16 Max • Voltage (V) 230 • Voltage type AC • Power source AC This device should be installed by a licensed electrician in a manner that conforms to local regulations and building codes. WARNING: Electrical power must be switched off during installation Remove the display unit and backplate of the device from the packaging. -
Page 4: Wiring Diagram
Wiring diagram For installation follow the wire diagrams. Option 1 Option 2... -
Page 5: Get Started
Get started Open the Heimgard app and follow the steps listed here to connect to your device. Power ON the device by switching the main circuit breaker back ON. The device will automatically go into Manage Devices inclusion mode when power on for first time (verify the inclusion mode time). -
Page 6: How To Use
How to use Child lock The thermostat offers 4 different modes. Enable / Disable Choose manual to operate the device form the smart home app. Press and hold all three buttons ON/OFF (D) + UP (F) + DOWN (G) at the same time for 5 seconds to enable or disable the child lock. ECO mode - preset of set temperature Default 17 degrees Press and hold 5 sec. -
Page 7: Local Configuration
Local configuration • Li.1 - 20% Low brightness • Li.2 - 50% Medium brightness • Li.3 - 100% Max brightness (default) Press and hold to access the menu. Use to navigate Press to confirm through programs. Press to confirm. P-01 Add or remove from Hub P-04 Button volume setting Add your thermostat to the Hub Adjust the button volume level... - Page 8 P-06 Sensor settings P-09 Anti-freeze settings Freeze protection mode controls the thermostat to avoid Select the sensor type you want to use to control the low temperature issues, e.g. frozen pipes. The anti-freeze thermostat mode is executed under off status, and the reference to navigate temperature is taken from the room sensor.
- Page 9 P-13 Button vibration settings the set temperature. This value can be set with a 0.5° interval. Adjust the Button vibration level This prevents the controller switching the relay on/off to navigate when the temperature oscillates around the set sensor temperature. •...
-
Page 10: Time Settings
P-15 Time settings Use the remote sensor in the case where you have the thermostat installed outside the room you want to heat. Set time hh:mm (e.g. when the floor heating does not provide a floor sensor probe). to adjust time Press to confirm and switch between hh and mm Fallback solution... - Page 11 P-19 Set local schedule temperatures Select *Auto mode when using local schedules. A local schedule is only active when the thermostat is in Auto mode. When using the thermostat without connecting it to a smart home hub, you can use the local schedule function to add 4 set temperatures per day.
-
Page 12: Need Help
Servicing is required when the device has been damaged in any way. Operating temperature: -10°C to +50°C Operating relative humidity: < 95% RH (no condensation) Visit heimgard.com for more information and tips Dispose the product properly at the end of life. This is on how to use. - Page 13 heimgard.com...
Need help?
Do you have a question about the Smart Thermostat and is the answer not in the manual?
Questions and answers